 |
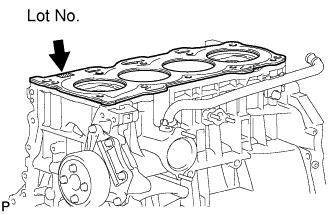
Place a new gasket on the cylinder block surface with the Lot No. stamp facing upward.
- NOTICE:
- Remove any oil from contact surface.
- Be careful of the installation direction.
CYLINDER HEAD > INSTALLATION |
| 1. INSTALL CYLINDER HEAD GASKET |
|
Place a new gasket on the cylinder block surface with the Lot No. stamp facing upward.
| 2. INSTALL CYLINDER HEAD SUB-ASSEMBLY |
Place the cylinder head on the head gasket.
Install the cylinder head bolts.
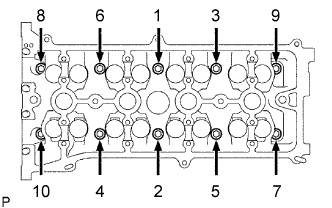 |
Apply a light coat of engine oil to the threads and under the heads of the cylinder head set bolts.
Using several steps, uniformly install and tighten the 10 cylinder head set bolts and plate washers with a 10 mm bi-hexagon wrench in the order shown in the illustration.
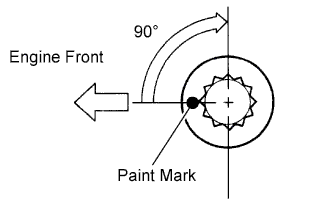 |
Mark the front of the cylinder head bolts with paint.
Retighten the cylinder head bolts by 90° as shown in the illustration.
Check that the paint mark is now at a 90° angle to the front.
| 3. INSTALL CAMSHAFT TIMING GEAR ASSEMBLY |
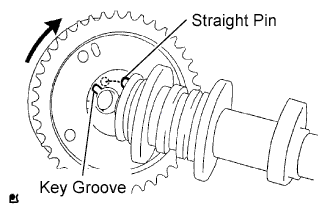 |
Put the camshaft timing gear and camshaft together with the straight pin and key groove misaligned, as shown in the illustration.
Turn the camshaft timing gear as shown in the illustration while pushing it gently against the camshaft. Push further at the position where the pin fits into the groove.
Check that there is no clearance between the gear fringe and camshaft.
Tighten the flange bolt with the camshaft timing gear fixed in place.
Check that the camshaft timing gear can move to the retard angle side (the right direction) and is locked in the most retarded position.
| 4. INSTALL NO. 2 CAMSHAFT TIMING SPROCKET |
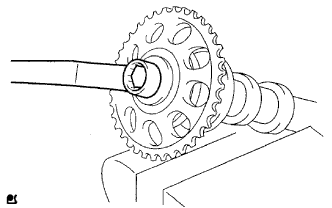 |
Clamp the camshaft in a vise, then install the camshaft timing sprocket with the bolt.
| 5. INSTALL CAMSHAFT |
Apply a light coat of engine oil to the journal portion of the camshaft.
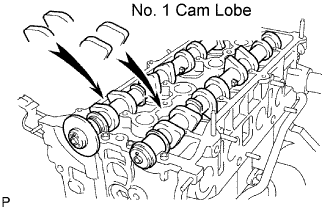 |
Place the 2 camshafts on the cylinder head with the No. 1 cam lobes facing the directions shown in the illustration.
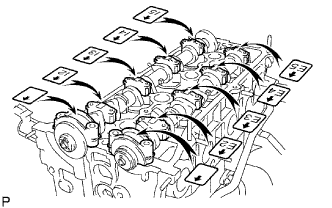 |
Examine the front marks and numbers, and check that the order is as shown in the illustration. Then install the bearing caps onto the cylinder head.
Apply a light coat of engine oil to the threads and under the heads of the bearing cap bolts.
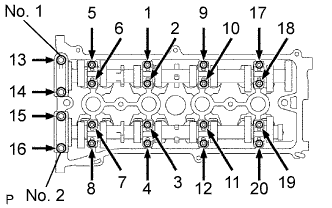 |
Using several steps, uniformly tighten the 20 bearing cap bolts in the sequence shown in the illustration.
| 6. INSTALL NO. 1 CHAIN VIBRATION DAMPER |
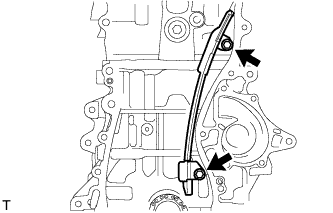 |
Install the chain vibration damper with the 2 bolts.
| 7. INSTALL CHAIN SUB-ASSEMBLY |
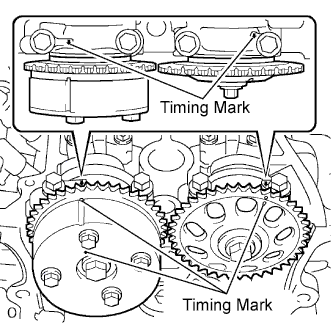 |
Set the No. 1 cylinder to TDC/compression.
Turn the camshafts with a wrench (using the hexagonal lobe) to align the timing marks of the camshaft timing gear with each timing mark located on the No. 1 and No. 2 bearing caps as shown in the illustration.
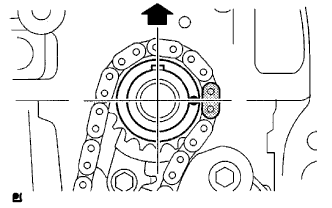 |
Using the crankshaft pulley bolt, turn the crankshaft to position the key on the crankshaft upward.
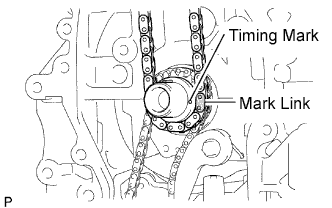 |
Install the chain onto the crankshaft timing sprocket with the gold or orange mark link aligned with the timing mark on the crankshaft.
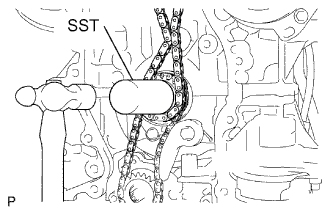 |
Using SST and a hammer, tap in the crankshaft timing sprocket.
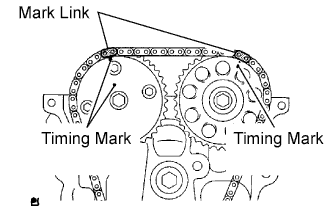 |
Align the gold or yellow links with each timing mark located on the camshaft timing gear and sprocket, then install the chain.
| 8. INSTALL CHAIN TENSIONER SLIPPER |
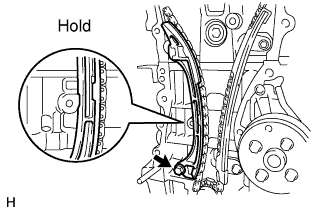 |
Install the chain tensioner slipper with the bolt.
| 9. INSTALL TIMING CHAIN GUIDE |
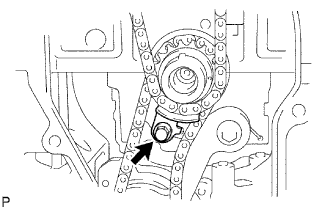 |
Install the timing chain guide with the bolt.
| 10. INSTALL NO. 1 CRANKSHAFT POSITION SENSOR PLATE |
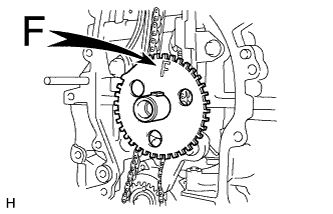 |
Install the sensor plate with the "F" mark facing forward.
| 11. INSTALL TIMING CHAIN COVER SUB-ASSEMBLY |
Remove any old packing material and be careful not to drop any oil on the contact surfaces of the timing chain cover, cylinder head and cylinder block.
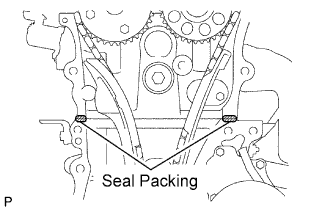 |
Apply seal packing (Diameter 4.0 to 4.5 mm (0.157 to 0.177 in.)) as shown in the illustration.
Apply a continuous bead of seal packing as shown in the illustration.
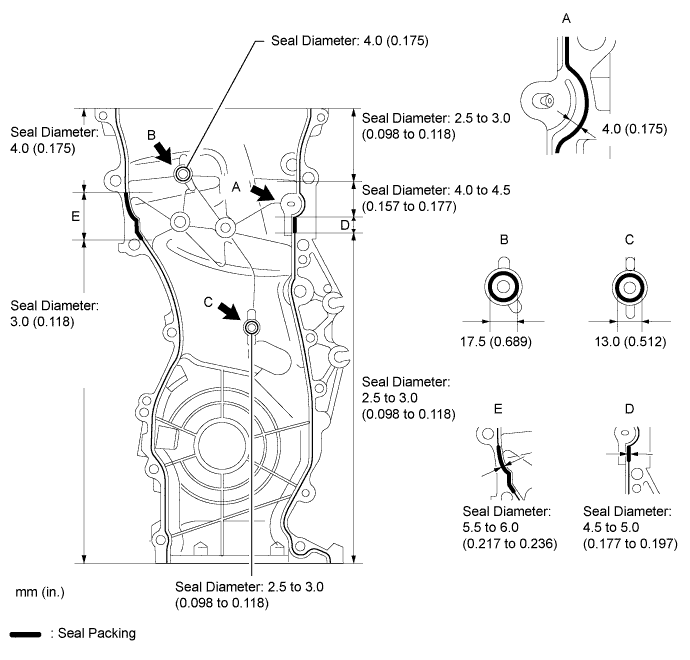
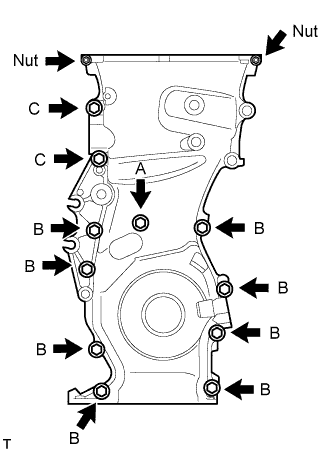 |
Install the timing chain cover with the 11 bolts and 2 nuts.
| Bolt A | 30 mm (1.18 in.) length for 10 mm head |
| Bolt B | 30 mm (1.18 in.) length for 12 mm head |
| Bolt C | 40 mm (1.57 in.) length for 14 mm head |
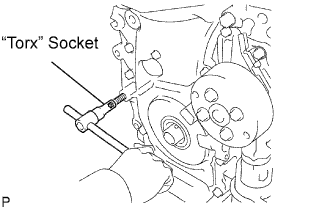 |
Using an E10 "torx" socket, install the stud bolt for the V-ribbed belt tensioner.
| 12. INSTALL NO. 1 CHAIN TENSIONER ASSEMBLY |
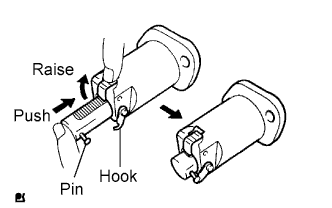 |
Release the ratchet pawl, then fully push in the plunger and hook the hook to the pin so that the plunger is in the position shown in the illustration.
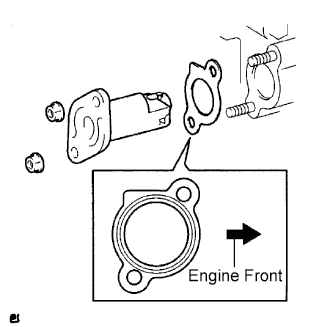 |
Install a new gasket and the chain tensioner with the 2 nuts.
| 13. INSTALL V-RIBBED BELT TENSIONER ASSEMBLY |
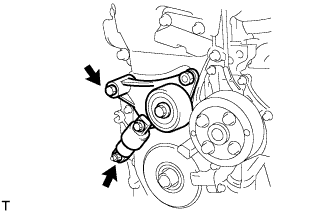 |
Install the V-ribbed belt tensioner with the bolt and nut.
| 14. INSTALL ENGINE MOUNTING BRACKET RH |
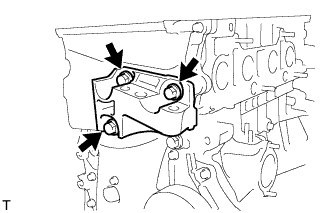 |
Install the engine mounting bracket RH with the 3 bolts.
| 15. INSTALL CRANKSHAFT PULLEY |
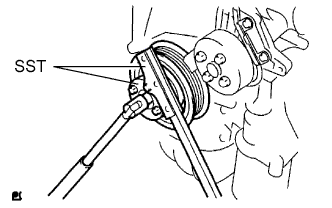 |
Using SST, fix the pulley in place and tighten the bolt.
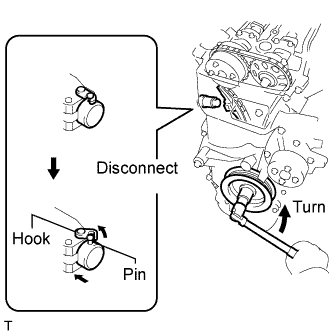 |
Turn the crankshaft counterclockwise, then disconnect the plunger knock pin from the hook.
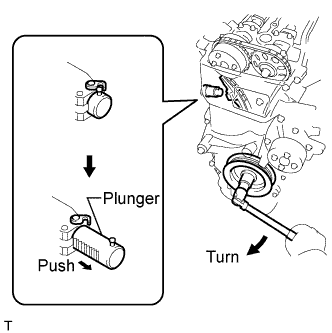 |
Turn the crankshaft clockwise, then check that the plunger is extended.
| 16. INSTALL OIL PAN SUB-ASSEMBLY |
Remove any old packing material and be careful not to drop any oil on the contact surfaces of the cylinder block and oil pan.
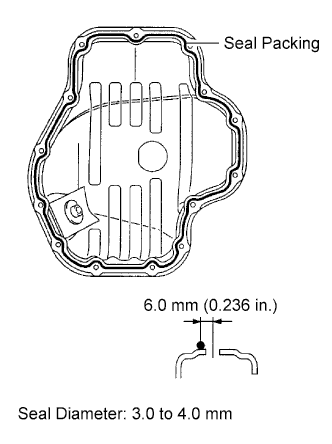 |
Apply a continuous bead of seal packing (Diameter 3.0 to 4.0 mm (0.118 to 0.157 in.)) as shown in the illustration.
Install the oil pan to the cylinder block.
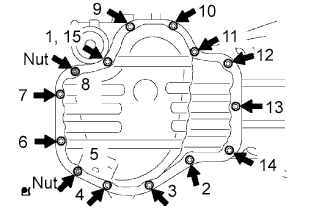 |
Uniformly tighten the 12 bolts and 2 nuts in the sequence shown in the illustration.
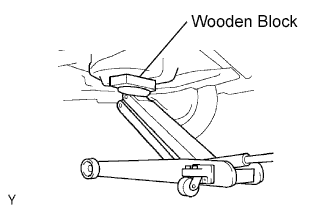 |
Place a transmission jack underneath the engine, then put a wooden block on the jack.
Remove the chain block and sling device.
Remove the No. 1 and No. 2 engine hangers.
| 17. INSTALL CRANKSHAFT POSITION SENSOR |
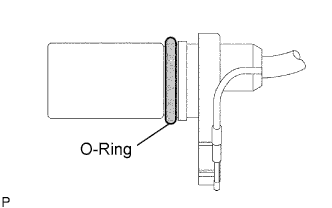 |
Apply a light coat of engine oil to the O-ring of the sensor.
 |
Install the sensor with the bolt.
Install the wire harness clamp.
Install the connector clamp.
Connect the sensor connector.
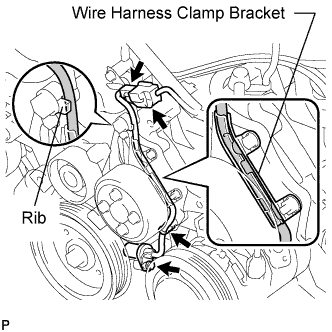
Confirm that the wire harness of the sensor is secured to the wire harness clamp bracket through the back of the rib of the timing chain cover.
| 18. INSTALL CYLINDER HEAD COVER SUB-ASSEMBLY |
Remove any old packing material from the contact surface.
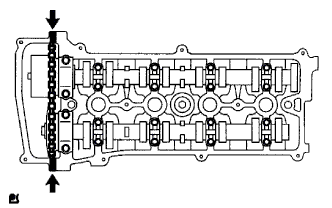 |
Apply seal packing to the 2 locations shown in the illustration.
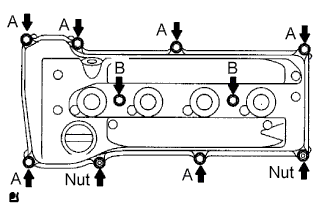 |
Install the cylinder head cover with the 8 bolts and 2 nuts.
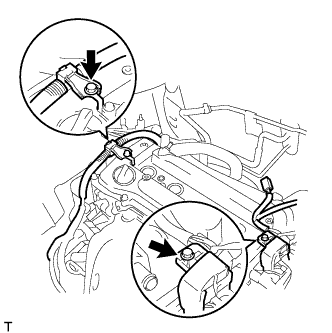 |
Install the 2 engine wires with the 2 bolts.
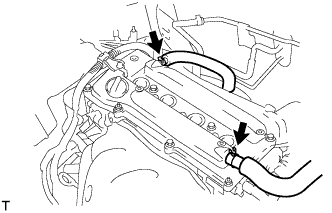 |
Connect the 2 ventilation hoses to the cylinder head cover.
| 19. INSTALL IGNITION COIL ASSEMBLY |
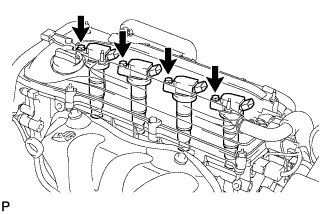 |
Install the 4 ignition coils with the 4 bolts.
Connect the 4 ignition coil connectors.
| 20. INSTALL IDLER PULLEY BRACKET |
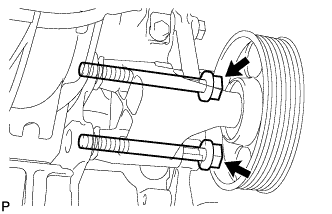 |
Install the bracket with the 2 bolts.
| 21. INSTALL ENGINE MOUNTING INSULATOR RH |
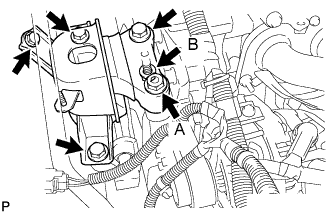 |
Install the engine mounting insulator RH with the 4 bolts and 2 nuts.
| 22. INSTALL RADIATOR RESERVOIR TANK |
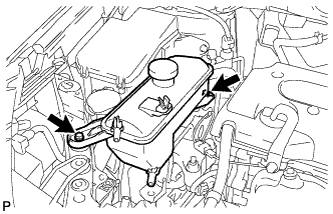 |
Install the radiator reservoir with the 2 bolts.
| 23. INSTALL GENERATOR ASSEMBLY |
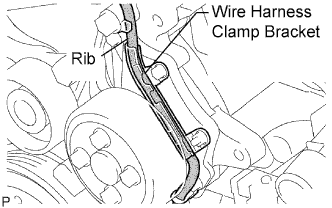 |
Confirm that the wire harness of the crankshaft position sensor is secured to the wire harness clamp bracket through the back of the rib of the timing chain cover.
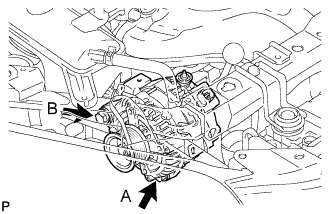 |
Install the generator with the 2 bolts.
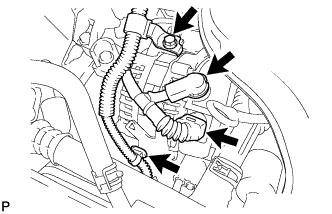 |
Install the wire harness clamp.
Install the wire harness clamp bracket with the bolt.
Connect the generator wire with the nut.
Install the terminal cap.
Connect the generator connector.
| 24. INSTALL FAN & GENERATOR V BELT |
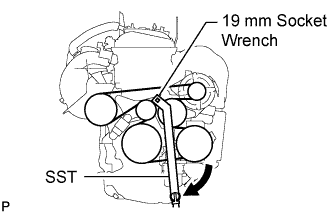 |
Using SST 19 mm socket wrench, loosen the V-ribbed belt tensioner arm clockwise, then install the fan and generator V belt.
| 25. INSTALL FRONT SUSPENSION MEMBER REINFORCEMENT RH |
Install the reinforcement RH with the 4 bolts.
| 26. CONNECT ENGINE WIRE |
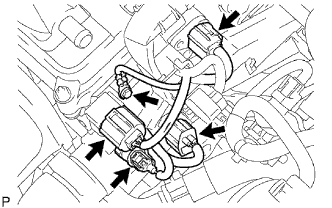 |
Connect the ground cable with the bolt.
Connect the camshaft position sensor connector.
Connect the engine coolant temperature sensor connector.
Connect the engine oil pressure switch connector.
Connect the radio setting condenser connector.
| 27. CONNECT NO. 1 RADIATOR HOSE |
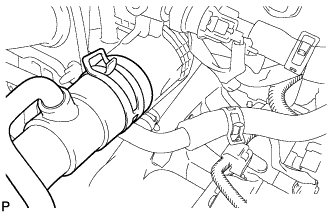 |
Connect the No. 1 radiator hose.
| 28. INSTALL CAMSHAFT TIMING OIL CONTROL VALVE ASSEMBLY |
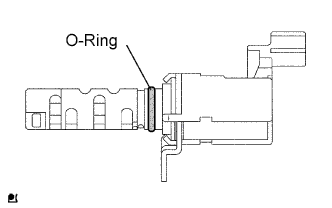 |
Apply a light coat of engine oil to the O-ring of the oil control valve.
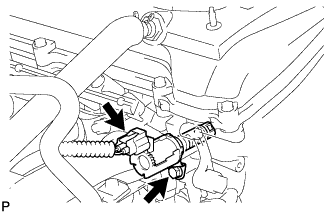 |
Install the oil control valve with the bolt.
Connect the oil control valve connector.
| 29. INSTALL EXHAUST MANIFOLD CONVERTER SUB-ASSEMBLY |
Install a new gasket onto the cylinder head.
Temporarily tighten the exhaust manifold converter with the 5 nuts.
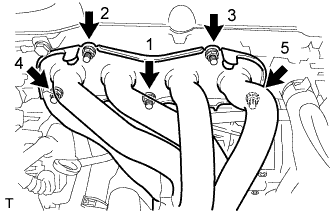 |
Tighten the 5 nuts in the sequence shown in the illustration.
| 30. INSTALL NO. 1 EXHAUST MANIFOLD HEAT INSULATOR |
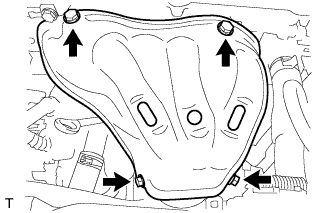 |
Install the exhaust manifold heat insulator with the 4 bolts.
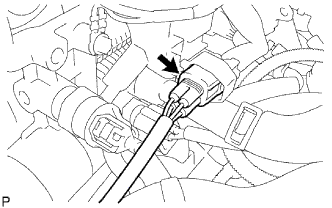 |
Connect the air-fuel ratio sensor connector.
| 31. INSTALL NO. 2 MANIFOLD STAY |
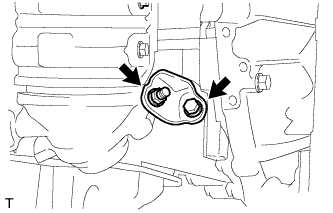 |
Install the stay with the bolt and nut.
| 32. INSTALL MANIFOLD STAY |
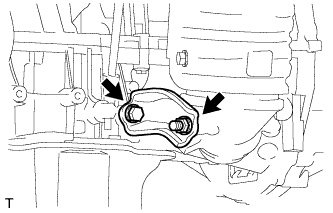 |
Install the stay with the bolt and nut.
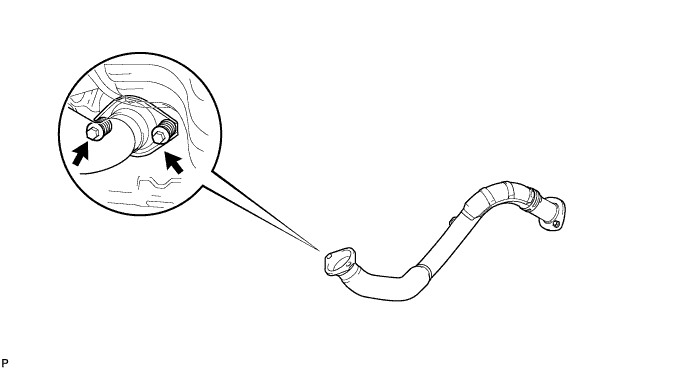
| 33. INSTALL FRONT EXHAUST PIPE |
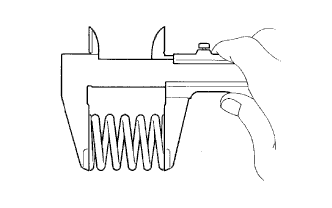 |
Using a vernier caliper, measure the free length of the compression spring.
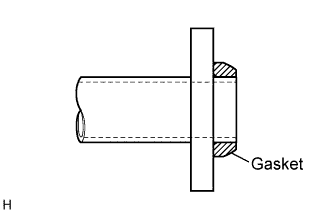 |
Install a new gasket by hand so that its surface is flush with the exhaust manifold.
Install the front exhaust pipe with the 2 compression springs and 2 bolts.
| 34. INSTALL OIL DIPSTICK GUIDE |
Apply a light coat of engine oil to a new O-ring and install it onto the guide.
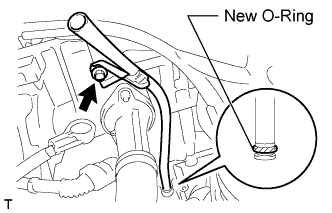 |
Install the guide with the bolt.
| 35. INSTALL OIL DIPSTICK |
| 36. INSTALL INTAKE MANIFOLD INSULATOR |
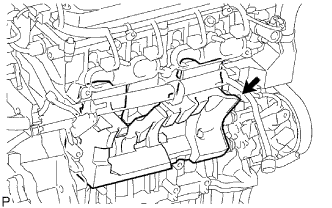 |
Install the intake manifold insulator onto the cylinder block.
| 37. INSTALL INTAKE MANIFOLD |
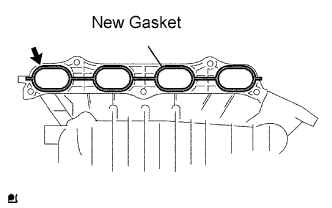 |
Install a new gasket into the intake manifold.
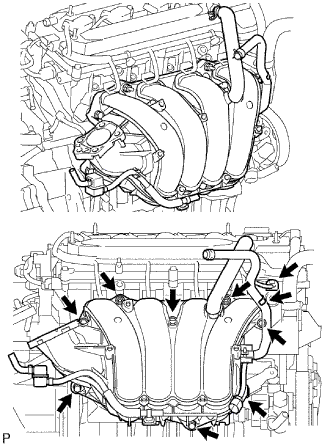 |
Install the intake manifold with the 5 bolts and 2 nuts.
Fit the union to check valve hose into the vacuum hose clamp.
Install the wire harness clamp.
Connect the camshaft timing oil control valve connector.
Connect the union to check valve hose to the brake booster.
| 38. INSTALL FUEL DELIVERY PIPE SUB-ASSEMBLY |
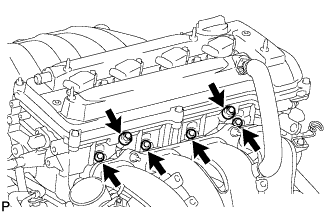 |
Install 4 new insulators into the cylinder head.
Install the 2 delivery pipe spacers onto the cylinder head.
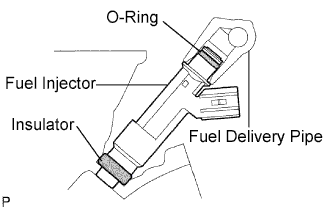 |
Install the fuel delivery pipe together with the 4 fuel injectors, then temporarily tighten the 2 bolts.
Check that the fuel injector rotates smoothly.
If the fuel injector does not rotate, replace the O-ring.
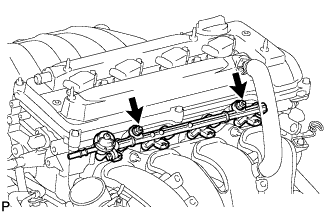 |
Tighten the 2 bolts to the specified torque.
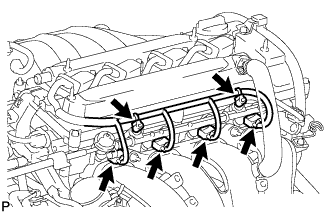 |
Connect the 4 fuel injector connectors.
Install the 2 wire harness clamps.
| 39. CONNECT FUEL TUBE |
Connect the fuel main tube.
Push the fuel tube connector until it makes a "click" sound.
Install the fuel pipe clamp.
Install the fuel tube to the fuel hose clamp.
| 40. INSTALL THROTTLE BODY |
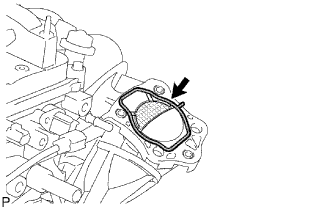 |
Install a new gasket onto the intake manifold.
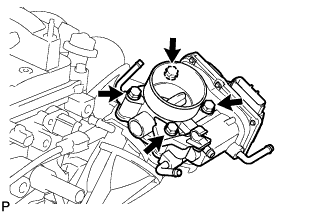 |
Install the throttle body and fuel pipe support with the 4 bolts.
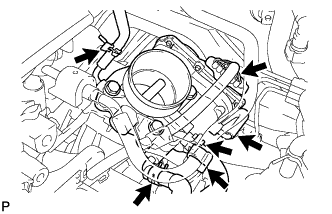 |
Connect the fuel tube into the clamp.
Connect the wire harness clamp.
Connect the throttle position sensor and control motor connector.
for Type A:
Connect the No. 1 throttle body hose to the throttle body.
Connect the No. 2 water by-pass hose to the throttle body.
Connect the water by-pass hose to the throttle body.
Connect the purge line hose to the throttle body.
| 41. INSTALL AIR CLEANER CAP |
Install the air cleaner filter element onto the air cleaner case.
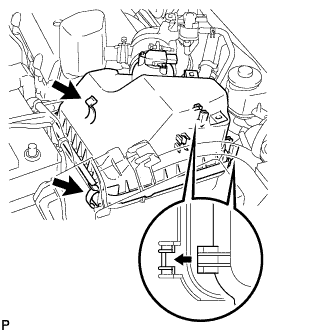 |
Insert the hinge part of the air cleaner cap into the air cleaner case, then hang the 2 hook clamps.
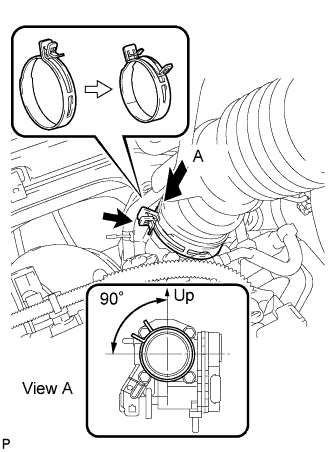 |
Align the matchmarks of the No. 1 air cleaner hose and throttle body, and then connect the air cleaner hose No. 1 to the throttle body and unfasten the No. 1 air cleaner hose clamp.
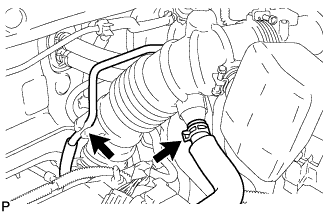 |
Connect the purge line hose to the clamp.
Connect the No. 2 ventilation hose to the air cleaner hose.
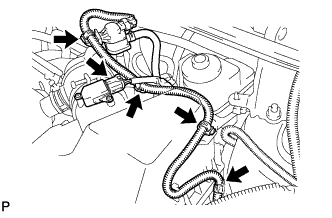 |
Connect the 4 wire harness clamps.
Connect the mass air flow meter connector.
| 42. ADD ENGINE OIL |
Clean and install the oil drain plug with a new gasket.
Add new oil.
| Item | Specified Condition |
| Drain and refill with oil filter change | 4.2 liters (4.4 US qts, 3.7 Imp. qts) |
| Drain and refill without oil filter change | 4.0 liters (4.2 US qts, 3.5 Imp. qts) |
| Dry fill | 4.9 liters (5.2 US qts, 4.3 Imp. qts) |
Install the oil filler cap.
| 43. CONNECT CABLE TO NEGATIVE BATTERY TERMINAL |
| 44. CHECK FOR FUEL LEAKS |
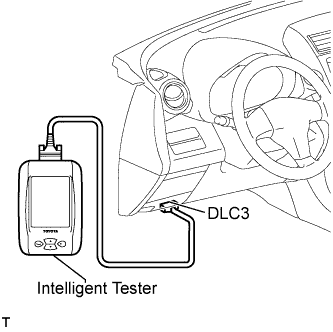 |
Make sure that there are no fuel leaks after performing maintenance on the fuel system.
Connect the intelligent tester to the DLC3.
Turn the ignition switch on (IG), and push the intelligent tester main switch ON.
Select the Active Test mode on the intelligent tester.
Check that there are no leaks from the fuel system.
Turn the ignition switch off.
Disconnect the intelligent tester from the DLC3.
| 45. ADD ENGINE COOLANT |
Tighten the radiator drain cock plug by hand.
Tighten the cylinder block drain cock plug.
Add TOYOTA Super Long Life Coolant (SLLC) to the radiator reservoir filler opening.
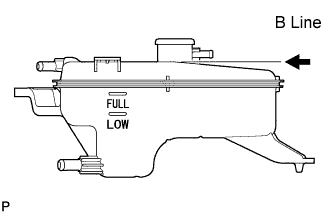 |
Continue adding TOYOTA SLLC until it is filled to the B line at the base of the reservoir's filler neck.
| Item | Specified Condition |
| A/T | 6.4 liters (6.8 US qts, 5.6 Imp. qts) |
| M/T | 6.3 liters (6.7 US qts, 5.5 Imp. qts) |
Press the No. 1 and No. 2 radiator hoses several times by hand, and then check the level of the coolant. If the coolant level drops below the B line, add TOYOTA SLLC to the B line.
Install the radiator reservoir cap.
Start the engine and warm it up until the cooling fan operates. While the cooling fan operates, circulate the coolant for several minutes.
Set the air conditioning as follows while warming up the engine.
| Item | Specified Condition |
| Manual Air Conditioning System | Fan speed: Any setting except OFF |
| Temperature: Toward WARM Air conditioning switch: OFF | |
| Automatic Air Conditioning System | Temperature: Toward MAX Air conditioning switch: OFF |
Maintain the engine speed at 2,000 to 2,500 rpm and warm up the engine until the cooling fan operates.
Press the No. 1 and No. 2 radiator hoses several times by hand to bleed air.
Stop the engine and wait until the coolant cools down to ambient temperature.
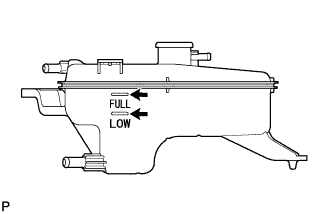 |
Check that the coolant level is between the FULL and LOW line.
If the coolant level is below the LOW line, repeat all of the procedures above.
If the coolant level is above the FULL line, drain coolant so that the coolant level is between the FULL and LOW line.
| 46. CHECK FOR ENGINE COOLANT LEAKS |
Check for engine coolant leaks .
| 47. CHECK FOR ENGINE OIL LEAKS |
Start the engine, and check that there are no oil leaks.
| 48. CHECK FOR EXHAUST GAS LEAKS |
| 49. CHECK IGNITION TIMING |
Warm up and stop the engine.
|
When using intelligent tester:
Connect the intelligent tester to the DLC3.
Allow the engine to idle.
Select the following menu items:
Powertrain / Engine and ECT / Data List / IGN Advance.
Read IGN Advance to check the ignition timing.
Check that the ignition timing advances immediately when the engine speed is increased.
Turn the ignition switch off.
Disconnect the intelligent tester from the DLC3.
When not using intelligent tester:
Remove the No. 1 engine cover .
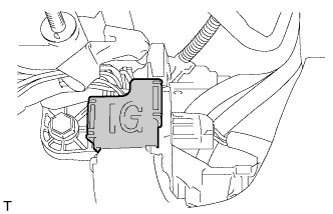 |
Open the ignition cover located to the right of the No. 4 ignition coil.
Pull out the wire harness from the IG cover.
Connect a timing light to the wire harness.
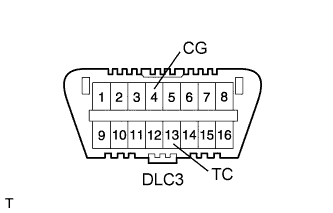 |
Using SST, connect terminals 13 (TC) and 4 (CG) of the DLC3.
Allow the engine to idle and check the ignition timing.
Remove SST from the DLC3.
Allow the engine to idle and check the ignition timing.
Check that the ignition timing advances immediately when the engine speed is increased.
Turn the ignition switch off.
Remove the timing light.
Close the IG cover.
Install the No. 1 engine cover .
| 50. INSPECT ENGINE IDLING SPEED |
|
When using intelligent tester:
Turn OFF all the accessories and air conditioning.
Move the shift lever to P or neutral.
Connect the intelligent tester to the DLC3.
Warm up the engine.
Select the tester menus:
Powertrain / Engine and ECT / Data List / Engine SPD
Read Engine SPD to check the idle speed while the radiator-cooling fan is not rotating.
| Item | Specified Condition |
| A/T vehicle | 610 to 710 rpm |
| M/T vehicle | 650 to 750 rpm |
Turn the ignition switch off.
Disconnect the tester from the DLC3.
 |
When not using intelligent tester:
Turn OFF all the accessories and air conditioning.
Move the shift lever to P or neutral.
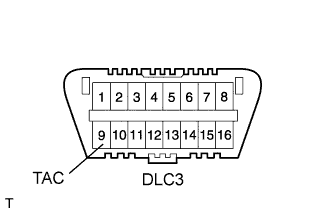
Connect SST to 9 (TAC) of the DLC3 terminal, and then connect a tachometer to SST.
Warm up the engine.
Check the idle speed while the radiator-cooling fan is not rotating.
| Item | Specified Condition |
| A/T vehicle | 610 to 710 rpm |
| M/T vehicle | 650 to 750 rpm |
Turn the ignition switch off.
Remove the tachometer and disconnect SST from the DLC3.
| 51. INSPECT COMPRESSION |
Warm up and stop the engine.
Remove the No. 1 engine under cover.
Remove the 4 ignition coils .
Remove the 4 spark plugs.
Disconnect the 4 fuel injector connectors.
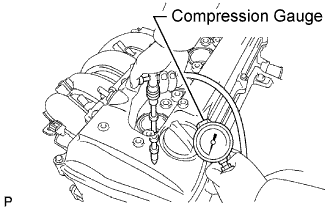 |
Insert a compression gauge into the spark plug hole.
While cranking the engine, measure the compression pressure.
Connect the 4 fuel injector connectors.
Install the 4 spark plugs.
Install the 4 ignition coils .
Install the No. 1 engine under cover.
| 52. INSPECT CO/HC |
Start and warm up the engine.
Run the engine at 2,500 rpm for approximately 180 seconds.
Insert the CO/HC meter testing probe at least 40 cm (1.3 ft.) into the tailpipe while idling.
Inspect the CO/HC concentration while idling and/or at 2,500 rpm.
If the CO/HC concentration is not as specified, perform troubleshooting.
| CO | HC | Problems | Causes |
| Normal | High | Rough idle | 1. Faulty ignition: - Incorrect timing - Plugs are contaminated, shorted, or gaps are defective 2. Incorrect valve clearance 3. Leaks in intake and exhaust valve 4. Leaks in cylinders |
| Low | High | Rough idle (Fluctuating HC reading) | 1. Vacuum leakage: - Ventilation hoses - Intake manifold - Throttle body - Brake booster line 2. Lean mixture causing misfire |
| High | High | Rough idle (Black smoke from exhaust) | 1. Restricted air filter 2. Plugged PCV valve 3. Faulty SFI system: - Faulty pressure regulator - Faulty engine coolant temperature sensor - Faulty mass air flow meter - Faulty ECM - Faulty injectors - Faulty throttle body |
| 53. INSTALL NO. 1 ENGINE COVER |
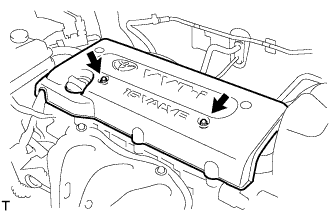 |
Install the engine cover with the 2 nuts.
| 54. INSTALL FRONT FENDER APRON RH |
| 55. INSTALL NO. 1 ENGINE UNDER COVER |
| 56. INSTALL FRONT WHEEL RH |
| 57. INSTALL RADIATOR SUPPORT OPENING COVER |