 |
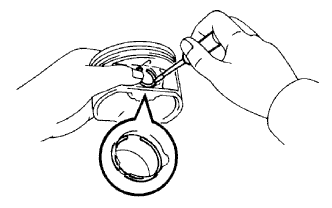
Using a small screwdriver, install a new snap ring onto one end of the piston pin hole.
- HINT:
- Make sure that the end gap of the snap ring is not aligned with the pin hole cutout portion of the piston.
ENGINE UNIT > REASSEMBLY |
| 1. INSTALL PISTON |
|
Using a small screwdriver, install a new snap ring onto one end of the piston pin hole.
Gradually heat the piston up to 80 to 90°C (176 to 194°F).
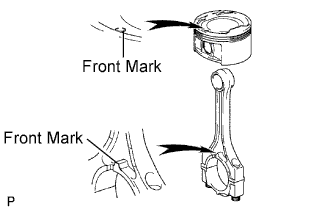 |
Align the front marks of the piston and connecting rod, then push in the piston pin with your thumb until the pin comes into contact with the snap pin hole.
| 2. INSTALL PISTON RING SET |
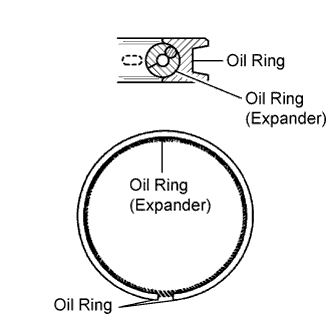 |
Install the expander and oil ring by hand.
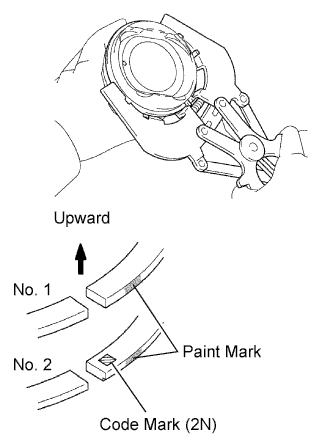 |
Using a piston ring expander, install the 2 compression rings with the paint mark as shown in the illustration.
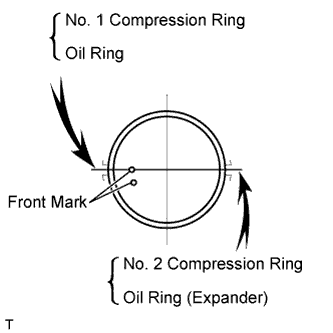 |
Position the piston rings so that the ring ends are as shown in the illustration.
| 3. INSTALL NO. 1 OIL NOZZLE SUB-ASSEMBLY |
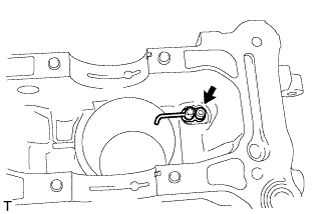 |
Install the 4 oil nozzles with the 4 bolts.
| 4. INSTALL CYLINDER BLOCK WATER JACKET SPACER |
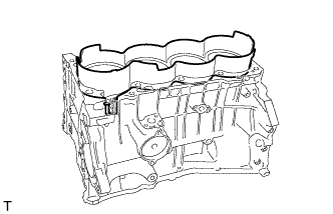 |
| 5. INSTALL CRANKSHAFT BEARING |
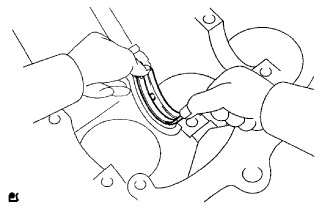 |
Install the upper bearing with an oil groove onto the cylinder block.
| 6. INSTALL NO. 2 CRANKSHAFT BEARING |
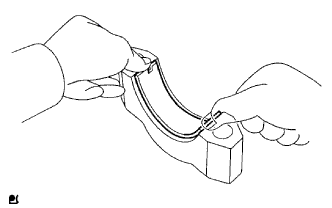 |
Install the lower bearing onto the bearing cap.
| 7. INSTALL CRANKSHAFT THRUST WASHER UPPER |
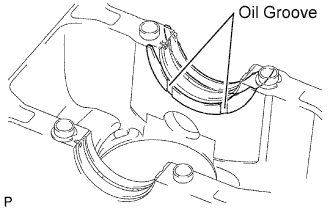 |
Install the 2 thrust washers onto the No. 3 journal position of the cylinder block with the oil groove facing outward.
| 8. INSTALL CRANKSHAFT |
Apply engine oil to the upper bearing, and install the crankshaft onto the cylinder block.
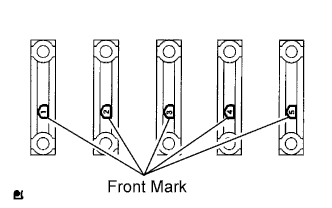 |
Examine the front marks and numbers, and install the bearing caps onto the cylinder block in the order shown in the illustration.
Apply a light coat of engine oil to the threads and under the heads of the bearing cap bolts.
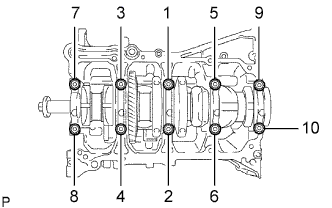 |
Using several steps, uniformly install and tighten the 10 bearing cap bolts in the sequence shown in the illustration.
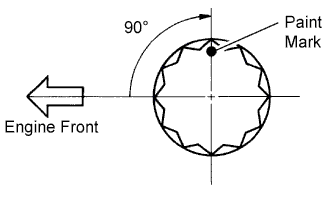 |
Mark the front of the bearing cap bolts with paint.
Retighten the 10 bearing cap bolts by 90° in the same sequence.
Check that the paint marks are now at a 90° angle to the front.
Check that the crankshaft turns smoothly.
| 9. INSTALL CONNECTING ROD BEARING |
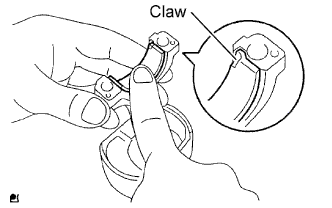 |
Align the bearing claw with the oil groove of the connecting rod or connecting rod cap.
| 10. INSTALL PISTON WITH CONNECTING ROD |
Apply engine oil to the cylinder walls, pistons, and surfaces of connecting rod bearings.
|
Check the position of the piston ring ends.
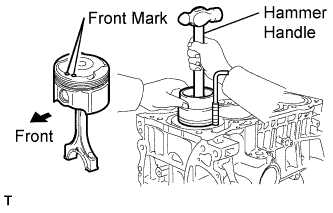 |
Using a hammer handle and piston ring compressor, press a piston and connecting rod assemblies into each cylinder with the front mark of the piston facing forward.
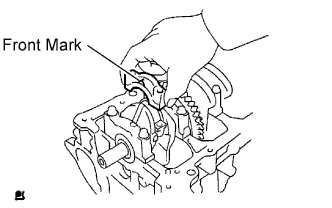 |
Check that the front mark of the connecting rod cap is facing in the correct direction.
Apply a light coat of engine oil to the threads and under the heads of the connecting rod bolts.
Using a 12 mm socket wrench, tighten the bolts in several passes to the specified torque.
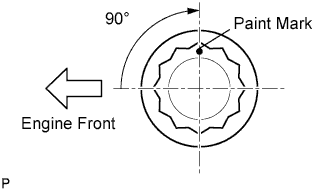 |
Mark the front of the connecting rod bolts with paint.
Retighten the cap bolts 90°as shown in the illustration.
Check that the crankshaft turns smoothly.
| 11. INSTALL BALANCE SHAFT BEARING |
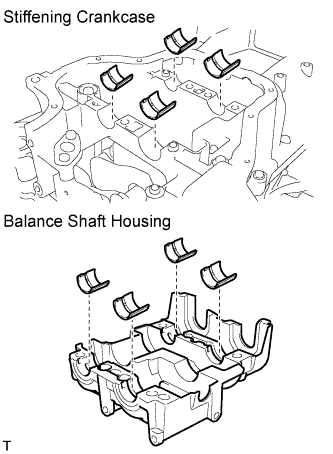 |
Align the bearing claw with the claw groove, and push in the 8 bearings.
Apply a light coat of engine oil in the bearings.
| 12. INSTALL BALANCE SHAFT |
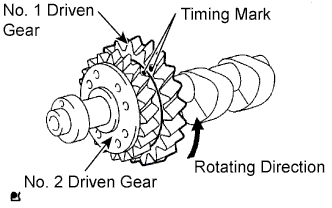 |
Rotate the No. 1 driven gear of the No. 1 balance shaft in the rotating direction until it hits the stopper.
 |
Confirm that the timing marks on the No. 1 and No. 2 driven gears are aligned.
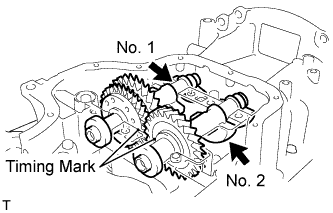 |
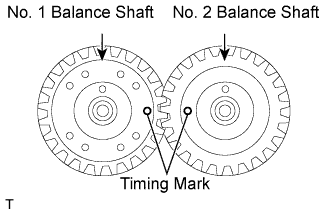
Align the timing marks of the No. 1 and No. 2 balance shafts as shown in the illustration.
Place the No. 1 and No. 2 balance shafts onto the crankcase.
Apply a light coat of engine oil to the threads and under the heads of the bolts.
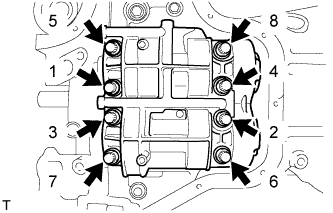 |
Using several steps, uniformly install and tighten the 8 bolts in the sequence shown in the illustration.
Mark the front of the bolts with paint.
Retighten the bolts 90°as shown in the illustration.
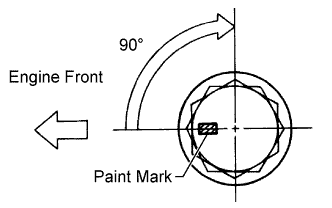 |
Check that the paint mark is now at a 90°angle to the front.
| 13. INSTALL STIFFENING CRANKCASE ASSEMBLY |
Remove any old packing material and be careful not to drop any oil on the contact surfaces of the cylinder block and crankcase.
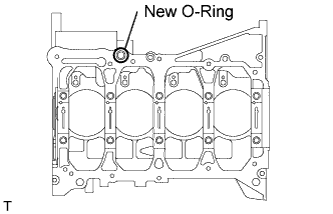 |
Place a new O-ring on the cylinder block as shown in the illustration.
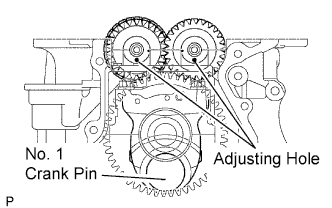 |
With the No. 1 crank pin of the crankshaft placed at the 6 o'clock position, install the No. 1 and No. 2 balance shafts and align the adjusting holes as shown in the illustration.
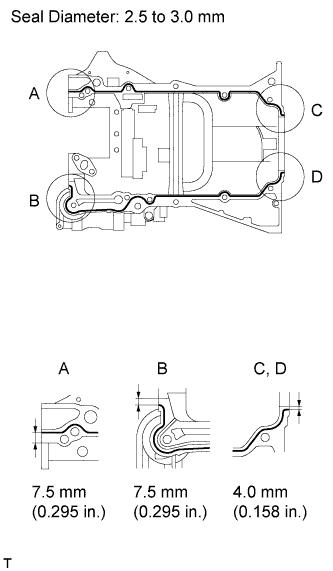 |
Apply a continuous bead of seal packing (Diameter 2.5 to 3.0 mm (0.098 to 0.118 in.)) as shown in the illustration.
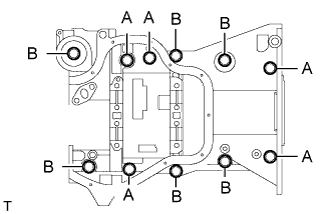 |
Temporarily install the crankcase with the 11 bolts.
| Item | Bolt Length |
| Bolt A | 112 mm (4.41 in.) |
| Bolt B | 35 mm (1.38 in.) |
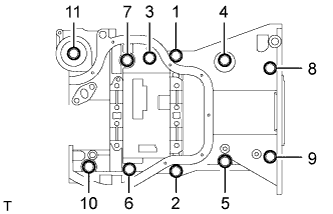 |
Uniformly tighten the bolts.
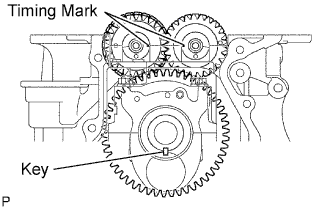 |
Confirm that the timing marks of the balance shafts are aligned when the key groove is placed at the 6 o'clock position, as shown in the illustration.
| 14. INSTALL ENGINE REAR OIL SEAL |
Apply multi-purpose grease to the lip of a new oil seal.
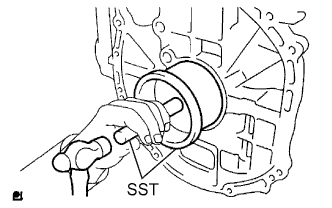 |
Using SST and a hammer, tap in the new oil seal until its surface is flush with the rear oil seal retainer edge.
| 15. INSTALL NO. 1 TAPER SCREW PLUG (w/o Oil Cooler) |
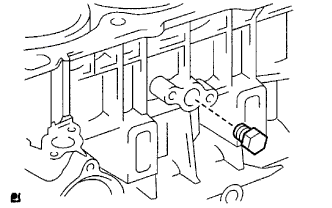 |
Apply adhesive to 2 or 3 threads of the plug, and install it.
| 16. INSTALL OIL CONTROL VALVE FILTER |
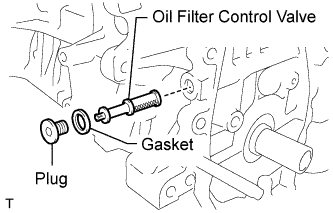 |
Check that there are no foreign objects on the mesh part of the oil control valve filter.
Using a 6 mm socket hexagon wrench, install a new gasket and the oil control valve filter with the plug.
| 17. INSTALL CYLINDER BLOCK WATER DRAIN COCK SUB-ASSEMBLY |
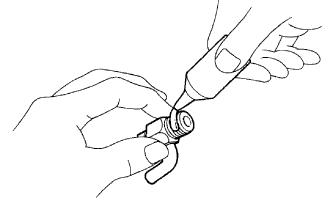 |
Apply adhesive to 2 or 3 threads of the drain cock.
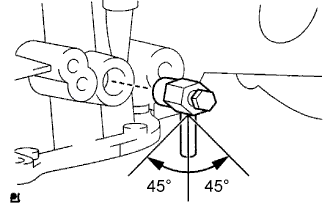 |
After tightening the drain cock to the specified torque, turn the drain cock clockwise as shown in the illustration.
| 18. INSTALL CYLINDER HEAD GASKET |
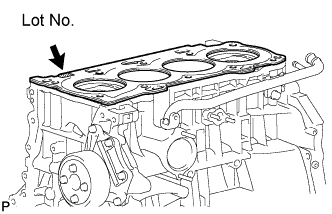 |
Place a new gasket on the cylinder block surface with the Lot No. stamp facing upward.
| 19. INSTALL CYLINDER HEAD SUB-ASSEMBLY |
Place the cylinder head on the head gasket.
Install the cylinder head bolts.
 |
Apply a light coat of engine oil to the threads and under the heads of the cylinder head set bolts.
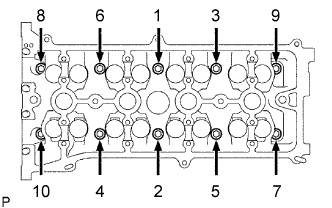
Using several steps, uniformly install and tighten the 10 cylinder head set bolts and plate washers with a 10 mm bi-hexagon wrench in the order shown in the illustration.
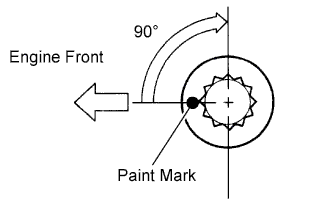 |
Mark the front of the cylinder head bolts with paint.
Retighten the cylinder head bolts by 90°as shown in the illustration.
Check that the paint mark is now at a 90°angle to the front.
| 20. INSTALL CAMSHAFT TIMING OIL CONTROL VALVE ASSEMBLY |
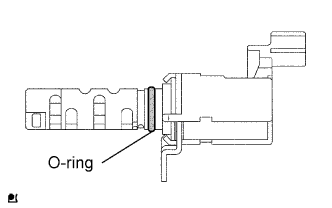 |
Apply a light coat of engine oil to a new O-ring, then install it onto the camshaft timing oil control valve.
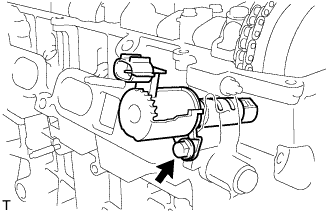 |
Install the camshaft timing oil control valve with the bolt.
| 21. INSTALL CAMSHAFT TIMING GEAR ASSEMBLY |
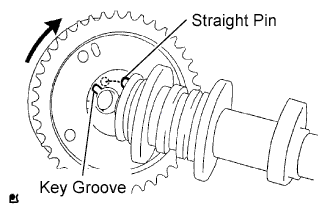 |
Put the camshaft timing gear and camshaft together with the straight pin and key groove misaligned, as shown in the illustration.
Turn the camshaft timing gear as shown in the illustration while pushing it gently against the camshaft. Push further at the position where the pin fits into the groove.
Check that there is no clearance between the gear fringe and camshaft.
Tighten the flange bolt with the camshaft timing gear fixed in place.
Check that the camshaft timing gear can move to the retard angle side (the right direction) and is locked in the most retarded position.
| 22. INSTALL NO. 2 CAMSHAFT TIMING SPROCKET |
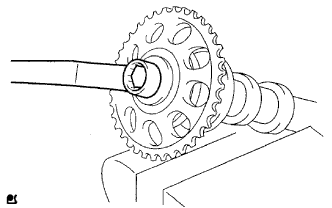 |
Clamp the camshaft in a vise, then install the camshaft timing sprocket with the bolt.
| 23. INSTALL NO. 2 CAMSHAFT BEARING |
Clean the contact surface of the bearing and the cylinder head.
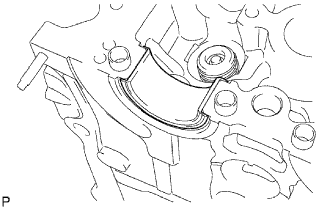 |
Install the No. 2 camshaft bearing onto the cylinder head.
| 24. INSTALL NO. 1 CAMSHAFT BEARING |
Clean the contact surface of the bearing and the bearing cap.
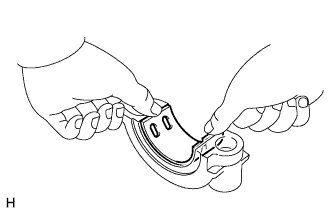 |
Align the bearing claw with the claw groove of No. 1 and No. 2 bearing cap, and push in the No. 1 camshaft bearing.
| 25. INSTALL CAMSHAFT |
Apply a light coat of engine oil to the journal portion of the camshaft.
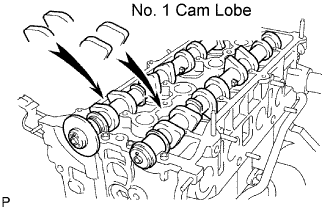 |
Place the 2 camshafts on the cylinder head with the No. 1 cam lobes facing the directions shown in the illustration.
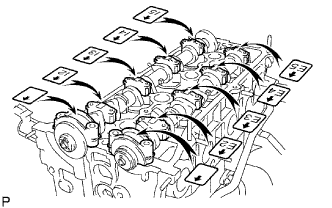 |
Examine the front marks and numbers, and check that the order is as shown in the illustration. Then install the bearing caps onto the cylinder head.
Apply a light coat of engine oil to the threads and under the heads of the bearing cap bolts.
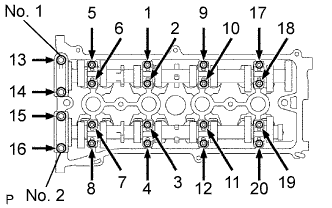 |
Using several steps, uniformly tighten the 20 bearing cap bolts in the sequence shown in the illustration.
| 26. INSTALL OIL PUMP DRIVE GEAR |
| 27. INSTALL OIL PUMP ASSEMBLY |
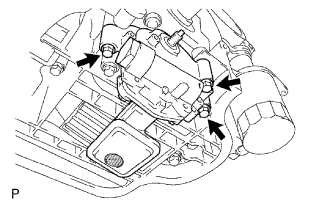 |
Install a new gasket and the oil pump with the 3 bolts.
| 28. INSTALL NO. 2 CHAIN SUB-ASSEMBLY |
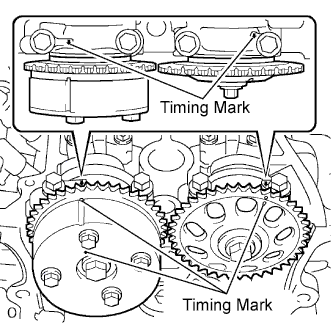 |
Set the No. 1 cylinder to TDC/compression.
Turn the camshafts with a wrench (using the hexagonal lobe) to align the timing marks of the camshaft timing gear with each timing mark located on the No. 1 and No. 2 bearing caps as shown in the illustration.
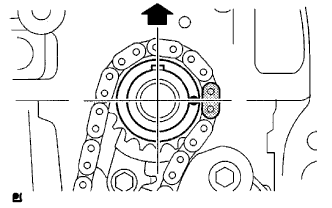 |
Using the crankshaft pulley bolt, turn the crankshaft to position the key on the crankshaft upward.
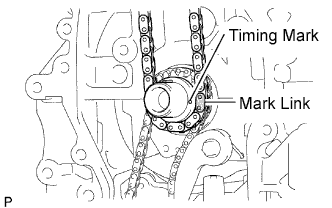 |
Install the chain onto the crankshaft timing sprocket with the gold or orange mark link aligned with the timing mark on the crankshaft.
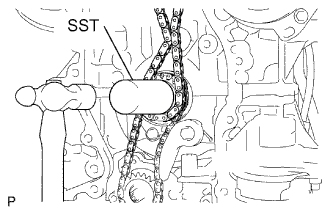 |
Using SST and a hammer, tap in the crankshaft timing sprocket.
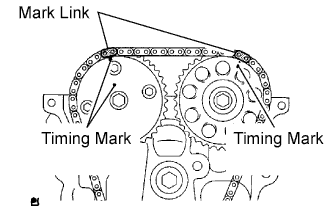 |
Align the gold or yellow links with each timing mark located on the camshaft timing gear and sprocket, then install the chain.
| 29. INSTALL CRANKSHAFT TIMING SPROCKET |
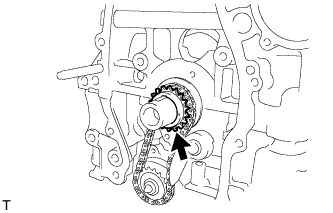 |
| 30. INSTALL NO. 1 CHAIN VIBRATION DAMPER |
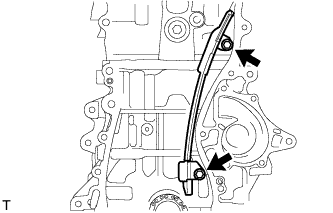 |
Install the chain vibration damper with the 2 bolts.
| 31. INSTALL CHAIN SUB-ASSEMBLY |
|
Set the No. 1 cylinder to TDC/compression.
Turn the camshafts with a wrench (using the hexagonal lobe) to align the timing marks of the camshaft timing gear with each timing mark located on the No. 1 and No. 2 bearing caps as shown in the illustration.
|
Using the crankshaft pulley bolt, turn the crankshaft to position the key on the crankshaft upward.
|
Install the chain onto the crankshaft timing sprocket with the gold or orange mark link aligned with the timing mark on the crankshaft.
|
Using SST and a hammer, tap in the crankshaft timing sprocket.
|
Align the gold or yellow links with each timing mark located on the camshaft timing gear and sprocket, then install the chain.
| 32. INSTALL CHAIN TENSIONER SLIPPER |
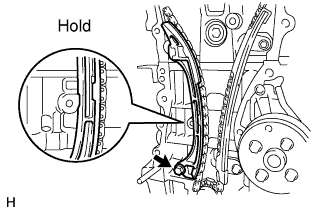 |
Install the chain tensioner slipper with the bolt.
| 33. INSTALL TIMING CHAIN GUIDE |
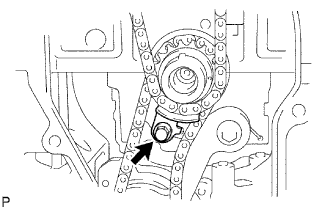 |
Install the timing chain guide with the bolt.
| 34. INSTALL NO. 1 CRANKSHAFT POSITION SENSOR PLATE |
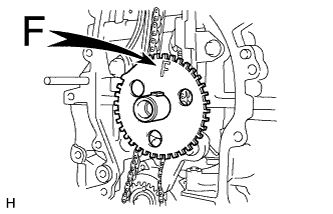 |
Install the sensor plate with the "F" mark facing forward.
| 35. REPLACE TIMING CHAIN COVER OIL SEAL |
If the timing chain cover is removed from the cylinder block:
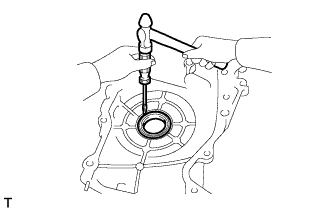 |
Using a screwdriver and hammer, tap out the oil seal.
Apply multi-purpose grease to the lip of a new oil seal.
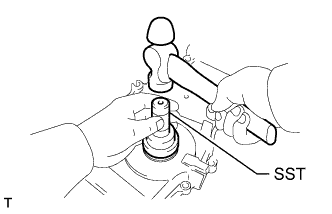 |
Using SST and a hammer, tap in the new oil seal until its surface is flush with the timing chain cover edge.
If the timing chain cover oil seal is installed to the cylinder block:
Remove fan and generator V belt (Click here).
Remove the crankshaft pulley .
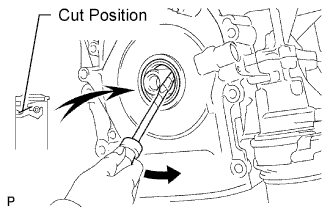 |
Using a knife, cut off the lip of the oil seal.
Using a screwdriver with its tip wrapped with tape, pry out the oil seal.
Apply multi-purpose grease to the lip of a new oil seal.
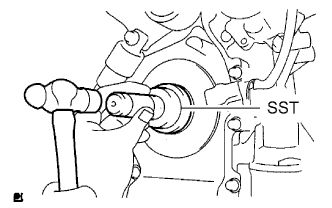 |
Using SST and a hammer, tap in the new oil seal until its surface is flush with the timing chain cover edge.
Install the crankshaft pulley .
Install the fan and generator V belt (Click here).
| 36. INSTALL TIMING CHAIN COVER SUB-ASSEMBLY |
Remove any old packing material and be careful not to drop any oil on the contact surfaces of the timing chain cover, cylinder head and cylinder block.
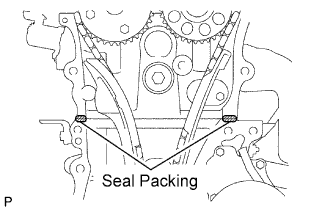 |
Apply seal packing (Diameter 4.0 to 4.5 mm (0.157 to 0.177 in.)) as shown in the illustration.
Apply a continuous bead of seal packing as shown in the illustration.
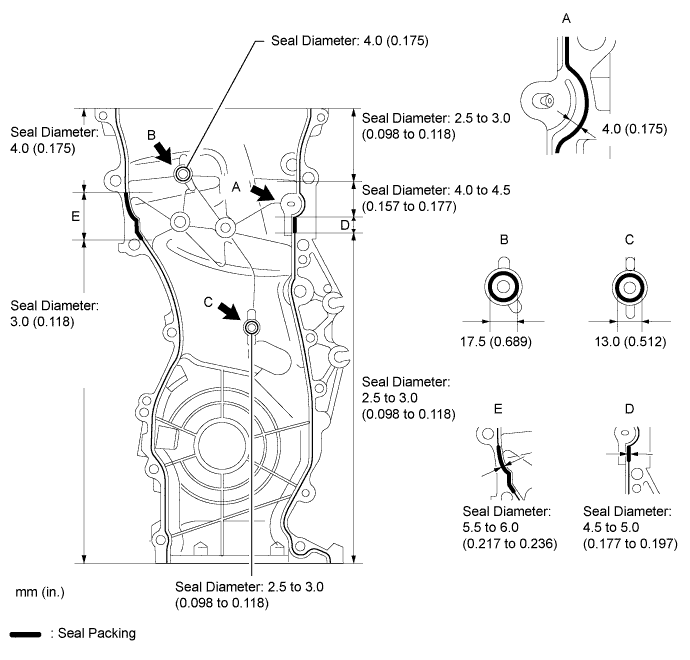
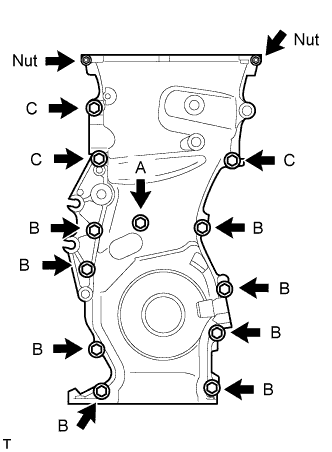 |
Install the timing chain cover with the 12 bolts and 2 nuts.
| Bolt A | 30 mm (1.18 in.) length for 10 mm head |
| Bolt B | 30 mm (1.18 in.) length for 12 mm head |
| Bolt C | 40 mm (1.57 in.) length for 14 mm head |
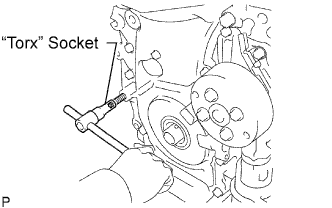 |
Using an E10 "torx" socket, install the stud bolt for the V-ribbed belt tensioner.
| 37. INSTALL NO. 1 CHAIN TENSIONER ASSEMBLY |
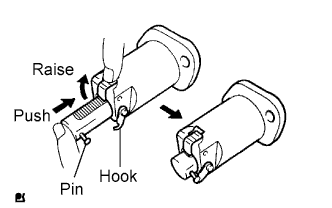 |
Release the ratchet pawl, then fully push in the plunger and hook the hook to the pin so that the plunger is in the position shown in the illustration.
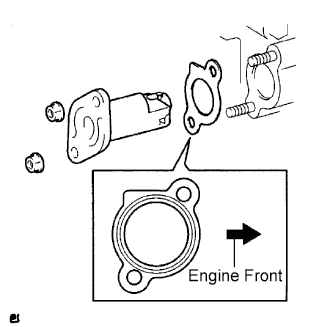 |
Install a new gasket and the chain tensioner with the 2 nuts.
| 38. INSTALL CRANKSHAFT PULLEY |
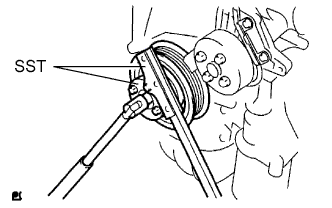 |
Using SST, fix the pulley in place and tighten the bolt.
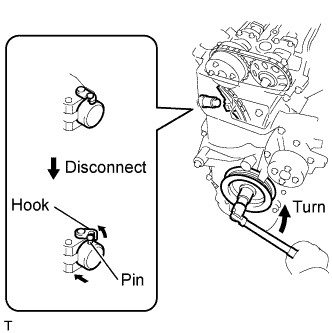 |
Turn the crankshaft counterclockwise, then disconnect the plunger knock pin from the hook.
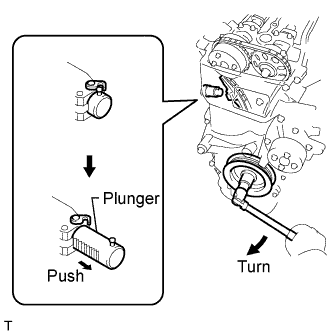 |
Turn the crankshaft clockwise, then check that the plunger is extended.
| 39. INSTALL OIL PAN SUB-ASSEMBLY |
Remove any old packing material and be careful not to drop any oil on the contact surfaces of the cylinder block and oil pan.
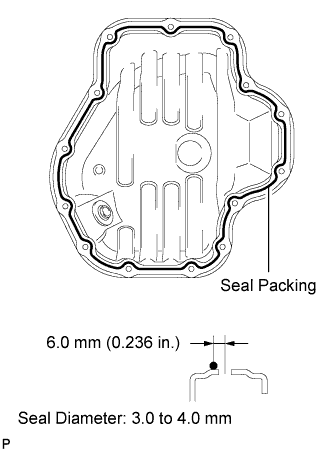 |
Apply a continuous bead of seal packing (Diameter 3.0 to 4.0 mm (0.118 to 0.157 in.)) as shown in the illustration.
Install the oil pan to the cylinder block.
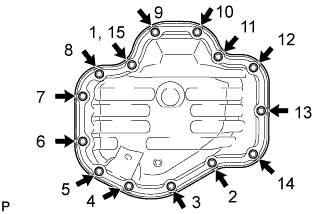 |
Uniformly tighten the 12 bolts and 2 nuts in the sequence shown in the illustration.
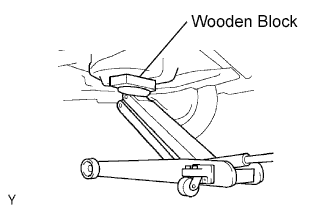 |
Place a transmission jack underneath the engine, then put a wooden block on the jack.
Remove the chain block and sling device.
Remove the No. 1 and No. 2 engine hangers.
| 40. INSTALL OIL PAN DRAIN PLUG |
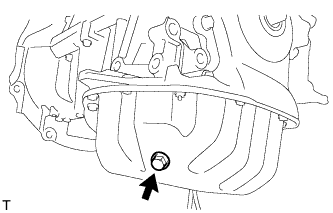 |
Place a new gasket on the oil pan drain plug, then install it onto the oil pan.
| 41. INSTALL WATER PUMP ASSEMBLY |
Remove any old seal packing material from the contact surface.
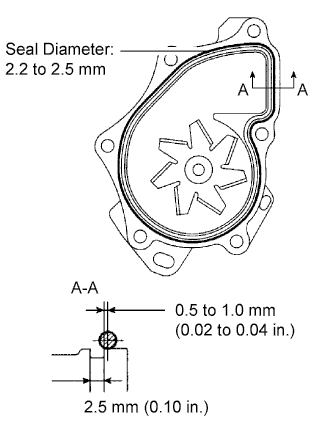 |
Apply a continuous line of seal packing as shown in the illustration.
Install the water pump and clamp bracket with the 4 bolts and 2 nuts.
Install the wire of the crankshaft position sensor onto the clamp bracket.
Install the clamp of the crankshaft position sensor onto the water pump.
| 42. INSTALL WATER PUMP PULLEY |
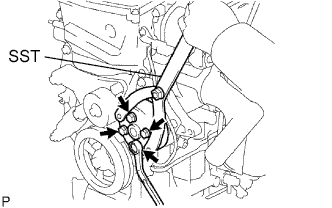 |
Using SST, install the water pump pulley with the 4 bolts.
| 43. INSTALL CRANKSHAFT POSITION SENSOR |
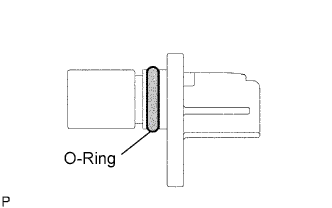 |
Apply a light coat of engine oil to the O-ring of the sensor.
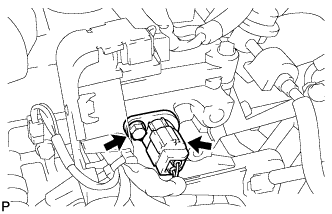 |
Install the sensor with the bolt.
Connect the sensor connector.
| 44. INSTALL OIL FILTER UNION |
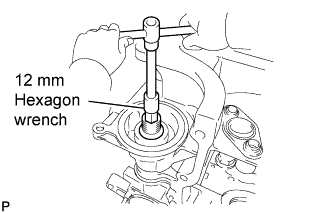 |
Using a 12 mm hexagon wrench, install the oil filter union.
| 45. INSTALL OIL FILTER SUB-ASSEMBLY |
Check and clean the oil filter installation surface.
Apply clean engine oil to the gasket of a new oil filter.
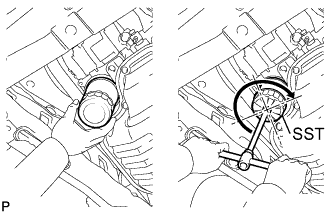 |
Lightly screw the oil filter into place by hand. Tighten it until the gasket contacts the seat.
Using SST, tighten the oil filter.
Depending on the work space available, choose from the following.
1. If enough space is available, use a torque wrench to tighten the oil filter.
| 46. SET NO. 1 CYLINDER TO TDC/COMPRESSION |
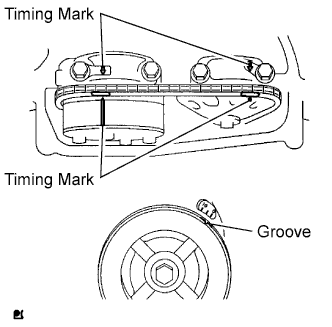 |
Turn the crankshaft pulley until its groove and the timing mark "0" of the timing chain cover are aligned.
Check that each timing mark of the camshaft timing gear and sprocket is aligned with each timing mark located on the No. 1 and No. 2 bearing caps as shown in the illustration.
If not, turn the crankshaft by 1 revolution (360°) to align the timing marks as above.
| 47. CHECK VALVE CLEARANCE |
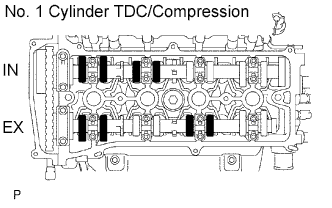 |
Check only the valves indicated.
Using a feeler gauge, measure the clearance between the valve lifter and camshaft.
| Item | Standard Condition |
| Intake | 0.21 to 0.27 mm (0.0083 to 0.0106 in.) |
| Exhaust | 0.38 to 0.48 mm (0.0150 to 0.0189 in.) |
Record any out-of-specification valve clearance measurements. They will be used later to determine the required replacement valve clearance lifters.
Turn the crankshaft 1 revolution (360°) and set the No. 4 cylinder to the TDC/compression.
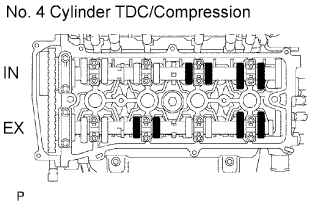 |
Check only the valves indicated.
Using a feeler gauge, measure the clearance between the valve lifter and camshaft.
| Item | Standard Condition |
| Intake | 0.21 to 0.27 mm (0.0083 to 0.0106 in.) |
| Exhaust | 0.38 to 0.48 mm (0.0150 to 0.0189 in.) |
Record any out-of-specification valve clearance measurements. They will be used later to determine the required replacement valve lifters.
| 48. ADJUST VALVE CLEARANCE |
Remove the No. 2 camshaft .
Remove the camshaft .
Remove the valve lifters.
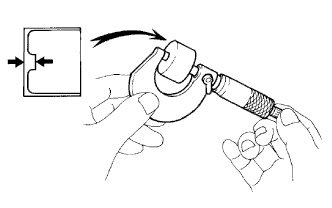 |
Using a micrometer, measure the thickness of the removed valve lifters.
Calculate the thickness of a new lifter so that the valve clearance comes within the specified values.
| Item | Specification |
| Intake | A = B + (C - 0.24 mm (0.0095 in.)) |
| Exhaust | A = B + (C - 0.35 mm (0.0138 in.)) |
| A | New lifter thickness |
| B | Used lifter thickness |
| C | Measured valve clearance |
Select a new lifter with a thickness as close as possible to the calculated values.
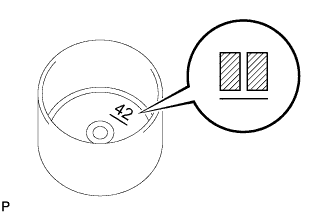 |
Valve lifter selection chart (intake).
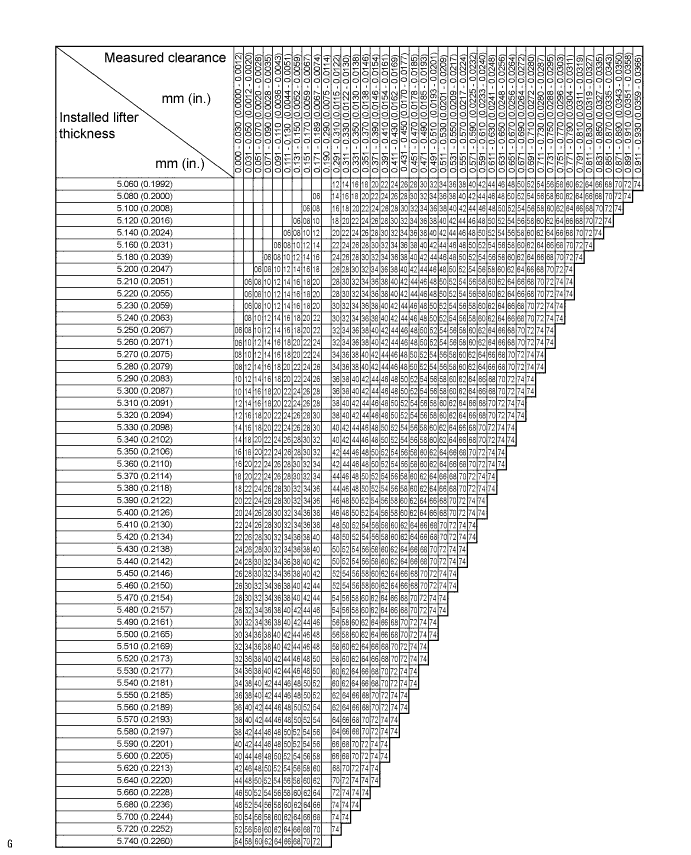
| Lifter No. | Thickness mm (in.) | Lifter No. | Thickness mm (in.) | Lifter No. | Thickness mm (in.) |
| 06 | 5.060 (0.1992) | 30 | 5.300 (0.2087) | 54 | 5.540 (0.2181) |
| 08 | 5.080 (0.2000) | 32 | 5.320 (0.2094) | 56 | 5.560 (0.2189) |
| 10 | 5.100 (0.2008) | 34 | 5.340 (0.2102) | 58 | 5.580 (0.2197) |
| 12 | 5.120 (0.2016) | 36 | 5.360 (0.2110) | 60 | 5.600 (0.2205) |
| 14 | 5.140 (0.2024) | 38 | 5.380 (0.2118) | 62 | 5.620 (0.2213) |
| 16 | 5.160 (0.2031) | 40 | 5.400 (0.2126) | 64 | 5.640 (0.2220) |
| 18 | 5.180 (0.2039) | 42 | 5.420 (0.2134) | 66 | 5.660 (0.2228) |
| 20 | 5.200 (0.2047) | 44 | 5.440 (0.2142) | 68 | 5.680 (0.2236) |
| 22 | 5.220 (0.2055) | 46 | 5.460 (0.2150) | 70 | 5.700 (0.2244) |
| 24 | 5.240 (0.2063) | 48 | 5.480 (0.2157) | 72 | 5.720 (0.2252) |
| 26 | 5.260 (0.2071) | 50 | 5.500 (0.2165) | 74 | 5.740 (0.2260) |
| 28 | 5.280 (0.2079) | 52 | 5.520 (0.2173) | - | - |
Valve lifter selection chart (exhaust).
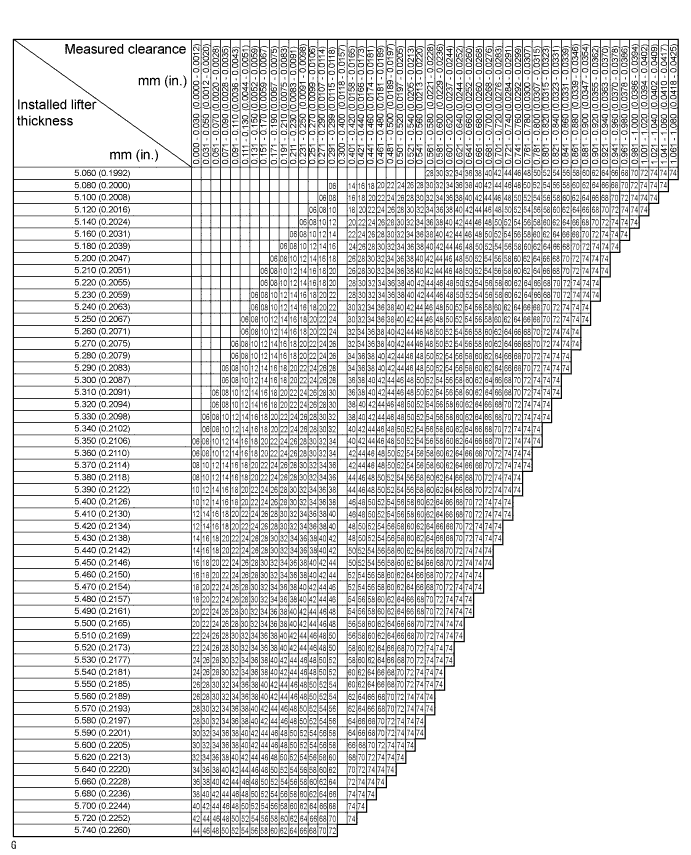
| Lifter No. | Thickness mm (in.) | Lifter No. | Thickness mm (in.) | Lifter No. | Thickness mm (in.) |
| 06 | 5.060 (0.1992) | 30 | 5.300 (0.2087) | 54 | 5.540 (0.2181) |
| 08 | 5.080 (0.2000) | 32 | 5.320 (0.2094) | 56 | 5.560 (0.2189) |
| 10 | 5.100 (0.2008) | 34 | 5.340 (0.2102) | 58 | 5.580 (0.2197) |
| 12 | 5.120 (0.2016) | 36 | 5.360 (0.2110) | 60 | 5.600 (0.2205) |
| 14 | 5.140 (0.2024) | 38 | 5.380 (0.2118) | 62 | 5.620 (0.2213) |
| 16 | 5.160 (0.2031) | 40 | 5.400 (0.2126) | 64 | 5.640 (0.2220) |
| 18 | 5.180 (0.2039) | 42 | 5.420 (0.2134) | 66 | 5.660 (0.2228) |
| 20 | 5.200 (0.2047) | 44 | 5.440 (0.2142) | 68 | 5.680 (0.2236) |
| 22 | 5.220 (0.2055) | 46 | 5.460 (0.2150) | 70 | 5.700 (0.2244) |
| 24 | 5.240 (0.2063) | 48 | 5.480 (0.2157) | 72 | 5.720 (0.2252) |
| 26 | 5.260 (0.2071) | 50 | 5.500 (0.2165) | 74 | 5.740 (0.2260) |
| 28 | 5.280 (0.2079) | 52 | 5.520 (0.2173) | - | - |
Install the selected valve lifter.
| 49. INSTALL CAMSHAFT |
Apply a light coat of engine oil to the journal portion of the camshaft.
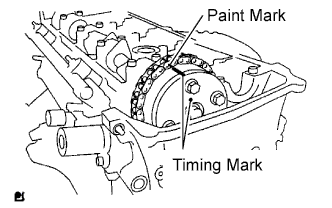 |
Install the timing chain onto the camshaft timing gear with the paint mark aligned with the timing mark in the camshaft timing gear as shown in the illustration.
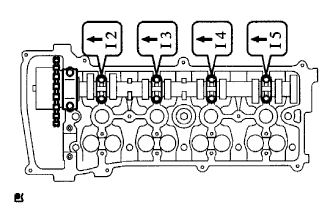 |
Examine the front marks and numbers, and check that the order is as shown in the illustration. Then install the bearing caps into the cylinder head.
Apply a light coat of engine oil on the threads and under the heads of the bearing cap bolts.
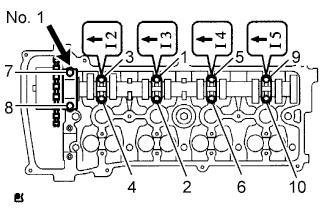 |
Using several steps, uniformly tighten the 10 bearing cap bolts in the sequence shown in the illustration.
| 50. INSTALL NO. 2 CAMSHAFT |
Apply a light coat of engine oil to the journal portion of the No. 2 camshaft.
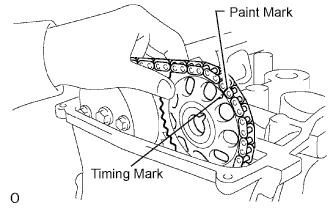 |
Put the No. 2 camshaft on the cylinder head with the paint mark of the chain aligned with the timing mark on the camshaft timing sprocket.
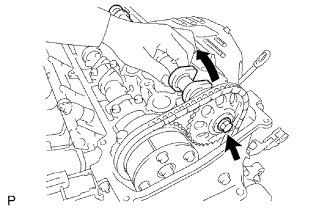 |
While holding the No. 2 camshaft by hand, temporarily tighten the camshaft timing sprocket set bolt.
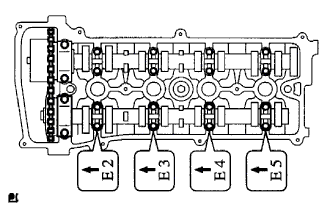 |
Examine the front marks, and numbers and check that the order is as shown in the illustration. Then install the bearing caps onto the cylinder head.
Apply a light coat of engine oil to the threads and under the heads of the bearing cap bolts.
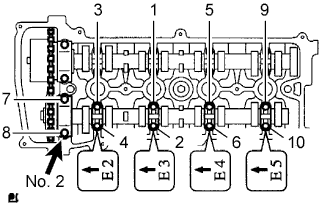 |
Using several steps, uniformly tighten the 10 bearing cap bolts in the sequence shown in the illustration.
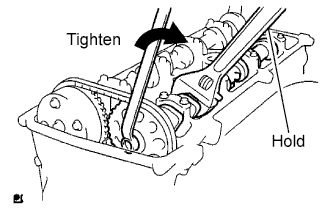 |
While holding the camshaft with a wrench, tighten the camshaft timing sprocket set bolt.
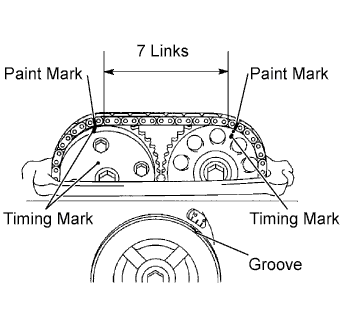 |
Check that the paint marks on the chain are aligned with the timing marks on the camshaft timing gear and camshaft timing sprocket. Also, check that the crankshaft pulley groove is aligned with the timing mark "0" of the timing chain cover.
| 51. INSTALL NO. 1 CHAIN TENSIONER ASSEMBLY |
|
Release the ratchet pawl, then fully push in the plunger and hook the hook to the pin so that the plunger is in the position shown in the illustration.
|
Install a new gasket and the chain tensioner with the 2 nuts.
| 52. INSTALL CYLINDER HEAD COVER GASKET |
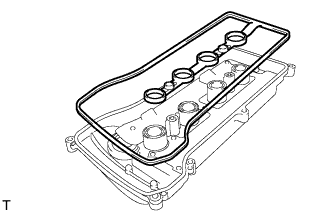 |
Install the gasket onto the cylinder head cover.
| 53. INSTALL CYLINDER HEAD COVER SUB-ASSEMBLY |
Remove any old packing material from the contact surface.
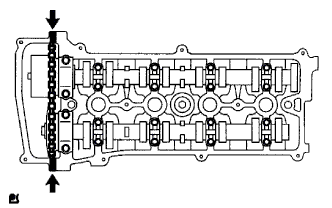 |
Apply seal packing to the 2 locations shown in the illustration.
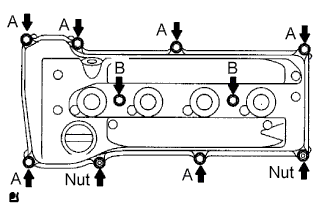 |
Install the cylinder head cover with the 8 bolts and 2 nuts.
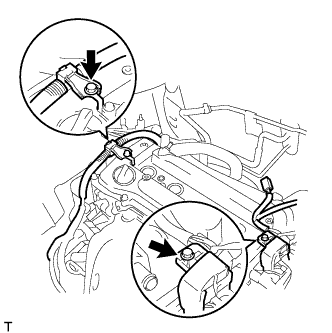 |
Install the 2 engine wires with the 2 bolts.
Connect the clamp of the engine wire (labeled B).
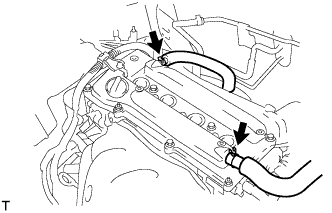 |
Connect the 2 ventilation hoses to the cylinder head cover.
| 54. INSTALL OIL FILLER CAP SUB-ASSEMBLY |
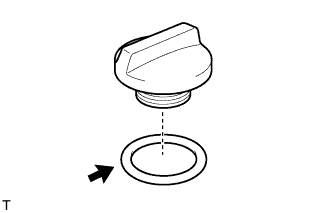 |
Install the gasket to the cap.
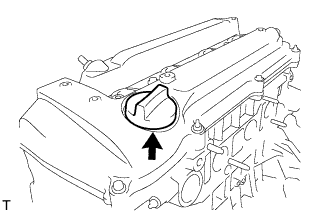 |
Install the oil filler cap.
| 55. INSTALL SPARK PLUG |
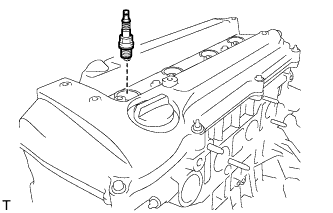 |
| 56. INSTALL IGNITION COIL ASSEMBLY |
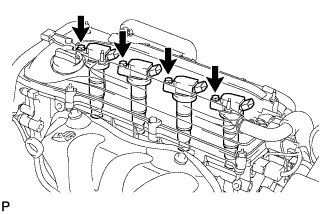 |
Install the 4 ignition coils with the 4 bolts.
Connect the 4 ignition coil connectors.
| 57. INSTALL VENTILATION VALVE SUB-ASSEMBLY |
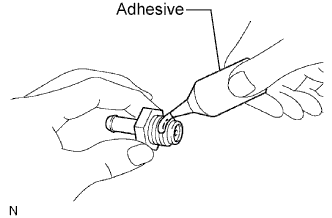 |
Apply adhesive to the threads of the ventilation valve.
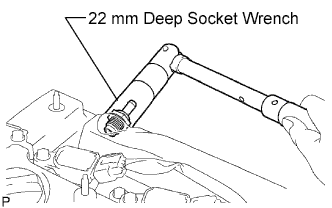 |
Using a 22 mm deep socket wrench, install the ventilation valve.
| 58. INSTALL OIL DIPSTICK GUIDE |
Apply a light coat of engine oil to a new O-ring and install it onto the guide.
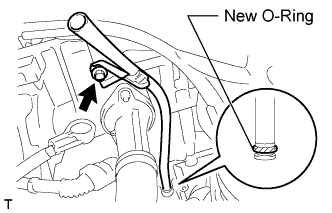 |
Install the guide with the bolt.
| 59. INSTALL OIL DIPSTICK |
| 60. INSTALL CAMSHAFT POSITION SENSOR |
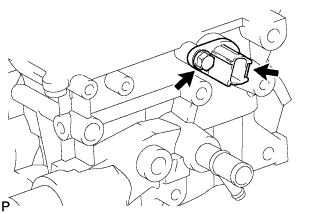 |
Install the sensor with the bolt.
| 61. INSTALL ENGINE COOLANT TEMPERATURE SENSOR |
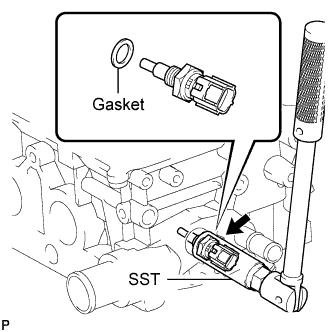 |
Using SST, install a new gasket and the ECT sensor.
| 62. INSTALL OIL PRESSURE SWITCH ASSEMBLY |
Apply adhesive to 2 or 3 threads of the oil pressure switch.
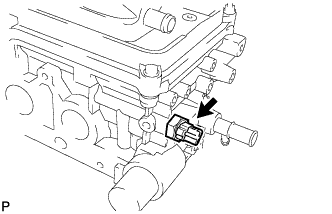 |
Using a 24 mm deep socket wrench, install the oil pressure switch.
| 63. INSTALL RADIO SETTING CONDENSER |
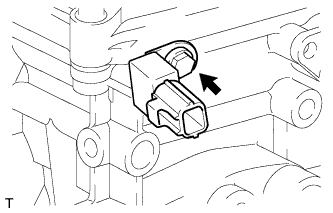 |
Install the condenser with the bolt.
| 64. INSTALL KNOCK SENSOR |
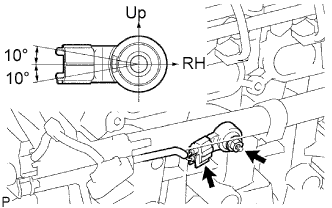 |
Install the sensor with the nut.
Connect the sensor connector.
| 65. INSTALL CAMSHAFT TIMING OIL CONTROL VALVE ASSEMBLY |
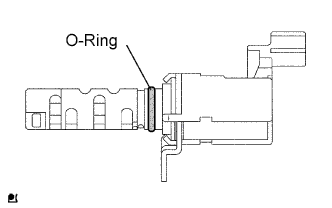 |
Apply a light coat of engine oil to the O-ring of the oil control valve.
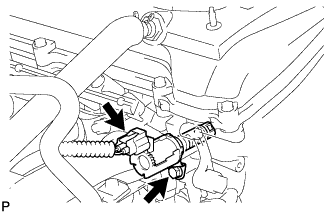 |
Install the oil control valve with the bolt.
Connect the oil control valve connector.
| 66. INSTALL ENGINE OIL COOLER (w/ Oil Cooler) |
Clean the oil cooler contact surface on the cooler mounting.
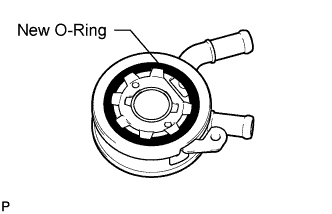 |
Install a new O-ring to the oil cooler.
Apply a light coat of engine oil on the threads and under the head of the union bolt.
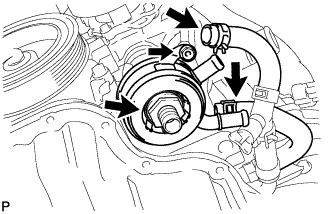 |
Install the oil cooler with the plate washer, union bolt and nut.
Connect the 2 oil cooler hoses.
| 67. INSTALL V-RIBBED BELT TENSIONER ASSEMBLY |
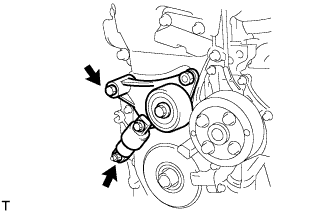 |
Install the V-ribbed belt tensioner with the bolt and nut.
| 68. INSTALL UNION BOLT (w/ Oil Cooler) |
Apply adhesive to the threads of the union bolt.
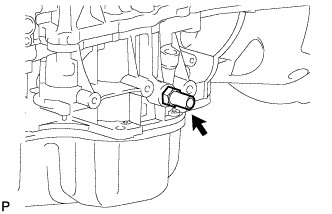 |
Install the union bolt.
| 69. INSTALL OIL COOLER PIPE (w/ Oil Cooler) |
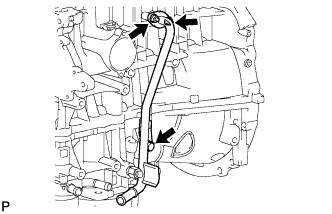 |
Install a new gasket and the pipe with the bolt and 2 nuts.
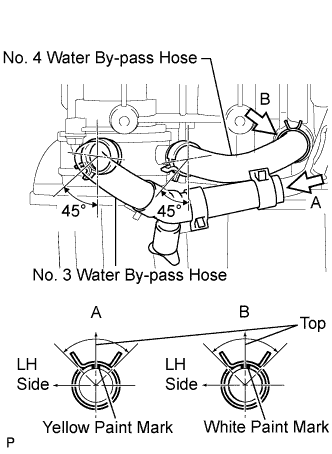 |
Connect the No. 3 and No. 4 water by-pass hose to the oil cooler.
| 70. INSTALL NO. 1 WATER BY-PASS PIPE |
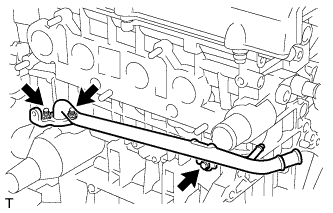 |
Install a new gasket and the pipe with the bolt and 2 nuts.
| 71. INSTALL THERMOSTAT |
Install a new gasket onto the thermostat.
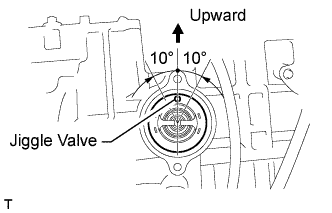 |
Install the thermostat with the jiggle valve upward.
| 72. INSTALL WATER INLET |
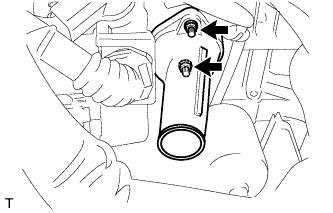 |
Install the water inlet with the 2 nuts.
| 73. INSTALL EXHAUST MANIFOLD CONVERTER SUB-ASSEMBLY |
Install a new gasket onto the cylinder head.
Temporarily tighten the exhaust manifold converter with the 5 nuts.
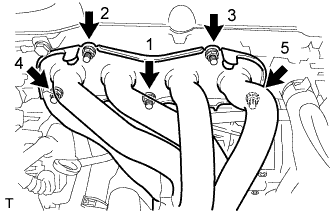 |
Tighten the 5 nuts in the sequence shown in the illustration.
| 74. INSTALL NO. 1 EXHAUST MANIFOLD HEAT INSULATOR |
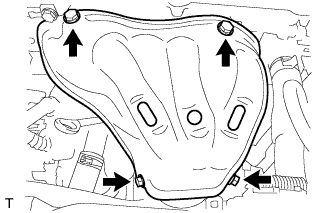 |
Install the exhaust manifold heat insulator with the 4 bolts.
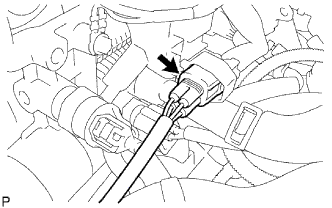 |
Connect the air-fuel ratio sensor connector.
| 75. INSTALL NO. 2 MANIFOLD STAY |
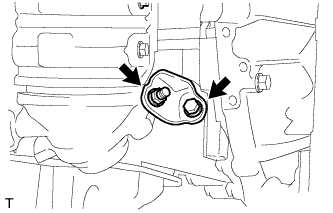 |
Install the stay with the bolt and nut.
| 76. INSTALL MANIFOLD STAY |
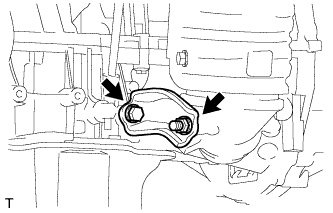 |
Install the stay with the bolt and nut.
| 77. INSTALL IDLER PULLEY |
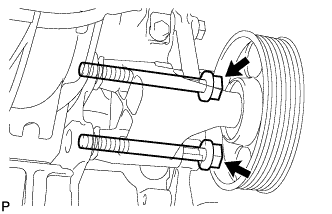 |
Install the idler bracket with the 2 bolts.