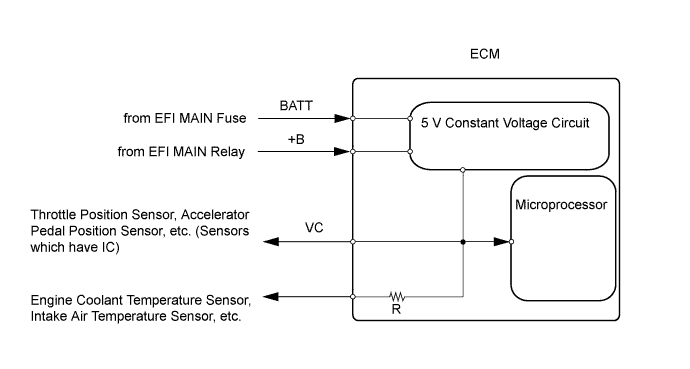
SFI SYSTEM > VC Output Circuit |
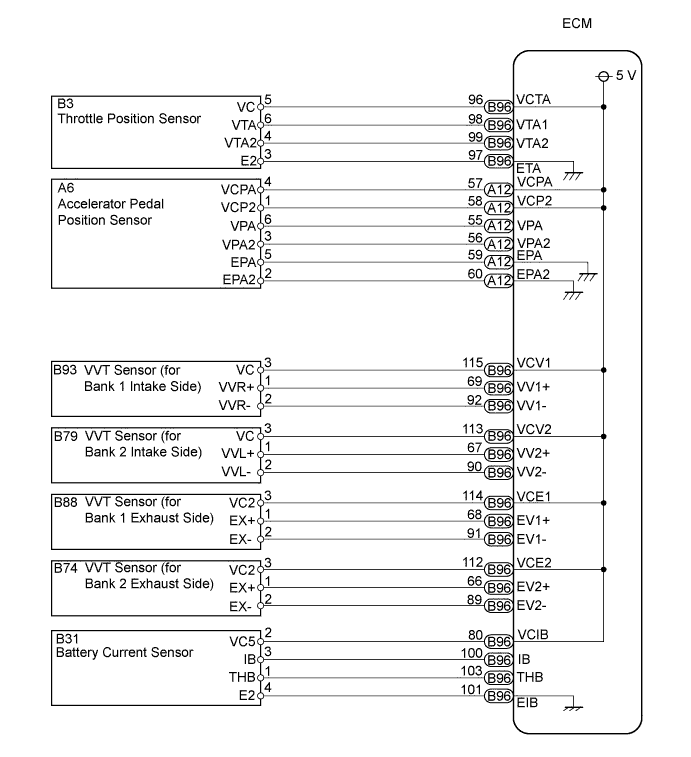
| 1.CHECK MIL |
Check that the Malfunction Indicator Lamp (MIL) lights up when turning the ignition switch ON.
|
| ||||
| NG | |
 |
| 2.CHECK COMMUNICATION BETWEEN INTELLIGENT TESTER AND ECM |
Connect the intelligent tester to the DLC3.
Turn the ignition switch to the ON position and tester on.
Check the communication between the tester and ECM.
| Result | Proceed to |
| Communication is possible | A |
| Communication is not possible | B |
|
| ||||
| B | |
|
| 3.CHECK MIL (THROTTLE POSITION SENSOR) |
Disconnect the throttle body connector.
Turn the ignition switch to the ON position.
Check the MIL.
| Result | Proceed to |
| MIL illuminates | A |
| MIL does not illuminate | B |
Reconnect the throttle body connector.
|
| ||||
| B | |
|
| 4.CHECK MIL (ACCELERATOR PEDAL POSITION SENSOR) |
Disconnect the accelerator pedal position sensor connector.
Turn the ignition switch to the ON position.
Check the MIL.
| Result | Proceed to |
| MIL illuminates | A |
| MIL does not illuminate | B |
Reconnect the accelerator pedal position sensor connector.
|
| ||||
| B | |
|
| 5.CHECK MIL (BATTERY CURRENT SENSOR) |
Disconnect the battery current sensor connector.
Turn the ignition switch to the ON position.
Check the MIL.
| Result | Proceed to |
| MIL illuminates | A |
| MIL does not illuminate | B |
Reconnect the battery current sensor connector.
|
| ||||
| B | |
|
| 6.CHECK MIL (VVT SENSOR FOR BANK 1 INTAKE SIDE) |
Disconnect the VVT sensor connector.
Turn the ignition switch to the ON position.
Check the MIL.
| Result | Proceed to |
| MIL illuminates | A |
| MIL does not illuminate | B |
Reconnect the VVT sensor connector.
|
| ||||
| B | |
|
| 7.CHECK MIL (VVT SENSOR FOR BANK 2 INTAKE SIDE) |
Disconnect the VVT sensor connector.
Turn the ignition switch to the ON position.
Check the MIL.
| Result | Proceed to |
| MIL illuminates | A |
| MIL does not illuminate | B |
Reconnect the VVT sensor connector.
|
| ||||
| B | |
|
| 8.CHECK MIL (VVT SENSOR FOR BANK 1 EXHAUST SIDE) |
Disconnect the VVT sensor connector.
Turn the ignition switch to the ON position.
Check the MIL.
| Result | Proceed to |
| MIL illuminates | A |
| MIL does not illuminate | B |
Reconnect the VVT sensor connector.
|
| ||||
| B | |
|
| 9.CHECK MIL (VVT SENSOR FOR BANK 2 EXHAUST SIDE) |
Disconnect the VVT sensor connector.
Turn the ignition switch to the ON position.
Check the MIL.
| Result | Proceed to |
| MIL illuminates | A |
| MIL does not illuminate | B |
Reconnect the VVT sensor connector.
|
| ||||
| B | |
|
| 10.CHECK WIRE HARNESS |
Disconnect the throttle body connector.
Disconnect the accelerator pedal position sensor connector.
Disconnect the battery current sensor connector.
Disconnect the VVT sensor for bank 1 intake side connector.
Disconnect the VVT sensor for bank 2 intake side connector.
Disconnect the VVT sensor for bank 1 exhaust side connector.
Disconnect the VVT sensor for bank 2 exhaust side connector.
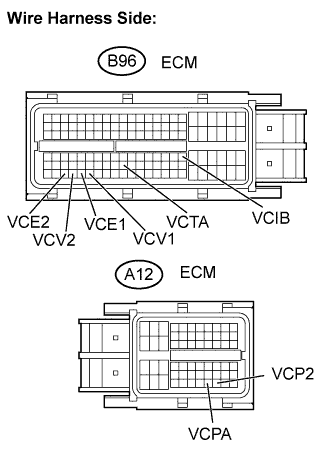 |
Disconnect the ECM connectors.
Measure the resistance.
| Tester Connection | Specified Condition |
| B96-96 (VCTA) - Body ground | 10 kΩ or higher |
| A12-57 (VCPA) - Body ground | 10 kΩ or higher |
| A12-58 (VCP2) - Body ground | 10 kΩ or higher |
| B96-80 (VCIB) - Body ground | 10 kΩ or higher |
| B96-115 (VCV1) - Body ground | 10 kΩ or higher |
| B96-113 (VCV2) - Body ground | 10 kΩ or higher |
| B96-114 (VCE1) - Body ground | 10 kΩ or higher |
| B96-112 (VCE2) - Body ground | 10 kΩ or higher |
Reconnect the throttle body connector.
Reconnect the accelerator pedal position sensor connector.
Reconnect the battery current sensor connector.
Reconnect the VVT sensor connector.
Reconnect the ECM connectors.
|
| ||||
| OK | ||
 | ||
| ||
