TRANSFER ASSEMBLY > REASSEMBLY |
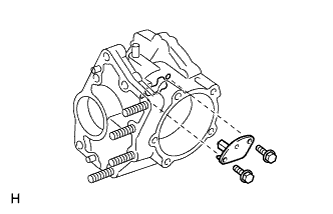
| 1. INSTALL BREATHER OIL DEFLECTOR |
|
Install a new deflector with the 2 bolts.
| 2. INSTALL RING GEAR MOUNTING CASE WASHER |
Install a new washer to the transfer case.
| 3. INSTALL TRANSFER RING GEAR MOUNTING CASE NO. 2 WASHER |
Install a new washer to the cover.
| 4. INSTALL TRANSFER RING GEAR MOUNTING CASE |
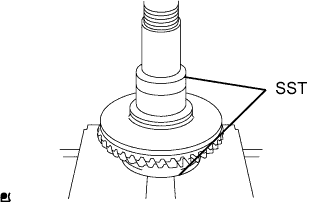 |
Using SST and a press, press in the mounting case to the ring gear.
| 5. INSTALL SHAFT SNAP RING |
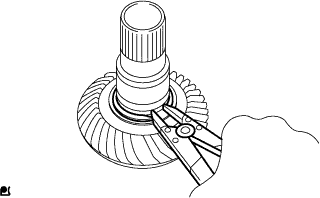 |
Using a snap ring expander, install a new snap ring.
| 6. INSTALL RING GEAR MOUNTING CASE BEARING (for RH Side) |
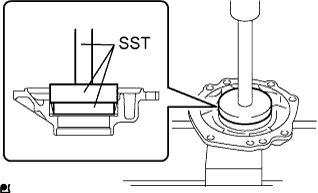 |
Using SST and a press, press in the bearing (race) to the cover.
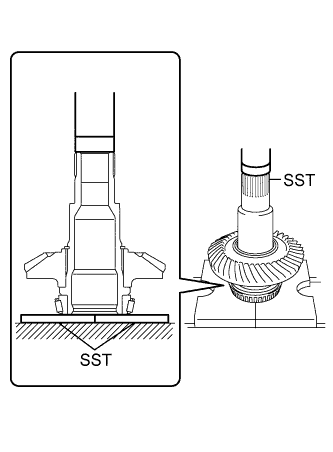 |
Using SST and a press, press in the bearing to the mounting case.
Apply gear oil to the bearing.
| 7. INSTALL RING GEAR MOUNTING CASE BEARING (for LH Side) |
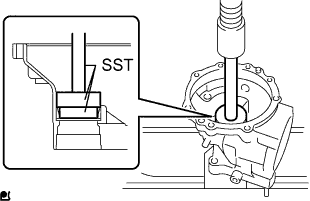 |
Using SST and a press, press in the bearing (race) to the case.
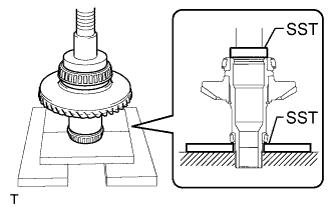 |
Using SST and a press, press in the bearing to the mounting case.
Apply gear oil to the mounting case bearing.
| 8. INSTALL TRANSFER OUTPUT SHAFT WASHER |
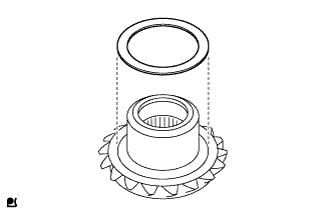 |
Install the washer to the driven pinion.
| 9. INSTALL TRANSFER DRIVEN PINION FRONT BEARING |
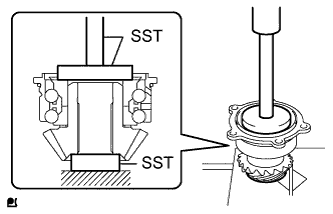 |
Using SST and a press, press in the bearing to the driven pinion.
| 10. INSTALL TRANSFER OUTPUT REAR SHAFT DUST DEFLECTOR |
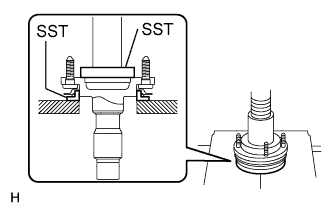 |
Using SST and a press, press in the dust deflector to the output shaft.
| 11. INSTALL TRANSFER DRIVEN PINION |
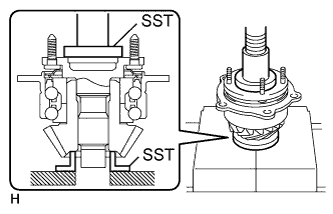 |
Using SST and a press, press in the driven pinion to the output rear shaft.
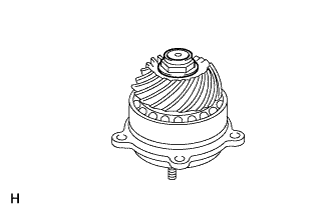 |
Install a new nut to the output shaft.
| 12. INSTALL TRANSFER OUTPUT REAR SHAFT SUB-ASSEMBLY |
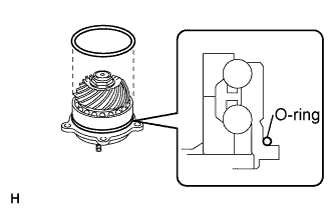 |
Install a new O-ring to the transfer driven pinion front bearing.
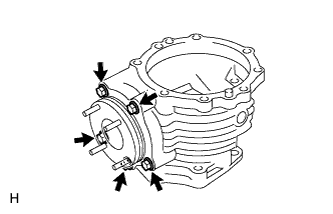 |
Install the transfer output rear shaft to the case with the 5 bolts.
| 13. INSPECT TRANSFER DRIVEN PINION FRONT BEARING PRELOAD |
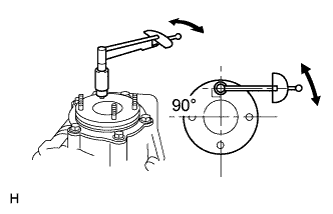 |
Using a torque wrench, measure the preload.
| 14. INSTALL TRANSFER RING GEAR |
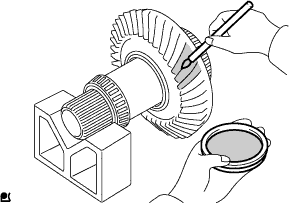 |
Coat 3 or 4 teeth in 4 different positions on the ring gear with Prussian blue.
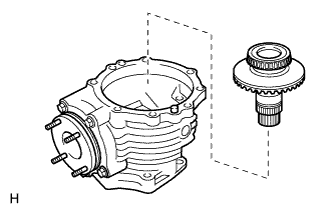 |
Install the mounting case to the transfer case.
| 15. INSTALL NO. 1 TRANSFER CASE COVER |
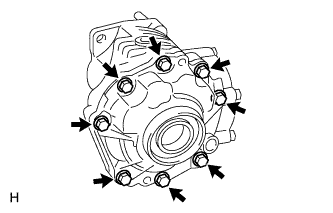 |
Install the No. 1 transfer case cover with the 8 bolts.
| 16. ADJUST RING GEAR BACKLASH |
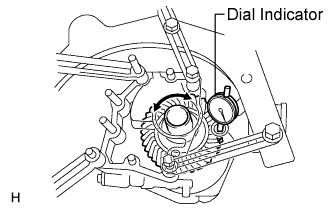 |
Using a dial indicator, measure the backlash of the ring gear at no fewer than 3 positions.
| Mark | Thickness | Mark | Thickness |
| A0 | 1.97 mm (0.0776 in.) | C0 | 2.37 mm (0.0933 in.) |
| A1 | 1.99 mm (0.0783 in.) | C1 | 2.39 mm (0.0941 in.) |
| A2 | 2.01 mm (0.0791 in.) | C2 | 2.41 mm (0.0949 in.) |
| A3 | 2.03 mm (0.0799 in.) | C3 | 2.43 mm (0.0957 in.) |
| A4 | 2.05 mm (0.0807 in.) | C4 | 2.45 mm (0.0965 in.) |
| A5 | 2.07 mm (0.0815 in.) | C5 | 2.47 mm (0.0972 in.) |
| A6 | 2.09 mm (0.0823 in.) | C6 | 2.49 mm (0.0980 in.) |
| A7 | 2.11 mm (0.0831 in.) | C7 | 2.51 mm (0.0988 in.) |
| A8 | 2.13 mm (0.0839 in.) | C8 | 2.53 mm (0.0996 in.) |
| A9 | 2.15 mm (0.0846 in.) | C9 | 2.55 mm (0.1004 in.) |
| B0 | 2.17 mm (0.0854 in.) | D0 | 2.57 mm (0.1012 in.) |
| B1 | 2.19 mm (0.0862 in.) | D1 | 2.59 mm (0.1019 in.) |
| B2 | 2.21 mm (0.0870 in.) | D2 | 2.61 mm (0.1028 in.) |
| B3 | 2.23 mm (0.0878 in.) | D3 | 2.63 mm (0.1035 in.) |
| B4 | 2.25 mm (0.0886 in.) | D4 | 2.65 mm (0.1043 in.) |
| B5 | 2.27 mm (0.0894 in.) | D5 | 2.67 mm (0.1051 in.) |
| B6 | 2.29 mm (0.0902 in.) | D6 | 2.69 mm (0.1059 in.) |
| B7 | 2.31 mm (0.0909 in.) | D7 | 2.71 mm (0.1067 in.) |
| B8 | 2.33 mm (0.0917 in.) | D8 | 2.73 mm (0.1075 in.) |
| B9 | 2.35 mm (0.0925 in.) | D9 | 2.75 mm (0.1083 in.) |
| 17. ADJUST TOTAL PRELOAD |
|
Using a torque wrench, measure the total preload.
| Mark | Thickness | Mark | Thickness |
| A0 | 1.18 mm (0.0465 in.) | C2 | 1.62 mm (0.0638 in.) |
| A1 | 1.20 mm (0.0472 in.) | C3 | 1.64 mm (0.0646 in.) |
| A2 | 1.22 mm (0.0480 in.) | C4 | 1.66 mm (0.0654 in.) |
| A3 | 1.24 mm (0.0488 in.) | C5 | 1.68 mm (0.0661 in.) |
| A4 | 1.26 mm (0.0496 in.) | C6 | 1.70 mm (0.0669 in.) |
| A5 | 1.28 mm (0.0504 in.) | C7 | 1.72 mm (0.0677 in.) |
| A6 | 1.30 mm (0.0512 in.) | C8 | 1.74 mm (0.0685 in.) |
| A7 | 1.32 mm (0.0519 in.) | C9 | 1.76 mm (0.0693 in.) |
| A8 | 1.34 mm (0.0528 in.) | D0 | 1.78 mm (0.0701 in.) |
| A9 | 1.36 mm (0.0535 in.) | D1 | 1.80 mm (0.0709 in.) |
| B0 | 1.38 mm (0.0543 in.) | D2 | 1.82 mm (0.0717 in.) |
| B1 | 1.40 mm (0.0551 in.) | D3 | 1.84 mm (0.0724 in.) |
| B2 | 1.42 mm (0.0559 in.) | D4 | 1.86 mm (0.0732 in.) |
| B3 | 1.44 mm (0.0567 in.) | D5 | 1.88 mm (0.0740 in.) |
| B4 | 1.46 mm (0.0575 in.) | D6 | 1.90 mm (0.0748 in.) |
| B5 | 1.48 mm (0.0583 in.) | D7 | 1.92 mm (0.0756 in.) |
| B6 | 1.50 mm (0.0591 in.) | D8 | 1.94 mm (0.0764 in.) |
| B7 | 1.52 mm (0.0598 in.) | D9 | 1.96 mm (0.0772 in.) |
| B8 | 1.54 mm (0.0606 in.) | E0 | 1.98 mm (0.0780 in.) |
| B9 | 1.56 mm (0.0614 in.) | E1 | 2.00 mm (0.0787 in.) |
| C0 | 1.58 mm (0.0622 in.) | E2 | 2.02 mm (0.0795 in.) |
| C1 | 1.60 mm (0.0629 in.) | - | - |
| 18. INSPECT TOOTH CONTACT BETWEEN RING GEAR AND DRIVE PINION |
Rotate the ring gear several times.
Look through the service filler hole or remove the ring gear to check the tooth contact pattern.
If the teeth are not contacting properly, select a driven pinion bearing front (outer race) side washer from the chart and install the washer.
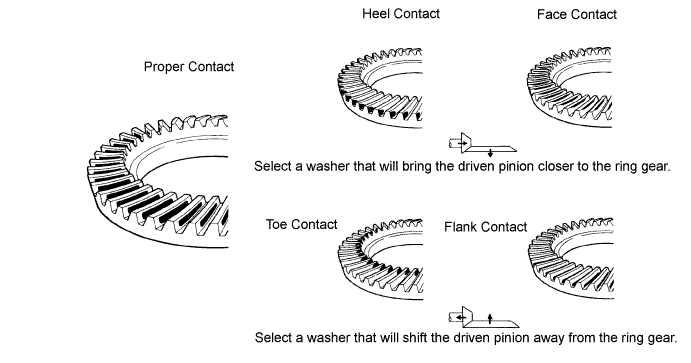
Perform the following procedures for face or flank contact:
Use the backlash adjustment washer (ring gear mounting case washer) to move and adjust the ring gear. (*1)
Perform the ring gear and driven pinion tooth contact inspection again.
Perform the ring gear and driven pinion backlash inspection. If the ring gear and driven pinion backlash is not within the standard range, replace the ring gear and driven pinion with new ones.
Perform the following procedures for heel or toe contact:
Select a transfer driven pinion bearing front (outer race) side washer (transfer output shaft washer) from the chart and install the washer.
| Mark | Thickness | Mark | Thickness |
| 01 | 1.02 mm (0.0402 in.) | 15 | 1.30 mm (0.0512 in.) |
| 02 | 1.04 mm (0.0409 in.) | 16 | 1.32 mm (0.0520 in.) |
| 03 | 1.06 mm (0.0417 in.) | 17 | 1.34 mm (0.0528 in.) |
| 04 | 1.08 mm (0.0425 in.) | 18 | 1.36 mm (0.0535 in.) |
| 05 | 1.10 mm (0.0433 in.) | 19 | 1.38 mm (0.0543 in.) |
| 06 | 1.12 mm (0.0441 in.) | 20 | 1.40 mm (0.0551 in.) |
| 07 | 1.14 mm (0.0449 in.) | 21 | 1.42 mm (0.0559 in.) |
| 08 | 1.16 mm (0.0457 in.) | 22 | 1.44 mm (0.0567 in.) |
| 09 | 1.18 mm (0.0465 in.) | 23 | 1.46 mm (0.0575 in.) |
| 10 | 1.20 mm (0.0472 in.) | 24 | 1.48 mm (0.0583 in.) |
| 11 | 1.22 mm (0.0480 in.) | 25 | 1.50 mm (0.0591 in.) |
| 12 | 1.24 mm (0.0488 in.) | 26 | 1.52 mm (0.0598 in.) |
| 13 | 1.26 mm (0.0496 in.) | 27 | 1.54 mm (0.0606 in.) |
| 14 | 1.28 mm (0.0504 in.) | 28 | 1.56 mm (0.0614 in.) |
| 19. COMPLETELY INSTALL TRANSFER OUTPUT REAR SHAFT SUB-ASSEMBLY |
Using a chisel and a hammer, stake the pinion gear nut.
|
Install the transfer output rear shaft to the case with the 5 bolts.
Install the No. 1 transfer case cover.
Using a non-residue solvent, clean the contact surfaces of the housing and cover.
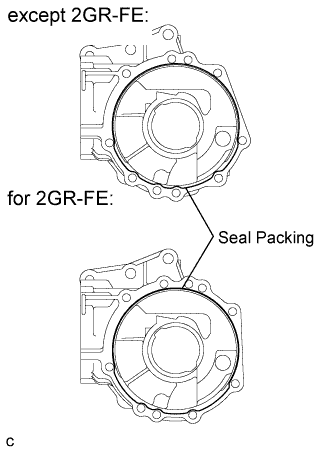 |
Apply seal packing to the cover as shown in the illustration.
|
Install the cover to the case with the 8 bolts.
| 20. INSTALL TRANSFER CASE OIL SEAL LH |
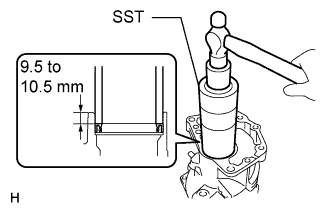 |
Using SST and a hammer, tap in the transfer case oil seal.
Coat a new oil seal lip with MP grease.
| 21. INSTALL TRANSFER CASE OIL SEAL RH |
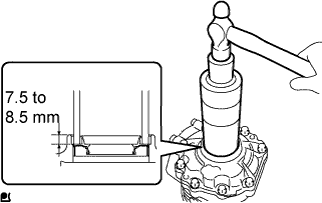 |
Using SST and a hammer, tap in the oil seal.
Coat a new oil seal lip with MP grease.
| 22. INSTALL TRANSFER CASE STRAIGHT PIN |
except K111F:
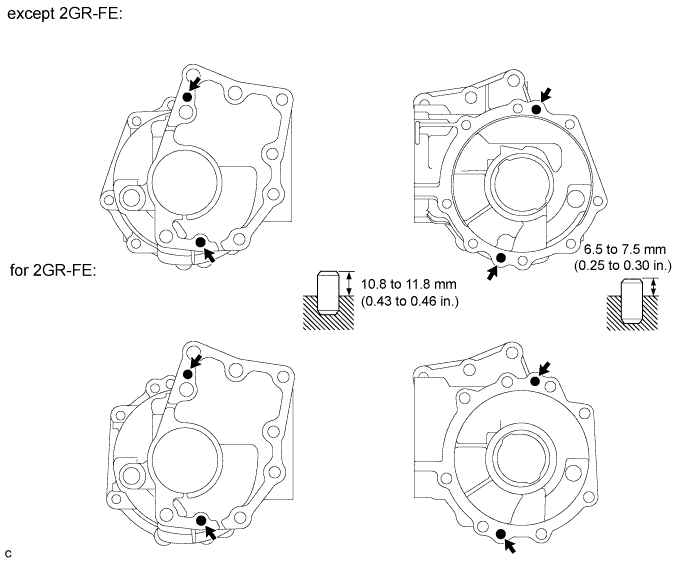
for K111F:
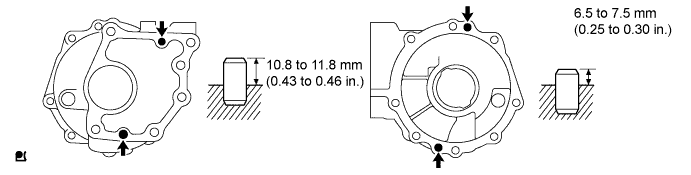
| 23. INSTALL TRANSFER CASE BREATHER PLUG |
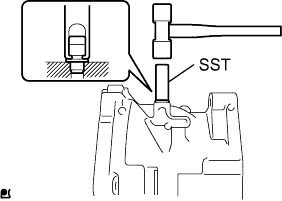 |
Using SST and a hammer, tap in a new breather plug.
| 24. INSTALL TRANSFER DRAIN PLUG |
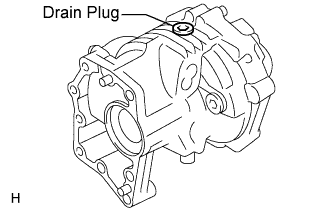 |
Install a new gasket and the plug to the transfer case.
| 25. INSTALL TRANSFER CASE NO. 1 PLUG |
Install a new gasket and the plug to the transfer case.
| 26. INSTALL TRANSFER CASE NO. 2 PLUG |
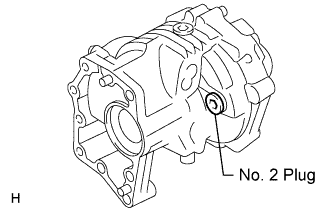 |
Install a new gasket and the plug to the transfer case.
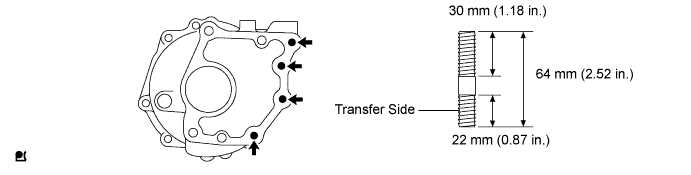
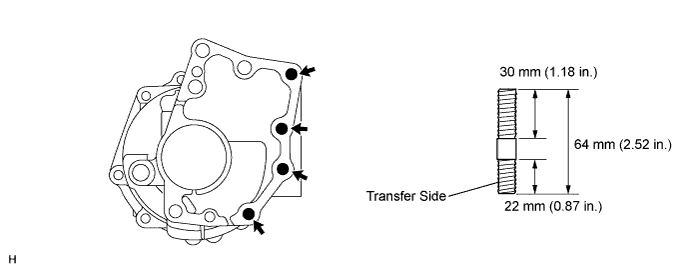
| 27. INSTALL TRANSFER AND TRANSAXLE SETTING STUD BOLT |
Apply sealer to the stud bolts.
except K111F:
for K111F: