 |
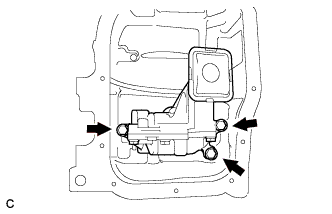
Install the oil pump with the 3 bolts.
- Torque:
- 21 N*m{ 214 kgf*cm , 15 ft.*lbf }
OIL PUMP > INSTALLATION |
| 1. INSTALL OIL PUMP ASSEMBLY |
|
Install the oil pump with the 3 bolts.
| 2. INSTALL NO. 2 OIL PAN SUB-ASSEMBLY |
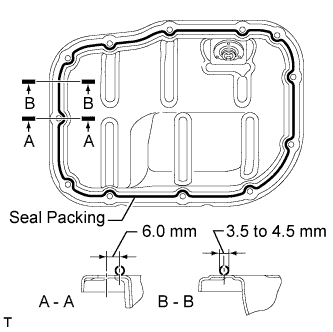 |
Remove any old packing material and be careful not to drop any oil on the contact surfaces of the cylinder block and oil pan.
Apply seal packing in a continuous line as shown in the illustration.
| Area | Seal Packing Diameter | Distance from Center of Bolt Hole to Center of Seal Packing |
| A - A | 3.0 to 4.5 mm (0.118 to 0.177 in.) | 6.0 mm (0.236 in.) |
| B - B | - |
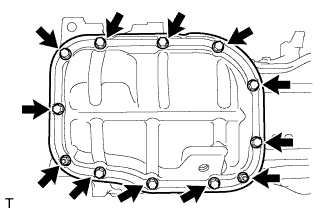 |
Install the No. 2 oil pan with the 10 bolts and 2 nuts.
| 3. INSTALL NO. 2 CHAIN SUB-ASSEMBLY |
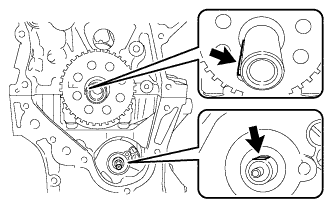 |
Temporarily install the crankshaft pulley bolt.
Set the crankshaft key as shown in the illustration.
Turn the drive shaft so that the cutout faces upward.
Remove the crankshaft pulley bolt.
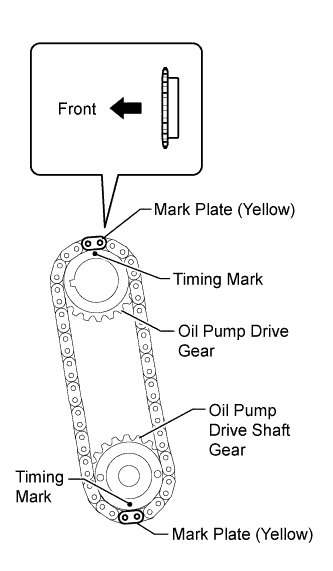 |
Align the yellow mark plates with the timing mark of each gear as shown in the illustration.
Install the gears onto the crankshaft and oil pump shaft with the chain on the gears.
Temporarily install the oil pump drive shaft gear with the nut.
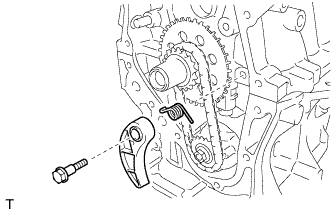 |
Install the spring to the chain tensioner plate, and then install the chain tensioner plate with the bolt.
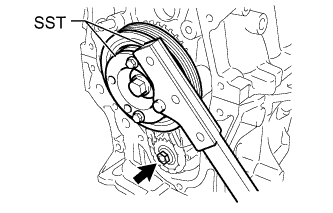 |
Temporarily install the crankshaft pulley with the pulley bolt.
Using SST, hold the crankshaft. Then tighten the drive shaft gear nut.
Remove SST, the crankshaft pulley bolt and crankshaft pulley.
| 4. INSTALL CRANKSHAFT TIMING SPROCKET |
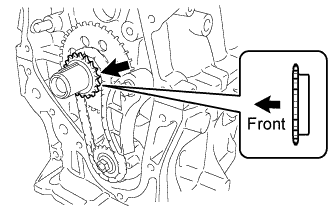 |
Install the crankshaft timing sprocket as shown in the illustration.
| 5. INSTALL NO. 1 CHAIN VIBRATION DAMPER |
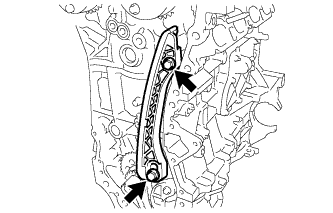 |
Install the chain vibration damper with the 2 bolts.
| 6. SET NO. 1 CYLINDER TO TDC/COMPRESSION |
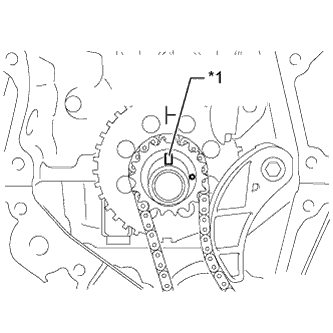 |
Temporarily install the crankshaft pulley bolt.
Turn the crankshaft counterclockwise to position the timing gear key at the top.
| *1 | Timing Gear Key |
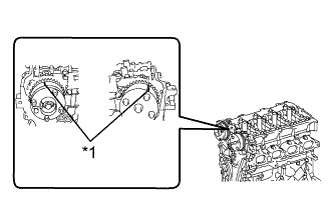 |
Check that the timing marks on the camshaft timing gears are aligned as shown in the illustration.
| *1 | Timing Mark |
Remove the crankshaft pulley bolt.
| 7. INSTALL CHAIN SUB-ASSEMBLY |
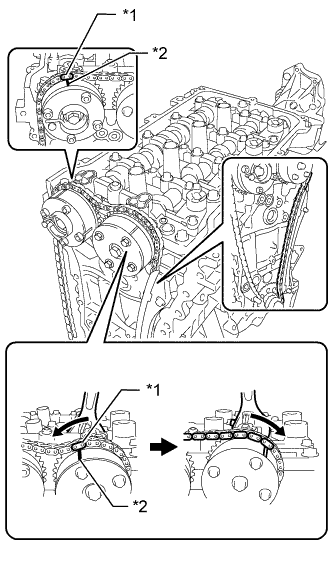 |
Align the mark plate (orange) with the timing mark as shown in the illustration and install the chain.
| *1 | Mark Plate (Orange) |
| *2 | Timing Mark |
Hold the hexagonal portion of the camshaft with a wrench and turn the camshaft timing gear counterclockwise to align the mark plate (orange) and timing mark, and then install the chain.
Hold the hexagonal portion of the camshaft with a wrench and turn the camshaft timing gear clockwise.
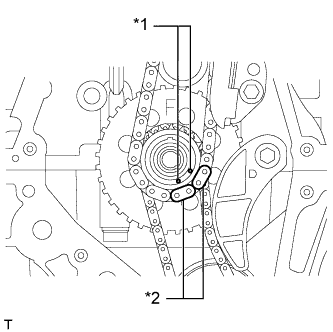 |
Align the mark plates (yellow) and timing marks and install the chain to the crankshaft timing gear.
| *1 | Timing Mark |
| *2 | Mark Plate (Yellow) |
| 8. INSTALL CHAIN TENSIONER SLIPPER |
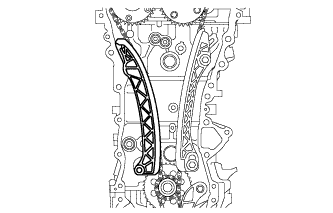 |
Install the chain tensioner slipper to the cylinder block.
| 9. CHECK NO. 1 CYLINDER TO TDC/COMPRESSION |
Check each timing mark at TDC/compression.
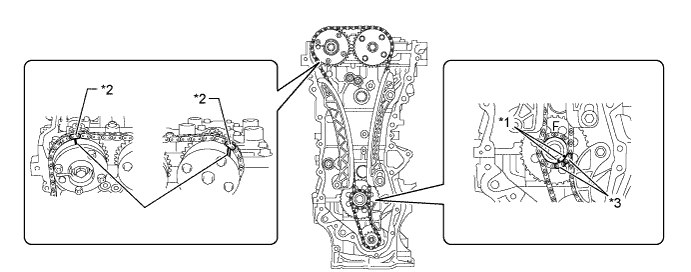
| *1 | Timing Mark | *2 | Mark Plate (Orange) |
| *3 | Mark Plate (Yellow) | - |
| 10. INSTALL TIMING CHAIN COVER SUB-ASSEMBLY |
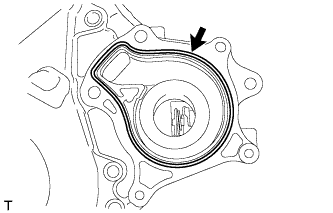 |
Install a new gasket.
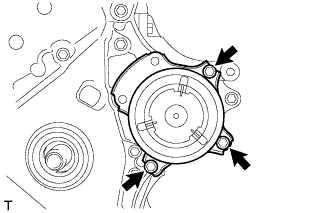 |
for Type A:
Install the water pump with the 3 bolts.
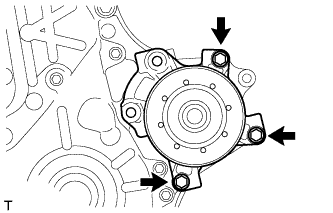 |
for Type B:
Install the water pump with the 3 bolts.
Remove any old packing (FIPG) material and be careful not to drop any oil on the contact surfaces of the timing chain cover, cylinder head, camshaft housing, stiffening crankcase and cylinder block.
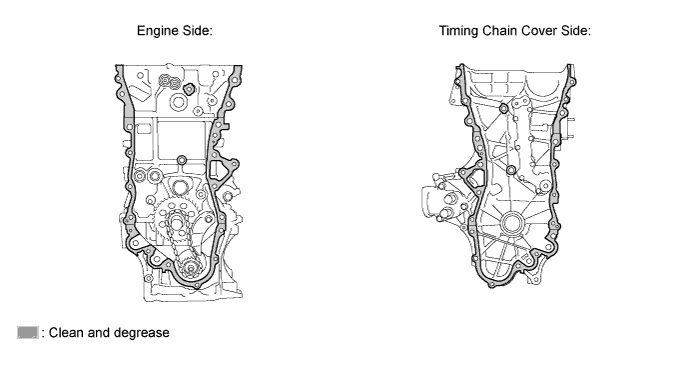
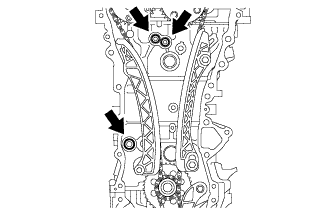 |
Install 3 new O-rings.
Apply seal packing as shown in the illustration.
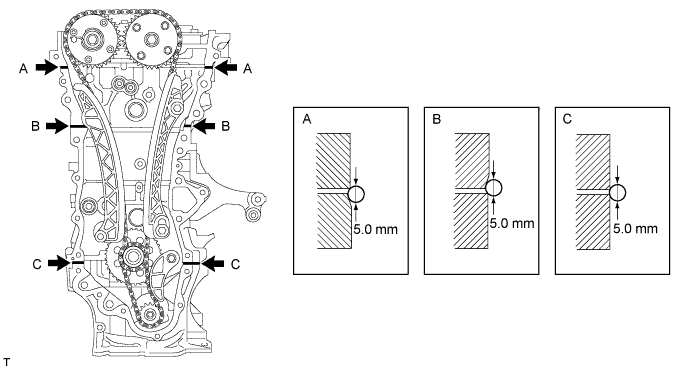
Apply seal packing to the timing chain cover in a continuous line as shown in the following illustration.
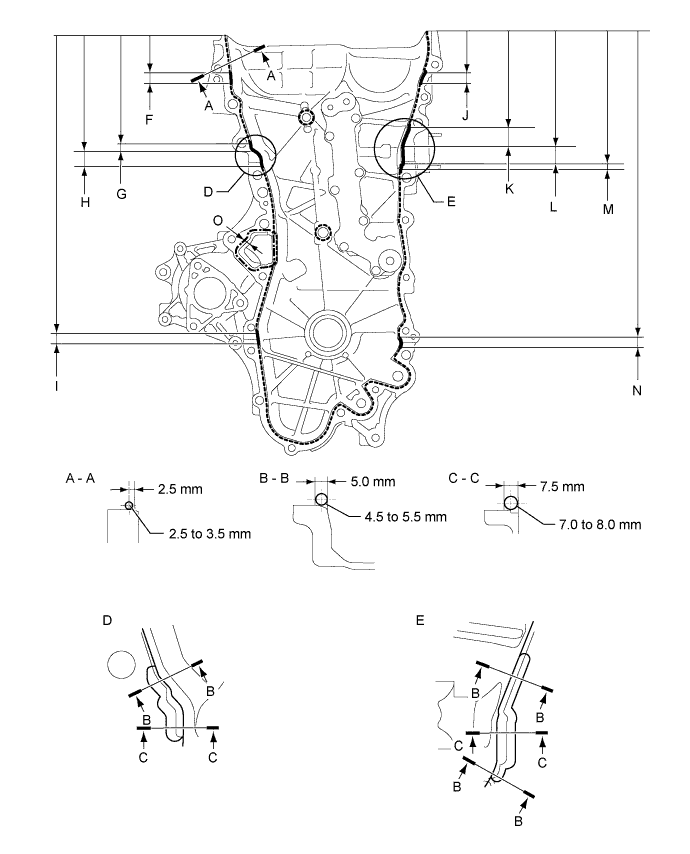
| Item | Seal Packing |
| Dashed line | Toyota Genuine Seal Packing Black, Three Bond 1207B or equivalent |
| Continuous line | |
| Alternate long and short dashed line | Toyota Genuine Seal Packing 1282B, Three Bond 1282B or equivalent |
| Area | Seal Packing Diameter | Distance from Edge of Cover to: | Seal Packing Application Length | Distance from Top of Cover to Top of Seal Packing |
| Dashed line | 2.5 to 3.0 mm (0.0984 to 0.118 in.) | Center of seal packing 2.5 mm (0.0984 in.) | - | - |
| Continuous line | 4.5 to 5.5 mm (0.177 to 0.217 in.) or 7.0 to 8.0 mm (0.276 to 0.315 in.) | - | - | - |
| Alternate long and short dashed line | 4.0 mm (0.157 in.) | Center of seal packing 3.0 mm (0.118 in.) | - | - |
| A - A | 2.5 to 3.0 mm (0.0984 to 0.118 in.) | Center of seal packing 2.5 mm (0.0984 in.) | - | - |
| B - B | 4.5 to 5.5 mm (0.177 to 0.217 in.) | Opposite edge of seal packing 5.0 mm (0.197 in.) | - | - |
| C - C | 7.0 to 8.0 mm (0.276 to 0.315 in.) | Opposite edge of seal packing 7.5 mm (0.295 in.) | - | - |
| F | 4.5 to 5.5 mm (0.177 to 0.217 in.) | - | 15.8 mm (0.622 in.) | 50.1 mm (1.97 in.) |
| G | 4.5 to 5.5 mm (0.177 to 0.217 in.) | - | 10.3 mm (0.406 in.) | 155.1 mm (6.11 in.) |
| H | 7.0 to 8.0 mm (0.276 to 0.315 in.) | - | 19.5 mm (0.768 in.) | 165.4 mm (6.51 in.) |
| I | 4.5 to 5.5 mm (0.177 to 0.217 in.) | - | 14.6 mm (0.575 in.) | 397.8 mm (1.31 ft.) |
| J | 4.5 to 5.5 mm (0.177 to 0.217 in.) | - | 18.6 mm (0.732 in.) | 51.4 mm (2.02 in.) |
| K | 4.5 to 5.5 mm (0.177 to 0.217 in.) | - | 25.3 mm (0.996 in.) | 133.9 mm (5.27 in.) |
| L | 7.0 to 8.0 mm (0.276 to 0.315 in.) | - | 25.8 mm (1.02 in.) | 159.2 mm (6.28 in.) |
| M | 4.5 to 5.5 mm (0.177 to 0.217 in.) | - | 5.0 mm (0.197 in.) | 185.0 mm (7.28 in.) |
| N | 4.5 to 5.5 mm (0.177 to 0.217 in.) | - | 14.6 mm (0.575 in.) | 397.8 mm (1.31 ft.) |
| O | 4.0 mm (0.157 in.) | Center of seal packing 3.0 mm (0.118 in.) | - | - |
Clean the bolts and their installation holes.
Install the timing chain cover.
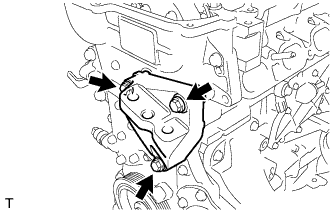 |
Temporarily install the engine mounting bracket with the 3 bolts.
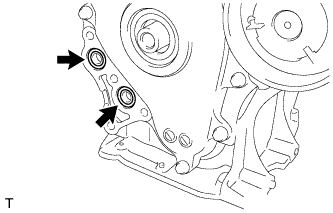 |
Install 2 new O-rings.
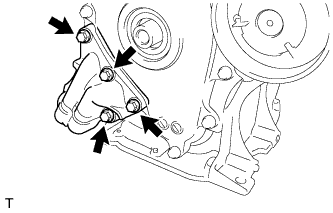 |
Temporarily install the oil filter bracket with the 4 bolts.
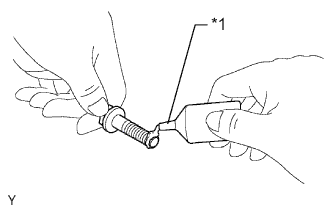 |
Apply adhesive to 5 and a half threads or more of the end of bolt E.
| *1 | Adhesive |
Install the timing chain cover with the 26 bolts and new seal washer in the order shown in the illustration.
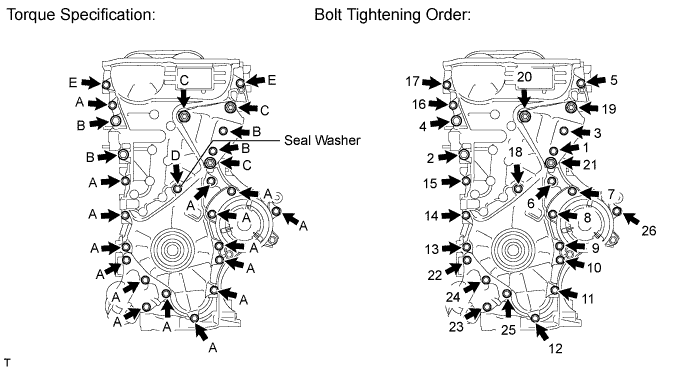
| Item | Length | Thread Diameter |
| Bolt A, E | 35 mm (1.38 in.) | 8 mm (0.315 in.) |
| Bolt B | 55 mm (2.17 in.) | 10 mm (0.394 in.) |
| Bolt C | 80 mm (3.15 in.) | 10 mm (0.394 in.) |
| Bolt D | 40 mm (1.57 in.) | 6 mm (0.236 in.) |
| 11. INSTALL TIMING CHAIN COVER OIL SEAL |
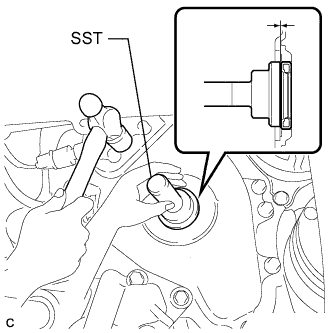 |
Apply MP grease to the lip of a new oil seal.
Using SST and a hammer, tap in the oil seal until its surface is flush with the timing chain cover edge.
| 12. INSTALL CRANKSHAFT PULLEY |
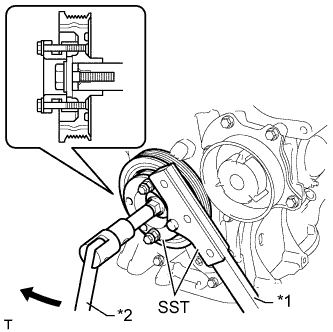 |
Align the key groove of the pulley with the pulley set key.
Temporarily install the pulley with the pulley bolt.
Using SST, hold the pulley in place and tighten the pulley bolt.
| *1 | Hold |
| *2 | Turn |
| 13. INSTALL NO. 1 CHAIN TENSIONER ASSEMBLY |
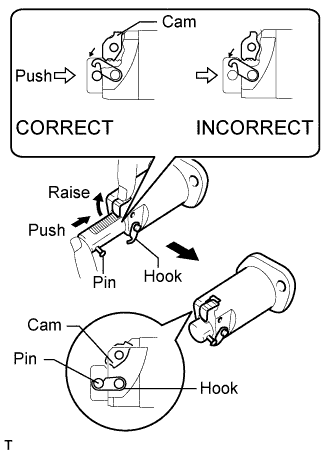 |
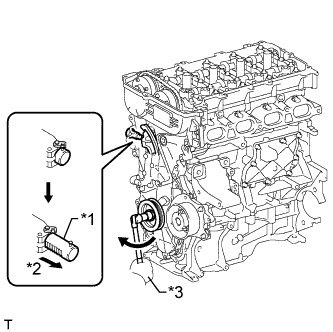
Release the cam, and then fully push in the plunger and engage the hook to the pin so that the plunger is in the position shown in the illustration.
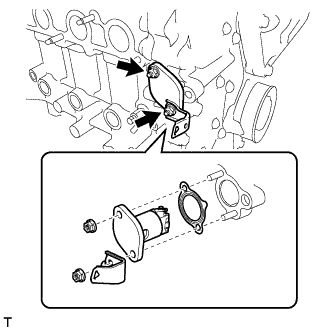 |
Install a new gasket, the chain tensioner and bracket with the 2 nuts.
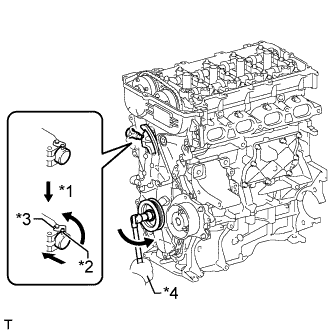 |
Rotate the crankshaft counterclockwise slightly and check that the hook becomes released.
| *1 | Release |
| *2 | Pin |
| *3 | Hook |
| *4 | Turn |
 |
Turn the crankshaft clockwise and check that the plunger is extended.
| *1 | Plunger |
| *2 | Plunger Extended |
| *3 | Turn |
| 14. INSTALL SPARK PLUG TUBE GASKET |
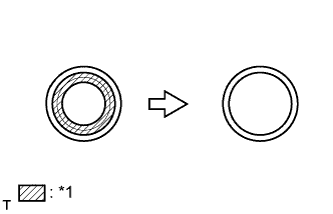 |
Using a cutter knife, cut off the seal part of the removed gasket.
| *1 | Part to Cut Off |
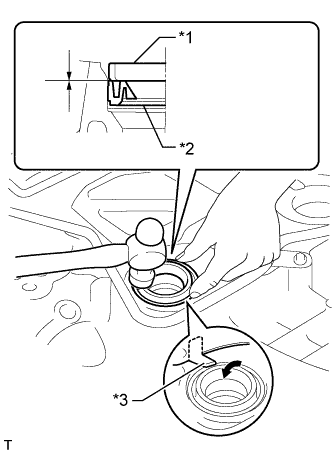 |
Using a hammer and a plug tube gasket which has had the sealing part cut off, uniformly tap in a new plug tube gasket all the way.
| *1 | Plug Tube Gasket without Sealing Part |
| *2 | New Plug Tube Gasket |
| *3 | Claw |
Return the claws of the ventilation baffle plate to their original positions.
| 15. INSTALL CYLINDER HEAD COVER GASKET |
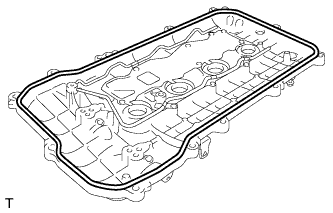 |
Install a new cylinder head cover gasket to the cylinder head cover.
| 16. INSTALL CYLINDER HEAD COVER SUB-ASSEMBLY |
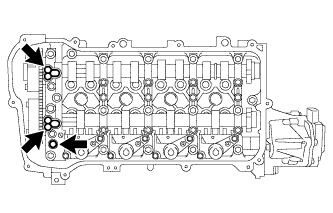 |
Install 3 new gaskets to the camshaft bearing cap.
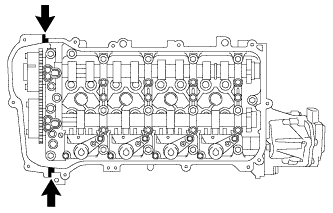 |
Apply seal packing as shown in the illustration.
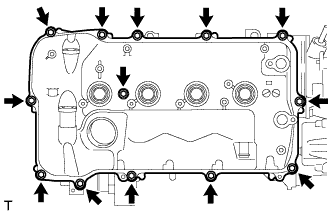 |
Install the cylinder head cover with a new seal washer and the 13 bolts.
| 17. INSTALL RADIO SETTING CONDENSER |
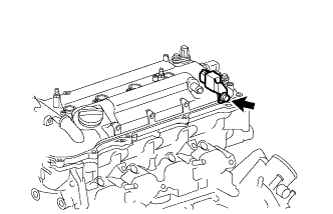 |
Install the setting condenser with the bolt.
| 18. INSTALL IGNITION COIL ASSEMBLY |
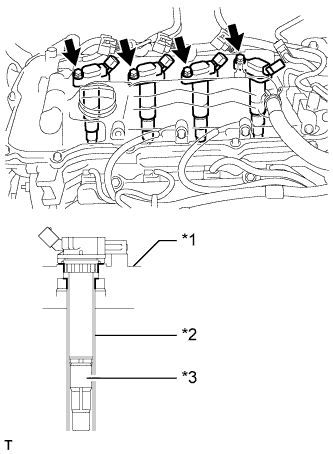 |
Install the 4 ignition coils with the 4 bolts.
| *1 | Cylinder Head Cover |
| *2 | Spark Plug Tube |
| *3 | Plug Cap |
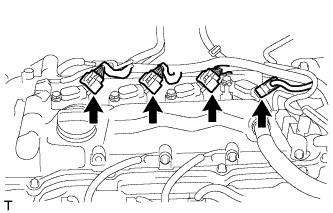 |
Connect the 4 ignition coil connectors.
| 19. INSTALL THERMOSTAT |
Install a new gasket on the thermostat.
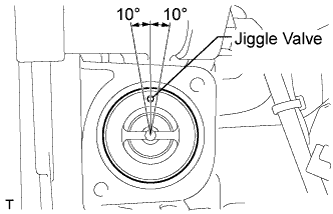 |
Install the thermostat to the water inlet housing.
| 20. INSTALL WATER INLET |
Install the water inlet with the 2 nuts.
| 21. CONNECT WATER INLET HOSE |
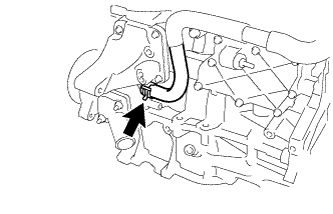 |
Connect the water inlet hose to the water inlet housing.
| 22. CONNECT NO. 3 WATER BY-PASS HOSE |
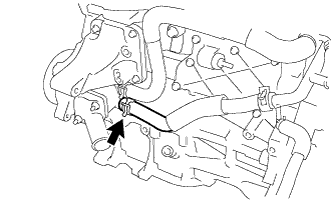 |
Connect the No. 3 water by-pass hose to the water inlet housing.
| 23. INSTALL ENGINE OIL LEVEL DIPSTICK GUIDE |
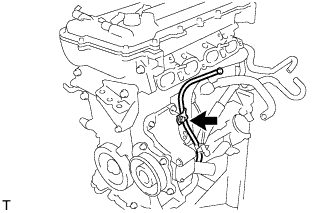 |
Apply a light coat of engine oil to a new O-ring.
Install the O-ring to the dipstick guide.
Install the dipstick guide with the bolt.
Install the engine oil level dipstick.
| 24. INSTALL ENGINE ASSEMBLY WITH TRANSAXLE |
Install the engine assembly with transaxle (Click here).