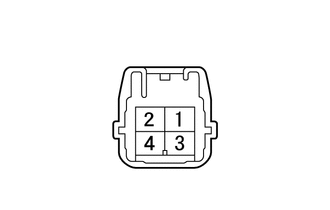
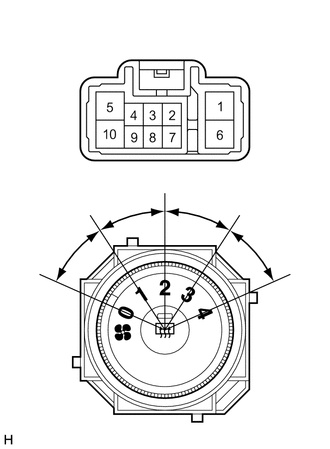
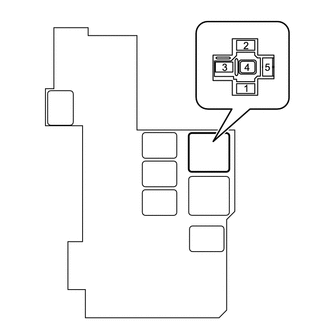
Home › Vehicle Interior › HEATING / AIR CONDITIONING › AIR CONDITIONING SYSTEM(for Manual Air Conditioning System)
RM30B0U _58 Vehicle Interior _009988 HEATING / AIR CONDITIONING _0054779 AIR CONDITIONING SYSTEM(for Manual Air Conditioning System) J

HEATING / AIR CONDITIONING  AIR CONDITIONING SYSTEM(for Manual Air Conditioning System)  Blower Motor Circuit  


DESCRIPTION

When the No. 2 heater control sub-assembly is operated, the heater relay will turn on to allow current to flow to the blower motor and then the motor will start rotating. Operating the No. 2 heater control sub-assembly switches the current flow between the blower resistor and body ground, thus, shifting the rotation speed of the blower motor with fan sub-assembly.

WIRING DIAGRAM
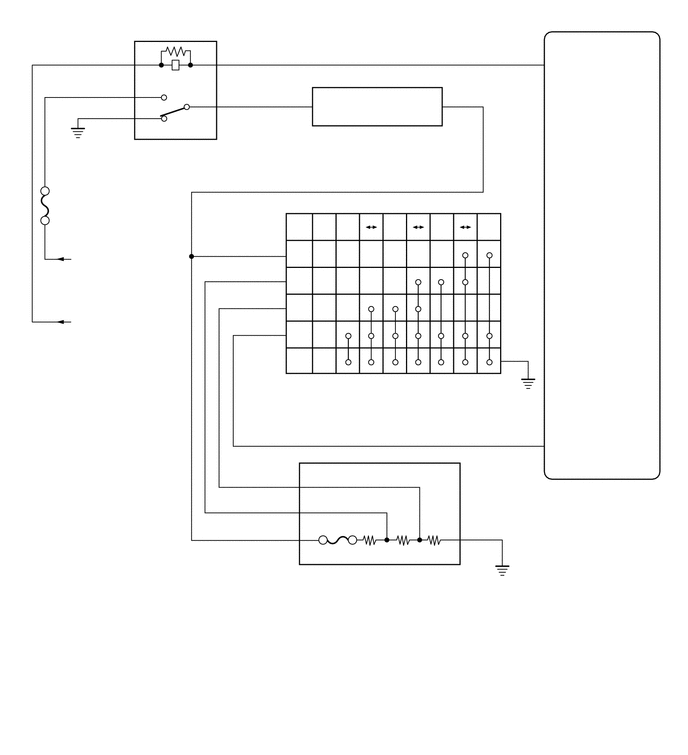
E269928
5.708,5.052 6.167,5.25 0.458,0.198 10 G80 5.708,5.198 7.083,5.656 1.375,0.458 10 Air Conditioning Amplifier Assembly 2.99,3.948 3.448,4.146 0.458,0.198 10 G21 3,4.104 5.281,4.438 2.281,0.333 10 No. 2 Heater Control Sub-assembly 2.833,3.302 3.479,3.49 0.646,0.188 10 4 2.833,3.021 3.396,3.219 0.563,0.198 10 9 2.781,2.75 3,2.927 0.219,0.177 10 10 2.833,2.49 2.979,2.667 0.146,0.177 10 6 2.677,1.396 3.135,1.594 0.458,0.198 10 G55 2.677,1.542 5.042,1.74 2.365,0.198 10 Blower Motor with Fan Sub-assembly 1.667,1.479 2.052,1.74 0.385,0.26 10 HTR 3.104,0.927 3.271,1.094 0.167,0.167 10 2 4.635,0.927 4.802,1.094 0.167,0.167 10 1 2.302,0.927 2.469,1.094 0.167,0.167 10 3 2.302,0.49 2.469,0.656 0.167,0.167 10 2 1.26,0.5 1.427,0.667 0.167,0.167 10 1 1.26,0.823 1.427,0.99 0.167,0.167 10 5 1.26,1.052 1.427,1.219 0.167,0.167 10 4 0.781,2.604 1.896,2.885 1.115,0.281 10 from Battery 0.781,3.25 1.958,3.625 1.177,0.375 10 from ECU-IG NO.3 Fuse 3,4.896 3.208,5.146 0.208,0.25 10 2 3,5.156 3.208,5.344 0.208,0.188 10 3 3,5.448 3.229,5.667 0.229,0.219 10 1 3.146,4.896 3.688,5.073 0.542,0.177 10 M1 3.146,5.156 3.688,5.333 0.542,0.177 10 M2 3.156,5.448 3.698,5.625 0.542,0.177 10 HI 5.26,3.583 5.479,3.76 0.219,0.177 10 5 4.844,5.438 5.021,5.729 0.177,0.292 10 4 4.667,5.438 4.802,5.615 0.135,0.177 10 E 3.354,5.938 3.813,6.135 0.458,0.198 10 G56 3.365,6.104 5.042,6.323 1.677,0.219 10 Blower Resistor 3.323,2.281 3.469,2.458 0.146,0.177 10 0 3.583,2.292 3.729,2.469 0.146,0.177 10 1 4.073,2.292 4.219,2.469 0.146,0.177 10 2 4.563,2.281 4.708,2.458 0.146,0.177 10 3 5.063,2.281 5.208,2.458 0.146,0.177 10 4 3.052,2.563 3.24,2.75 0.188,0.188 10 HI 3.021,2.844 3.385,3.021 0.365,0.177 10 M2 3.021,3.125 3.323,3.302 0.302,0.177 10 M1 3.031,3.406 3.26,3.583 0.229,0.177 10 LO 3.063,3.677 3.292,3.854 0.229,0.177 10 E 5.448,0.5 5.688,0.688 0.24,0.188 10 14 5.708,0.583 6.083,0.771 0.375,0.188 10 HR 5.719,4.552 6.438,4.74 0.719,0.188 10 SBLW 5.438,4.458 5.677,4.646 0.24,0.188 10 17 0.552,2.063 1.667,2.344 1.115,0.281 10 HTR

CAUTION / NOTICE / HINT

NOTICE:

Inspect the fuses for circuits related to this system before performing the following procedure.


PROCEDURE
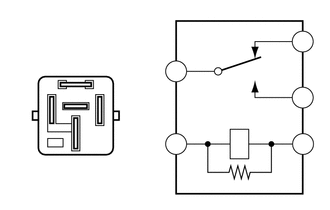
1.INSPECT HTR RELAY
a.
E269958
0.771,0.885 0.781,0.448 0.781,0.448 0.865,0.448 true 0.521,1.167 0.385,0.802 0.385,0.802 0.26,0.802 true 0.781,1.479 0.833,1.823 0.833,1.823 0.958,1.823 true 0.865,1.104 1.125,1.604 1.125,1.604 1.25,1.604 true 1.042,1.104 1.302,1.146 1.302,1.146 1.427,1.146 true 3.115,1.417 3.271,1.615 0.156,0.198 10 false 1 1.802,0.656 1.958,0.854 0.156,0.198 10 false 3 1.792,1.417 1.948,1.615 0.156,0.198 10 false 2 3.115,0.938 3.271,1.135 0.156,0.198 10 false 5 1.302,1.531 1.458,1.729 0.156,0.198 10 false 4 0.156,0.719 0.313,0.917 0.156,0.198 10 false 1 1.458,1.063 1.615,1.26 0.156,0.198 10 false 2 1,1.74 1.156,1.938 0.156,0.198 10 false 3 0.927,0.365 1.083,0.563 0.156,0.198 10 false 5 3.115,0.344 3.271,0.542 0.156,0.198 10 false 4

Remove the HTR relay from No. 2 engine room relay block.


b.

Measure the resistance according to the value(s) in the table below.

Standard Resistance:
Tester Connection Condition Specified Condition
3 - 5 Battery voltage is not applied between terminals 1 and 2 10 kΩ or higher
3 - 4 Battery voltage is applied between terminals 1 and 2 10 kΩ or higher
3 - 5 Battery voltage is applied between terminals 1 and 2 Below 1 Ω
3 - 4 Battery voltage is not applied between terminals 1 and 2 Below 1 Ω


Result:
Proceed to
OK
NG


OK

2.INSPECT BLOWER MOTOR WITH FAN SUB-ASSEMBLY

NG

REPLACE HTR RELAY

2.INSPECT BLOWER MOTOR WITH FAN SUB-ASSEMBLY
a.

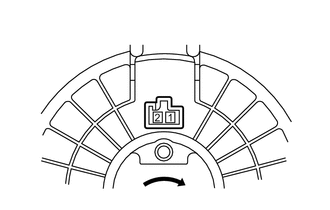
Disconnect the G55 blower motor with fan sub-assembly connector.

b.
E271251

Connect a positive (+) lead from the battery to terminal 2 and negative (-) to terminal 1, and check that the motor operates.

OK:

The blower motor with fan sub-assembly operates smoothly.


Result:
Proceed to
OK
NG


OK

3.INSPECT BLOWER RESISTOR

NG

REPLACE BLOWER MOTOR WITH FAN SUB-ASSEMBLY

3.INSPECT BLOWER RESISTOR
a.
E145426
1.979,1.167 2.427,0.896 true 1.479,1.177 1.01,0.885 true 1.979,1.552 2.448,1.781 true 1.469,1.552 1,1.76 true 2.479,0.792 2.823,1.042 0.344,0.25 10 HI 0.781,0.802 1.198,1.063 0.417,0.26 10 M1 2.49,1.74 2.938,2.031 0.448,0.292 10 M2 0.865,1.719 1.156,1.958 0.292,0.24 10 E

Remove the blower resistor.

Click hereVehicle Interior>HEATING / AIR CONDITIONING>BLOWER RESISTOR>REMOVAL


b.

Measure the resistance according to the value(s) in the table below.

Standard Resistance:
Tester Connection Condition Specified Condition
4 (E) - 1 (HI) Always 3.12 to 3.60 Ω
2 (M1) - 1 (HI) Always 1.45 to 1.67 Ω
3 (M2) - 1 (HI) Always 0.52 to 0.60 Ω


Result:
Proceed to
OK
NG


OK

4.INSPECT NO. 2 HEATER CONTROL SUB-ASSEMBLY

NG

4.INSPECT NO. 2 HEATER CONTROL SUB-ASSEMBLY
a.
E261701
1.135,1.01 0.833,0.677 true 0.656,1.385 1.042,1.385 true 1.031,0.375 1.177,0.375 1.177,0.375 1.385,1.104 true 2.635,1.771 2.49,1.771 2.49,1.771 2.354,1.49 true 1.104,1.76 1.26,1.76 1.26,1.76 1.396,1.49 true 0.677,0.583 0.833,0.781 0.156,0.198 10 E 2.677,1.698 2.948,1.896 0.271,0.198 10 HI 0.823,0.292 1.208,0.469 0.385,0.177 10 LO 0.396,1.302 0.667,1.5 0.271,0.198 10 M2 0.219,2.75 0.531,2.948 0.313,0.198 10 *1 0.802,2.073 1.115,2.271 0.313,0.198 10 *2 1.667,1.854 1.979,2.052 0.313,0.198 10 *3 2.51,2.063 2.823,2.26 0.313,0.198 10 *4 3.104,2.771 3.344,2.969 0.24,0.198 10 *5 0.885,1.688 1.292,1.885 0.406,0.198 10 M1
*1 Blower Switch OFF Position
*2 Blower Switch LO Position
*3 Blower Switch M1 Position
*4 Blower Switch M2 Position
*5 Blower Switch HI Position


Remove the No. 2 heater control sub-assembly.

Click hereVehicle Interior>HEATING / AIR CONDITIONING>AIR CONDITIONING PANEL(for Manual Air Conditioning System)>DISASSEMBLY


b.

Measure the resistance according to the value(s) in the table below.

Standard Resistance:
Tester Connection Switch Condition Specified Condition
4 (LO), 6 (HI), 9 (M1), 10 (M2) - 5 (E) Blower switch off 10 kΩ or higher
4 (LO) - 5 (E) Blower switch LO Below 1 Ω
4 (LO), 9 (M1) - 5 (E) Blower switch LO to M1 Below 1 Ω
4 (LO), 9 (M1) - 5 (E) Blower switch M1 Below 1 Ω
4 (LO), 9 (M1), 10 (M2) - 5 (E) Blower switch M1 to M2 Below 1 Ω
4 (LO), 10 (M2) - 5 (E) Blower switch M2 Below 1 Ω
4 (LO), 10 (M2), 6 (HI) - 5 (E) Blower switch M2 to HI Below 1 Ω
4 (LO), 6 (HI) - 5 (E) Blower switch HI Below 1 Ω


Result:
Proceed to
OK
NG


OK

5.CHECK HARNESS AND CONNECTOR (HTR RELAY - BATTERY AND BODY GROUND)

NG

5.CHECK HARNESS AND CONNECTOR (HTR RELAY - BATTERY AND BODY GROUND)
a.
E271252
0.083,0.063 0.396,0.219 0.313,0.156 10 *1 2.115,1.5 2.427,1.656 0.313,0.156 10 *2
*1 No. 1 Engine Room Relay Block
*2 HTR relay


Remove the HTR relay from the No. 1 engine room relay block.


b.

Measure the voltage according to the value(s) in the table below.

Standard Voltage:
Tester Connection Condition Specified Condition
HTR relay terminal 1 - Body ground Ignition switch ON 11 to 14 V
HTR relay terminal 5 - Body ground Always 11 to 14 V


c.

Measure the resistance according to the value(s) in the table below.

Standard Resistance:
Tester Connection Condition Specified Condition
HTR relay terminal 4 - Body ground Always Below 1 Ω


Result:
Proceed to
OK
NG


OK

6.CHECK HARNESS AND CONNECTOR (HTR RELAY - AIR CONDITIONING AMPLIFIER ASSEMBLY)

NG

REPAIR OR REPLACE HARNESS OR CONNECTOR

6.CHECK HARNESS AND CONNECTOR (HTR RELAY - AIR CONDITIONING AMPLIFIER ASSEMBLY)
a.

Remove the HTR relay from the No. 1 engine room relay block.


b.

Disconnect the G80 air conditioning amplifier assembly connector.


c.

Measure the resistance according to the value(s) in the table below.

Standard Resistance:
Tester Connection Condition Specified Condition
HTR relay terminal 2 - G80-14 (HR) Always Below 1 Ω
HTR relay terminal 2 - Body ground Always 10 kΩ or higher


Result:
Proceed to
OK
NG


OK

7.CHECK HARNESS AND CONNECTOR (AIR CONDITIONING AMPLIFIER ASSEMBLY - NO. 2 HEATER CONTROL SUB-ASSEMBLY)

NG

REPAIR OR REPLACE HARNESS OR CONNECTOR

7.CHECK HARNESS AND CONNECTOR (AIR CONDITIONING AMPLIFIER ASSEMBLY - NO. 2 HEATER CONTROL SUB-ASSEMBLY)
a.

Disconnect the G80 air conditioning amplifier assembly connector.


b.

Disconnect the G21 No. 2 heater control sub-assembly connector.


c.

Measure the resistance according to the value(s) in the table below.

Standard Resistance:
Tester Connection Condition Specified Condition
G80-17 (SBLW) - G21-4 (LO) Always Below 1 Ω
G80-17 (SBLW) - Body ground Always 10 kΩ or higher


Result:
Proceed to
OK
NG


OK

8.CHECK HARNESS AND CONNECTOR (BLOWER RESISTOR - NO. 2 HEATER CONTROL SUB-ASSEMBLY AND BODY GROUND)

NG

REPAIR OR REPLACE HARNESS OR CONNECTOR

8.CHECK HARNESS AND CONNECTOR (BLOWER RESISTOR - NO. 2 HEATER CONTROL SUB-ASSEMBLY AND BODY GROUND)
a.

Disconnect the G56 blower resistor connector.


b.

Disconnect the G21 No. 2 heater control sub-assembly connector.


c.

Measure the resistance according to the value(s) in the table below.

Standard Resistance:
Tester Connection Condition Specified Condition
G56-1 (HI) - G21-6 (HI) Always Below 1 Ω
G56-3 (M2) - G21-10 (M2) Always Below 1 Ω
G56-2 (M1) - G21-9 (M1) Always Below 1 Ω
G56-4 (E) - Body ground Always Below 1 Ω
G21-5 (E) - Body ground Always Below 1 Ω
G56-1 (HI) - Body ground Always 10 kΩ or higher
G56-3 (M2) - Body ground Always 10 kΩ or higher
G56-2 (M1) - Body ground Always 10 kΩ or higher


Result:
Proceed to
OK
NG


OK

9.CHECK HARNESS AND CONNECTOR (BLOWER MOTOR WITH FAN SUB-ASSEMBLY - NO. 2 HEATER CONTROL SUB-ASSEMBLY)

NG

REPAIR OR REPLACE HARNESS OR CONNECTOR

9.CHECK HARNESS AND CONNECTOR (BLOWER MOTOR WITH FAN SUB-ASSEMBLY - NO. 2 HEATER CONTROL SUB-ASSEMBLY)
a.

Disconnect the G55 blower motor with fan sub-assembly connector.


b.

Disconnect the G21 No. 2 heater control sub-assembly connector.


c.

Measure the resistance according to the value(s) in the table below.

Standard Resistance:
Tester Connection Condition Specified Condition
G55-1 - G21-6 (HI) Always Below 1 Ω
G55-1 - Body ground Always 10 kΩ or higher


Result:
Proceed to
OK
NG


OK

10.CHECK HARNESS AND CONNECTOR (BLOWER MOTOR WITH FAN SUB-ASSEMBLY - HTR RELAY)

NG

REPAIR OR REPLACE HARNESS OR CONNECTOR

10.CHECK HARNESS AND CONNECTOR (BLOWER MOTOR WITH FAN SUB-ASSEMBLY - HTR RELAY)
a.

Remove the HTR relay from No. 1 engine room relay block.


b.

Disconnect the G55 blower motor with fan sub-assembly connector.


c.

Measure the resistance according to the value(s) in the table below.

Standard Resistance:
Tester Connection Condition Specified Condition
HTR relay terminal 3 - G55-2 Always Below 1 Ω
HTR relay terminal 3 - Body ground Always 10 kΩ or higher


Result:
Proceed to
OK
NG


OK

NG

REPAIR OR REPLACE HARNESS OR CONNECTOR