1AD-FTV EMISSION CONTROL MONOLITHIC CONVERTER INSTALLATION
PROCEDURE

 25587
1.INSTALL NO. 2 MANIFOLD CONVERTER INSULATOR
Install the No. 2 manifold converter insulator with the 3 bolts.
- Torque:
- 29 N*m (291 kgf*cm, 21 ft.*lbf)
25734
2.INSTALL NO. 2 VACUUM PIPE
Temporarily install the No. 2 vacuum pipe with the union nut and bolt.
Tighten the bolt.
- Torque:
- 25 N*m (255 kgf*cm, 18 ft.*lbf)
Using a 14 mm union nut wrench, tighten the union nut of the No. 2 vacuum pipe.
- Torque:
- 30 N*m (306 kgf*cm, 22 ft.*lbf)
- NOTICE:
-
Use the formula to calculate special torque values for situations where a union nut wrench is combined with a torque wrench.
-
Click hereGeneral>INTRODUCTION>REPAIR INSTRUCTION>PRECAUTION
25733A
3.INSTALL NO. 1 VACUUM PIPE
Temporarily install the No. 1 vacuum pipe with the union nut and bolt.
Tighten the bolt.
- Torque:
- 25 N*m (255 kgf*cm, 18 ft.*lbf)
Using a 17 mm union nut wrench, tighten the union nut of the No. 1 vacuum pipe.
- Torque:
- 48 N*m (489 kgf*cm, 35 ft.*lbf)
- NOTICE:
-
Use the formula to calculate special torque values for situations where a union nut wrench is combined with a torque wrench.
-
Click hereGeneral>INTRODUCTION>REPAIR INSTRUCTION>PRECAUTION
89425A
4.INSTALL NO. 2 EXHAUST GAS TEMPERATURE SENSOR
89425B
5.INSTALL NO. 3 EXHAUST GAS TEMPERATURE SENSOR
89425
6.INSTALL EXHAUST GAS TEMPERATURE SENSOR
25770A
7.INSTALL NO. 2 VACUUM TRANSMITTING HOSE ASSEMBLY
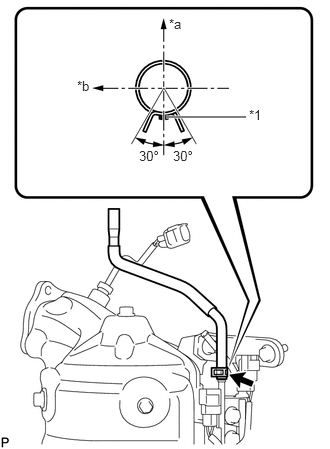
| *1 | Paint Mark (Green) |
| *a | Front Side of Vehicle |
| *b | LH Side |
Install the No. 2 vacuum transmitting hose assembly to the No. 2 vacuum pipe, and slide the clamp to secure the hose.
- HINT:
-
The direction of the vacuum transmitting hose clamp is indicated in the illustration.
25760A
8.INSTALL VACUUM TRANSMITTING HOSE ASSEMBLY
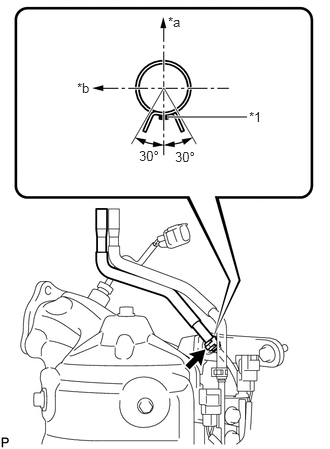
| *1 | Paint Mark (Light Blue) |
| *a | Front Side of Vehicle |
| *b | LH Side |
Install the vacuum transmitting hose assembly to the No. 1 vacuum pipe, and slide the clamp to secure the hose.
- HINT:
-
The direction of the vacuum transmitting hose clamp is indicated in the illustration.
25051
9.INSTALL EXHAUST MANIFOLD CONVERTER SUB-ASSEMBLY
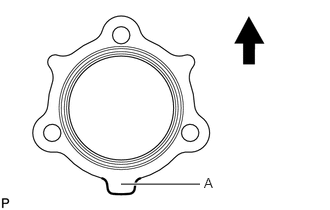

|
Top |
Install a new gasket to the turbocharger sub-assembly.
- HINT:
-
Make sure that the part labeled A is facing downwards as shown in the illustration.
Temporarily install the exhaust manifold converter sub-assembly with 3 new nuts.
Temporarily install the No. 2 exhaust manifold stay with the 2 bolts and nut.
Temporarily install the No. 2 manifold stay with the 3 bolts.
Temporarily install the manifold stay with the bolt and nut.
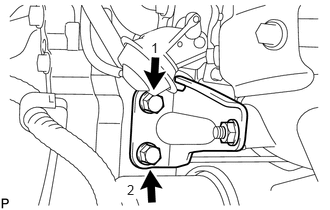
Tighten the 2 bolts of the No. 2 exhaust manifold stay in the order shown in the illustration.
- Torque:
- 56 N*m (571 kgf*cm, 41 ft.*lbf)
Tighten the 3 nuts of the exhaust manifold converter sub-assembly.
- Torque:
- 25 N*m (255 kgf*cm, 18 ft.*lbf)
- NOTICE:
-
Tighten the nuts while pressing the exhaust manifold converter sub-assembly against the engine.
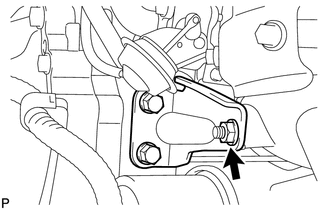
Tighten the nut of the No. 2 exhaust manifold stay.
- Torque:
- 56 N*m (571 kgf*cm, 41 ft.*lbf)
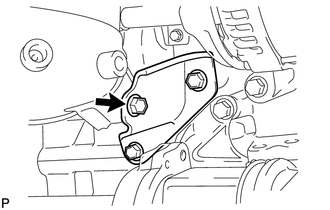
Tighten the bolt of the No. 2 manifold stay shown in the illustration.
- Torque:
- 56 N*m (571 kgf*cm, 41 ft.*lbf)
- NOTICE:
-
Tighten the bolt while pressing the No. 2 manifold stay against the exhaust manifold converter sub-assembly and cylinder block sub-assembly.
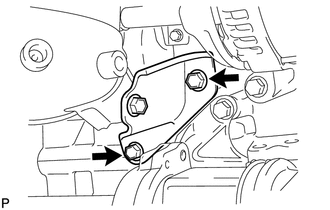
Tighten the 2 bolts of the No. 2 manifold stay shown in the illustration.
- Torque:
- 56 N*m (571 kgf*cm, 41 ft.*lbf)
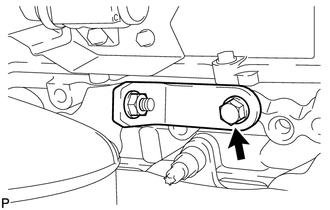
Tighten the bolt of the manifold stay.
- Torque:
- 25 N*m (255 kgf*cm, 18 ft.*lbf)
- NOTICE:
-
Tighten the bolt while pressing the manifold stay against the exhaust manifold converter sub-assembly and cylinder block sub-assembly.
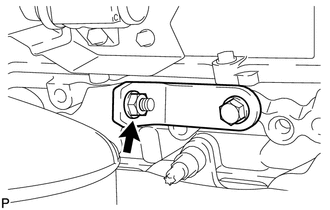
Tighten the nut of the manifold stay.
- Torque:
- 25 N*m (255 kgf*cm, 18 ft.*lbf)
Connect the No. 2 exhaust gas temperature sensor connector and No. 3 exhaust gas temperature sensor connector.
25509
10.INSTALL MANIFOLD CONVERTER INSULATOR SUB-ASSEMBLY
Install the manifold converter insulator sub-assembly with the bolt.
- Torque:
- 29 N*m (291 kgf*cm, 21 ft.*lbf)
- NOTICE:
-
Make sure that the ceramic wool inside the manifold converter insulator sub-assembly does not fall out and is not bent.
25589
11.INSTALL NO. 4 MANIFOLD CONVERTER INSULATOR
Install the No. 4 manifold converter insulator with the 4 bolts.
- Torque:
- 29 N*m (291 kgf*cm, 21 ft.*lbf)
12.INSTALL ENGINE ASSEMBLY
13.PERFORM CATALYST RECORD OF DPF THERMAL DETERIORATION CLEAR FUNCTION