1AD-FTV ENGINE MECHANICAL CYLINDER BLOCK INSPECTION
PROCEDURE

 15708
1.INSPECT NO. 1 OIL NOZZLE SUB-ASSEMBLY
Check the No. 1 oil nozzle sub-assembly for damage or clogging.
If there is damage or clogging, replace the No. 1 oil nozzle sub-assembly.
11401
2.CLEAN CYLINDER BLOCK SUB-ASSEMBLY
Using a gasket scraper, remove all the gasket material from the top surface of the cylinder block sub-assembly.
Using a soft brush and solvent, thoroughly clean the cylinder block sub-assembly.
3.INSPECT CYLINDER BLOCK FOR WARPAGE
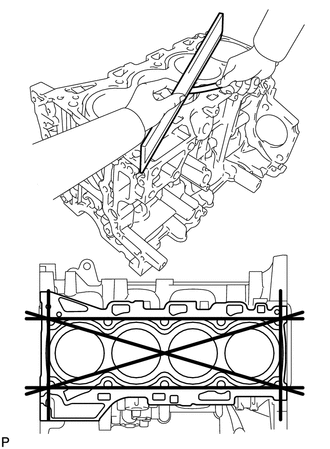
Using a precision straightedge and feeler gauge, measure the warpage of the surface where the cylinder head gasket contacts the cylinder head sub-assembly.
- Maximum warpage:
0.05 mm (0.00197 in.)
If the warpage is more than the maximum, replace the cylinder block sub-assembly.
Visually check the cylinders for vertical scratches.
If deep scratches are present, replace the cylinder block sub-assembly.
4.INSPECT CYLINDER BORE
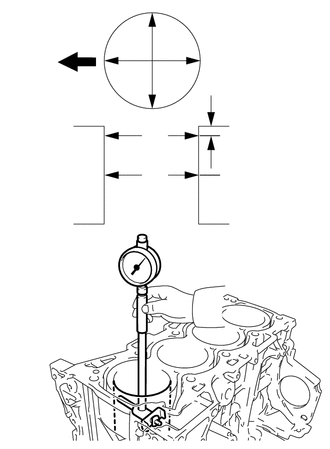
| *1 | Thrust Direction |
| *2 | Axial Direction |
| *a | Front |
| *b | 10 mm (0.394 in.) |
| *c | Center |
Using a cylinder gauge, measure the cylinder bore diameter at positions A and B in the thrust and axial directions.
- Standard diameter:
86.000 to 86.013 mm (3.3858 to 3.3863 in.)
- Maximum diameter:
86.213 mm (3.3942 in.)
If the diameter is more than the maximum, replace the cylinder block sub-assembly.
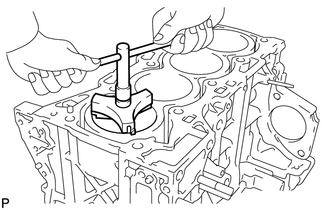
Inspect the cylinder ridge.
If the wear is less than 0.2 mm (0.00787 in.), using a ridge reamer, grind the top of the cylinder.
5.CLEAN PISTON
Using a gasket scraper, remove the carbon from the piston top.
Using a groove cleaning tool or broken compression ring, clean the piston ring grooves.
Using solvent and a brush, thoroughly clean the piston.
- NOTICE:
-
Do not use a wire brush.
6.INSPECT PISTON DIAMETER
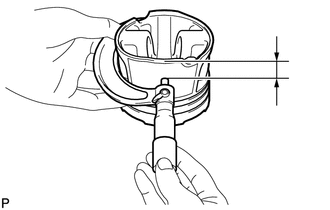
| *a | 10 mm (0.394 in.) |
Using a micrometer, measure the piston diameter at right angles to the piston center line where the position is 10 mm (0.394 in.) from the bottom edge of the piston.
- Standard piston diameter:
85.919 to 85.933 mm (3.3826 to 3.3832 in.)
7.INSPECT PISTON OIL CLEARANCE
Measure the cylinder bore diameter in the thrust direction.
Subtract the piston diameter measurement from the cylinder bore diameter measurement.
- Standard oil clearance:
0.067 to 0.094 mm (0.00264 to 0.00370 in.)
If the oil clearance is more than the standard, replace all the piston with pin sub-assemblies. If necessary, replace the cylinder block sub-assembly.
8.INSPECT RING GROOVE CLEARANCE
Using a feeler gauge, measure the clearance between a new piston ring and the wall of the ring groove.
- Standard Ring Groove Clearance:
Item Specified Condition No. 1 Compression Ring 0.095 to 0.135 mm (0.00374 to 0.00531 in.) No. 2 Compression Ring 0.08 to 0.12 mm (0.00315 to 0.00472 in.) Oil Ring 0.03 to 0.07 mm (0.00118 to 0.00276 in.)
If the clearance is more than the standard, replace the piston with pin sub-assembly.
9.INSPECT PISTON RING END GAP
Insert the piston ring into the cylinder bore.
Using a piston, push the piston ring a little beyond the bottom of the ring travel 115 mm (4.53 in.) from the top of the cylinder block sub-assembly.
Using a feeler gauge, measure the piston ring end gap.
- Standard End Gap:
Item Specified Condition No. 1 Compression Ring 0.22 to 0.32 mm (0.00866 to 0.0126 in.) No. 2 Compression Ring 0.93 to 1.08 mm (0.0366 to 0.0425 in.) Oil Ring 0.10 to 0.40 mm (0.00394 to 0.0157 in.)
- Maximum End Gap:
Item Specified Condition No. 1 Compression Ring 0.92 mm (0.0362 in.) No. 2 Compression Ring 1.68 mm (0.0661 in.) Oil Ring 1.00 mm (0.0394 in.)
If the end gap is more than the maximum, replace the piston ring set. If the piston ring end gap is more than the maximum even with a new piston ring set, replace the cylinder block sub-assembly.
10.INSPECT PISTON PIN OIL CLEARANCE
- HINT:
-
There is only 1 type of supply part for piston with pin sub-assembly.
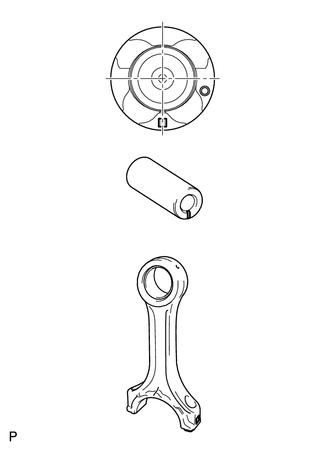
| *1 | Front Mark |
| *2 | Paint Mark |
| *3 | Piston Pin Hole Inside Diameter Mark |
| *4 | Connecting Rod Bushing Inside Diameter Mark |
Check each mark on the piston, piston pin and connecting rod sub-assembly.
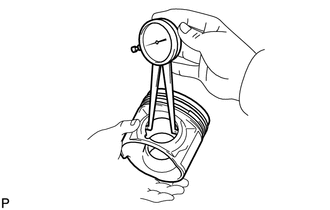
Using a caliper gauge, measure the inside diameter of the piston pin hole.
- Standard Piston Pin Hole Inside Diameter:
Item Specified Condition Mark A 29.009 to 29.013 mm (1.1421 to 1.1422 in.) Mark B 29.013 to 29.017 mm (1.1422 to 1.1424 in.) Mark C 29.017 to 29.021 mm (1.1424 to 1.1426 in.)
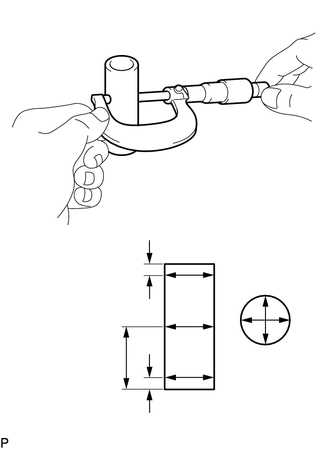
| *a | 6 mm (0.236 in.) |
| *b | 34.5 mm (1.36 in.) |
Using a micrometer, measure the piston pin diameter.
- Standard Piston Pin Diameter:
Item Specified Condition Mark A (White) 29.000 to 29.004 mm (1.1417 to 1.1419 in.) Mark B (Pink) 29.004 to 29.008 mm (1.1419 to 1.1420 in.) Mark C (Blue) 29.008 to 29.012 mm (1.1420 to 1.1422 in.)
Using a caliper gauge, measure the inside diameter of the connecting rod bush.
- Standard Bush Inside Diameter:
Item Specified Condition Mark A 29.019 to 29.023 mm (1.1425 to 1.1426 in.) Mark B 29.023 to 29.027 mm (1.1426 to 1.1428 in.) Mark C 29.027 to 29.031 mm (1.1428 to 1.1430 in.)
Subtract the piston pin diameter measurement from the piston pin hole diameter measurement.
- Standard oil clearance:
0.005 to 0.013 mm (0.000197 to 0.000512 in.)
- Maximum oil clearance:
0.05 mm (0.00197 in.)
If the oil clearance is more than the maximum, replace the piston with pin sub-assembly.
Subtract the piston pin diameter measurement from the connecting rod bush inside diameter measurement.
- Standard oil clearance:
0.015 to 0.023 mm (0.000591 to 0.000906 in.)
- Maximum oil clearance:
0.025 mm (0.000984 in.)
If the oil clearance is more than the maximum, replace the connecting rod sub-assembly. If necessary, replace the piston with pin sub-assembly.
13201
11.INSPECT CONNECTING ROD SUB-ASSEMBLY
Using a rod aligner and feeler gauge, check the connecting rod sub-assembly alignment.
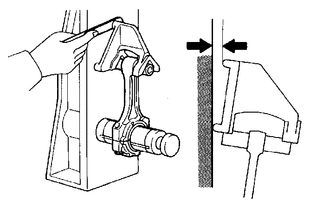
Check for bend.
- Maximum bend:
0.03 mm (0.00118 in.) per 100 mm (3.94 in.)
If the bend is more than the maximum, replace the connecting rod sub-assembly.
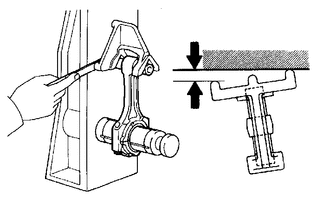
Check for twist.
- Maximum twist:
0.15 mm (0.00591 in.) per 100 mm (3.94 in.)
If the twist is more than the maximum, replace the connecting rod sub-assembly.
13265
12.INSPECT CONNECTING ROD BOLT
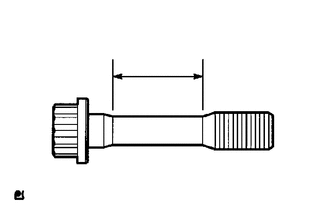
| *1 | Tension Portion |
Using a vernier caliper, measure the tension portion diameter of the connecting rod bolt.
- Standard diameter:
8.7 to 8.8 mm (0.343 to 0.346 in.)
- Minimum diameter:
8.5 mm (0.335 in.)
If the diameter is less than the minimum, replace the connecting rod bolt.
13411
13.INSPECT CRANKSHAFT
Inspect for circle runout.
Place the crankshaft on V-blocks.
Using a dial indicator, measure the circle runout at the center journal.
- Maximum circle runout:
0.04 mm (0.00157 in.)
If the circle runout is more than the maximum, replace the crankshaft.
Inspect the main journals.
Using a micrometer, measure the diameter of each main journal.
- Standard journal diameter:
58.982 to 59.000 mm (2.3221 to 2.3228 in.)
If the diameter is not as specified, check the crankshaft oil clearance. If necessary, replace the crankshaft.
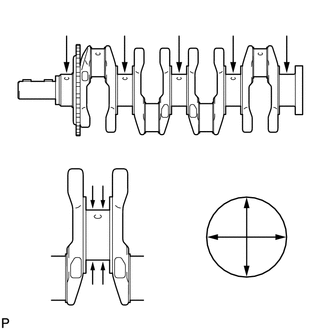
Check each main journal for taper and out-of- round.
- Maximum taper and out-of-round:
0.005 mm (0.000197 in.)
If the taper and out-of-round is more than the maximum, replace the crankshaft.
Inspect the crank pin.
Using a micrometer, measure the diameter of each crank pin.
- Standard crank pin diameter:
49.982 to 50.000 mm (1.9678 to 1.9685 in.)
If the diameter is not as specified, check the connecting rod oil clearance. If necessary, replace the crankshaft.
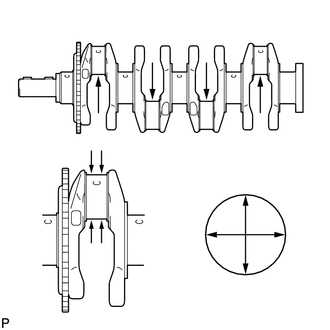
Check each crank pin for taper and out-of-round.
- Maximum taper and out-of-round:
0.003 mm (0.000118 in.)
If the taper and out-of-round is more than the maximum, replace the crankshaft.
14.INSPECT CRANKSHAFT OIL CLEARANCE
Install the crankshaft bearing and No. 2 crankshaft bearing.
Click hereEngine / Hybrid System>1AD-FTV ENGINE MECHANICAL>CYLINDER BLOCK>REASSEMBLY
Install the upper crankshaft thrust washer.
Click hereEngine / Hybrid System>1AD-FTV ENGINE MECHANICAL>CYLINDER BLOCK>REASSEMBLY
Clean each main journal and bearing.
Check each main journal and bearing for pitting and scratches.
- HINT:
-
If the journal or crankshaft bearing is damaged, replace the crankshaft bearing.
Place the crankshaft on the cylinder block sub-assembly.
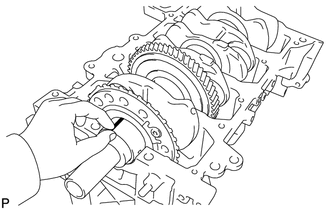
| *1 | Plastigage |
Lay a strip of Plastigage across each journal.
Place the crankshaft bearing cap on the cylinder block sub-assembly.
Install the crankshaft bearing cap.
Click hereEngine / Hybrid System>1AD-FTV ENGINE MECHANICAL>CYLINDER BLOCK>REASSEMBLY
- NOTICE:
-
Do not turn the crankshaft.
- HINT:
-
The crankshaft bearing cap bolts are tightened in 2 progressive steps.
Remove the crankshaft bearing cap.
Click hereEngine / Hybrid System>1AD-FTV ENGINE MECHANICAL>CYLINDER BLOCK>DISASSEMBLY
Measure the Plastigage at its widest point.
- Standard Oil Clearance:
Journal Specified Condition No. 3 0.020 to 0.038 mm (0.000787 to 0.00150 in.) Others 0.014 to 0.032 mm (0.000551 to 0.00126 in.)
- Maximum oil clearance:
0.10 mm (0.00394 in.)
If the oil clearance is more than the maximum, replace the crankshaft bearing. If necessary, replace the crankshaft.
- HINT:
-
If using a standard crankshaft bearing, replace it with one having the same number. If the number of the crankshaft bearing cannot be determined, select the correct crankshaft bearing by adding together the numbers imprinted on the cylinder block sub-assembly and crankshaft, and then selecting the bearing with the same number as the total.
-
There are 6 sizes of standard crankshaft bearing, marked 0, 1, 2, 3, 4 and 5.
- Standard Bearing Chart:
No. 3 Journal Item Number Mark Cylinder block 2 2 1 2 1 0 1 0 0 Crankshaft 2 1 2 0 1 2 0 1 0 Use bearing 4 3 2 1 0
Other Journals Item Number Mark Cylinder block 3 3 2 3 2 1 2 1 1 Crankshaft 2 1 2 0 1 2 0 1 0 Use bearing 5 4 3 2 1
EXAMPLE:
Cylinder block "2" + Crankshaft "1" = Total number 3 (Use bearing "3")
- Reference:
- Standard Cylinder Block Main Journal Bore Diameter:
No. 3 Journal Item Specified Condition Mark 0 63.000 to 63.006 mm (2.4803 to 2.4805 in.) Mark 1 63.006 to 63.012 mm (2.4805 to 2.4808 in.) Mark 2 63.012 to 63.018 mm (2.4808 to 2.4810 in.)
Other Journals Item Specified Condition Mark 1 63.000 to 63.006 mm (2.4803 to 2.4805 in.) Mark 2 63.006 to 63.012 mm (2.4805 to 2.4808 in.) Mark 3 63.012 to 63.018 mm (2.4808 to 2.4810 in.)
- Standard Crankshaft Journal Diameter:
Item Specified Condition Mark 0 58.994 to 59.000 mm (2.3226 to 2.3228 in.) Mark 1 58.988 to 58.994 mm (2.3224 to 2.3226 in.) Mark 2 58.982 to 58.988 mm (2.3221 to 2.3224 in.)
- Standard Sized Bearing Center Wall Thickness:
Item Specified Condition Mark 0 1.987 to 1.990 mm (0.0782 to 0.0783 in.) Mark 1 1.990 to 1.993 mm (0.0783 to 0.0785 in.) Mark 2 1.993 to 1.996 mm (0.0785 to 0.0786 in.) Mark 3 1.996 to 1.999 mm (0.0786 to 0.0787 in.) Mark 4 1.999 to 2.002 mm (0.0787 to 0.0788 in.) Mark 5 2.002 to 2.005 mm (0.0788 to 0.0789 in.)
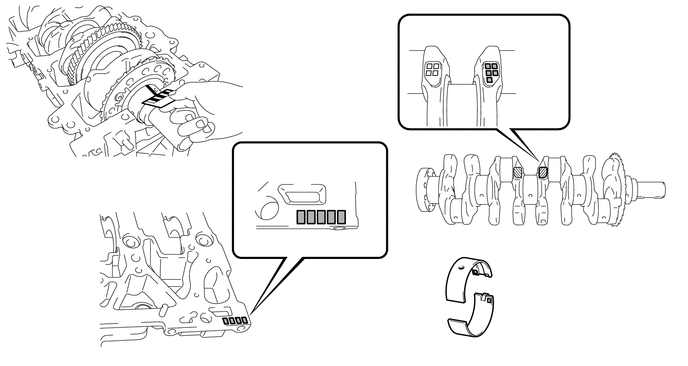
| *1 | Plastigage | *2 | No. 1 |
| *3 | No. 2 | *4 | No. 3 |
| *5 | No. 4 | *6 | No. 5 |
| *a | Crankshaft journal diameter: Mark 0, 1 or 2 | *b | Cylinder block main journal bore diameter: 0, 1 or 2 |
| *c | Crankshaft bearing: Mark 0, 1, 2, 3,. 4 or 5 | - | - |
Completely remove the Plastigage.
Lift out the crankshaft.
Remove the upper crankshaft thrust washer.
Click hereEngine / Hybrid System>1AD-FTV ENGINE MECHANICAL>CYLINDER BLOCK>DISASSEMBLY
Remove the crankshaft bearing and No. 2 crankshaft bearing.
Click hereEngine / Hybrid System>1AD-FTV ENGINE MECHANICAL>CYLINDER BLOCK>DISASSEMBLY
11416
15.INSPECT CRANKSHAFT BEARING CAP SET BOLT
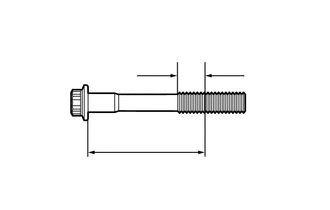
| *1 | Measuring Area |
| *a | 91.5 mm (3.60 in.) |
Using a vernier caliper, measure the thread outside diameter of the crankshaft bearing cap set bolt.
- Standard diameter:
10.8 to 11.0 mm (0.425 to 0.433 in.)
- Minimum diameter:
10.4 mm (0.409 in.)
If the diameter is less than the minimum, replace the crankshaft bearing cap set bolt.