HEATING / AIR CONDITIONING AIR CONDITIONING PANEL(for Manual Air Conditioning System) INSPECTION
PROCEDURE

 55901D
1.INSPECT NO. 1 HEATER CONTROL SUB-ASSEMBLY
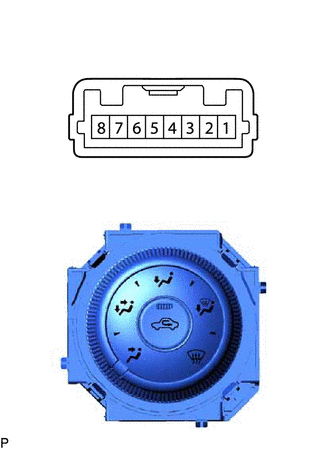
| *a | Component without harness connected
(No. 1 Heater Control Sub-assembly) |
| *b | Recirculation/fresh Switch |
Measure the resistance according to the value(s) in the table below.
- Standard Resistance:
Tester Connection Condition Specified Condition 3 (FRS) - 4 (REC) Recirculation/fresh switch: OFF Below 1 Ω 3 (FRS) - 4 (REC) Recirculation/fresh switch: ON 10 kΩ or higher 5 (LED+) - 4 (REC) Recirculation/fresh switch: OFF 10 kΩ or higher 5 (LED+) - 4 (REC) Recirculation/fresh switch: ON Below 30 Ω
If the result is not as specified, replace the No. 1 heater control sub-assembly.
Check that the recirculation/fresh indicator light comes on.
Turn the recirculation/fresh switch to ON.
Connect a positive (+) lead from the battery to terminal 2 (A/C+) and negative (-) lead to terminal 4 (REC), and check that the recirculation/fresh indicator light comes on.
- OK:
The indicator light comes on.
If the result is not as specified, replace the No. 1 heater control sub-assembly.
Check that the illumination light comes on.
Connect a positive (+) lead from the battery to terminal 7 (ILL+) and negative (-) lead to terminal 6 (ILL-), and check that the illumination light comes on.
- OK:
The illumination light comes on.
If the result is not as specified, replace the No. 1 heater control sub-assembly.
55902E
2.INSPECT NO. 2 HEATER CONTROL SUB-ASSEMBLY
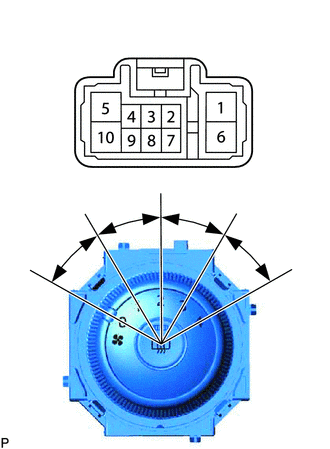
| *a | Component without harness connected
(No. 2 Heater Control Sub-assembly) |
| *b | Rear Window Defogger Switch |
| *1 | Blower Switch OFF Position |
| *2 | Blower Switch LO Position |
| *3 | Blower Switch M1 Position |
| *4 | Blower Switch M2 Position |
| *5 | Blower Switch HI Position |
Model code: ASA44R-ANTXKQ, ASA44R-ANFXKQ, ZSA42R-ANXXKQ, ZSA42R-ANFXKQ, ASA44L-ANTXKV, ASA44L-ANFXKV, ASA42L-ANTXKV, ASA42L-ANFXKV
Measure the resistance according to the value(s) in the table below.
- Standard Resistance:
Tester Connection Condition Specified Condition 4 (LO), 6 (HI), 9 (M1), 10 (M2) - 5 (E) Blower switch: 0 10 kΩ or higher 4 (LO) - 5 (E) Blower switch: 1 Below 1 Ω 4 (LO), 9 (M1) - 5 (E) Blower switch: 1 - 2 Below 1 Ω 4 (LO), 9 (M1) - 5 (E) Blower switch: 2 Below 1 Ω 4 (LO), 9 (M1), 10 (M2) - 5 (E) Blower switch: 2 - 3 Below 1 Ω 4 (LO), 10 (M2) - 5 (E) Blower switch: 3 Below 1 Ω 4 (LO), 10 (M2), 6 (HI) - 5 (E) Blower switch: 3 - 4 Below 1 Ω 4 (LO), 6 (HI) - 5 (E) Blower switch: 4 Below 1 Ω 2 (RDEF) - 5 (E) Rear window defogger switch: OFF 10 kΩ or higher 2 (RDEF) - 5 (E) Rear window defogger switch: ON Below 20 Ω
If the result is not as specified, replace the No. 2 heater control sub-assembly.
Check that the rear window defogger switch indicator light comes on.
Connect a positive (+) lead from the battery to terminal 3 (IG+) and negative (-) lead to terminal 5 (E).
Push the rear window defogger switch in and check that the indicator light comes on.
- OK:
The indicator light comes on.
If the result is not as specified, replace the No. 2 heater control sub-assembly.
Check that the illumination light comes on.
Connect a positive (+) lead from the battery to terminal 7 (ILL+) and negative (-) lead to terminal 1 (ILL-), and check that the illumination light comes on.
- OK:
The illumination light comes on.
If the result is not as specified, replace the No. 2 heater control sub-assembly.
| *a | Component without harness connected
(No. 2 Heater Control Sub-assembly) |
| *b | Rear Window Defogger Switch |
| *1 | Blower Switch OFF Position |
| *2 | Blower Switch LO Position |
| *3 | Blower Switch M1 Position |
| *4 | Blower Switch M1 Position |
| *5 | Blower Switch HI Position |
Model code except: ASA44R-ANTXKQ, ASA44R-ANFXKQ, ZSA42R-ANXXKQ, ZSA42R-ANFXKQ, ASA44L-ANTXKV, ASA44L-ANFXKV, ASA42L-ANTXKV, ASA42L-ANFXKV
Measure the resistance according to the value(s) in the table below.
- Standard Resistance:
Tester Connection Condition Specified Condition 1 (LO), 6 (HI), 8 (M1), 10 (M2) - 5 (E) Blower switch: 0 10 kΩ or higher 1 (LO) - 5 (E) Blower switch: 1 Below 1 Ω 1 (LO), 8 (M1) - 5 (E) Blower switch: 1 - 2 Below 1 Ω 1 (LO), 8 (M1) - 5 (E) Blower switch: 2 Below 1 Ω 1 (LO), 8 (M1), 10 (M2) - 5 (E) Blower switch: 2 - 3 Below 1 Ω 1 (LO), 10 (M2) - 5 (E) Blower switch: 3 Below 1 Ω 1 (LO), 10 (M2), 6 (HI) - 5 (E) Blower switch: 3 - 4 Below 1 Ω 1 (LO), 6 (HI) - 5 (E) Blower switch: 4 Below 1 Ω 2 (RDEF) - 3 (ERDF) Rear window defogger switch: OFF 10 kΩ or higher 2 (RDEF) - 3 (ERDF) Rear window defogger switch: ON Below 20 Ω
If the result is not as specified, replace the No. 2 heater control sub-assembly.
Check that the rear window defogger switch indicator light comes on.
Connect a positive (+) lead from the battery to terminal 4 (IG+) and negative (-) lead to terminal 5 (E).
Push the rear window defogger switch in and check that the indicator light comes on.
- OK:
The indicator light comes on.
If the result is not as specified, replace the No. 2 heater control sub-assembly.
Check that the illumination light comes on.
Connect a positive (+) lead from the battery to terminal 9 (ILL+) and negative (-) lead to terminal 7 (ILL-), and check that the illumination light comes on.
- OK:
The illumination light comes on.
If the result is not as specified, replace the No. 2 heater control sub-assembly.
55903A
3.INSPECT NO. 3 HEATER CONTROL SUB-ASSEMBLY
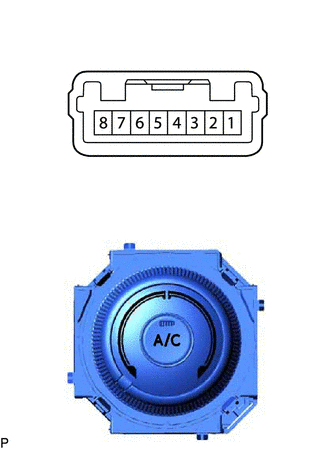
| *a | Component without harness connected
(No. 3 Heater Control Sub-assembly) |
| *b | A/C Switch |
Measure the resistance according to the value(s) in the table below.
- Standard Resistance:
Tester Connection Condition Specified Condition 2 (B) - 3 (A/C) A/C switch: ON Below 20 Ω 2 (B) - 3 (A/C) A/C switch: OFF 10 kΩ or higher
If the result is not as specified, replace the No. 3 heater control sub-assembly.
Check that the indicator light comes on.
Turn the No. 3 heater control sub-assembly (A/C switch) to the ON position.
Connect a positive (+) lead from the battery to terminal 2 (B) and negative (-) lead to terminal 4 (AIND), and check that the indicator light comes on.
- OK:
The indicator light comes on.
If the result is not as specified, replace the No. 3 heater control sub-assembly.
Check that the illumination light comes on.
Connect a positive (+) lead from the battery to terminal 5 (ILL+) and negative (-) lead to terminal 6 (ILL-), and check that the illumination light comes on.
- OK:
The illumination light comes on.
If the result is not as specified, replace the No. 3 heater control sub-assembly.