WIPER / WASHER WIPER AND WASHER SYSTEM(w/ Rain Sensor) TERMINALS OF ECU
CHECK WINDSHIELD WIPER RELAY ASSEMBLY

Disconnect the G85 windshield wiper relay assembly connector.
Measure the voltage and resistance according to the value(s) in the table below.
| Terminal No. (Symbol) | Wiring Color | Terminal Description | Condition | Specified Condition |
|---|---|---|---|---|
|
*: The rain sensor sensitivity can be adjusted by the windshield wiper switch adjusting ring. |
||||
| G85-2 (IG) - Body ground | L - Body ground | IG power supply | Ignition switch ON | 11 to 14 V |
| Ignition switch off | Below 1 V | |||
| G85-25 (W) - Body ground | SB - Body ground | Front washer switch circuit | Front washer switch on | Below 1 Ω |
| Front washer switch off | 10 kΩ or higher | |||
| G85-8 (VR2) - G85-21(VR1) | Y - W | Adjusting volume circuit | Windshield wiper switch adjusting ring* changed | 0 to 231 Ω |
| G85-12 (E) - Body ground | W-B - Body ground | Body ground | Always | Below 1 Ω |
Reconnect the G85 windshield wiper relay assembly connector.
Measure the resistance according to the value(s) in the table below.
| Terminal No. (Symbol) | Wiring Color | Terminal Description | Condition | Specified Condition |
|---|---|---|---|---|
| G85-10 (+1) - Body ground | G - Body ground | Front wiper motor low speed signal circuit | Front wiper motor off | Below 1 Ω |
Measure the voltage and check for pulses according to the value(s) in the table below.
| Terminal No. (Symbol) | Wiring Color | Terminal Description | Condition | Specified Condition |
|---|---|---|---|---|
| G85-1 (+SM) - Body ground | G - Body ground | Front wiper motor position detection signal | Front wiper motor in low or high operation | Below 1 V ←→ 11 to 14 V |
| Front wiper motor off | Below 1 V | |||
| G85-3 (C1) - G85-5 (C0) | GR - L | Windshield wiper switch assembly AUTO signal circuit | Ignition switch ON, windshield wiper switch assembly in AUTO | Below 1 V |
| Ignition switch ON, front wiper switch off | 11 to 14 V | |||
| G85-25 (W) - Body ground | SB - Body ground | Front washer switch circuit | Ignition switch ON, front washer switch on | Below 1 V |
| Ignition switch ON, front washer switch off | 11 to 14 V | |||
| G85-10 (+1) - Body ground | G - Body ground | Front wiper motor low speed signal circuit | Front wiper motor in low operation | 11 to 14 V |
| G85-11 (+2) - Body ground | R - Body ground | Front wiper motor high speed signal circuit | Front wiper motor in high operation | 11 to 14 V |
| Front wiper motor off | Below 1 V | |||
| G85-14 (MPX1) - Body ground | V - Body ground | Rain sensor signal | Ignition switch ON | Pulse generation |
| G85-24 (SPD) - Body ground | B - Body ground | Speed signal | Ignition switch ON, wheel being rotated | Pulse generation
(See waveform 1) |
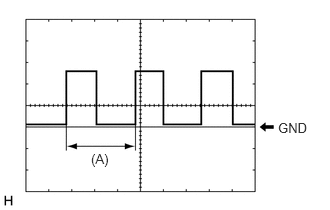
Waveform 1 (Reference):
| Item | Condition |
|---|---|
| Terminal No. (Symbol) | G85-24 (SPD) - Body ground |
| Tool Setting | 5 V/DIV., 20 ms./DIV. |
| Condition | Ignition switch ON, wheel being rotated |
- HINT:
-
When the system is functioning normally, one wheel revolution generates 4 pulses. As the vehicle speed increases, the width indicated by (A) in the illustration narrows.
CHECK HEADLIGHT CLEANER CONTROL RELAY (w/ Headlight Cleaner System)

Disconnect the A48 headlight cleaner control relay connector.
Measure the voltage and resistance according to the value(s) in the table below.
| Terminal No. (Symbol) | Wiring Color | Terminal Description | Condition | Specified Condition |
|---|---|---|---|---|
| A48-1 (HDLO) - Body ground | BR - Body ground | Low beam headlight operation signal | Low beam headlights not operating | 11 to 14 V |
| Low beam headlights operating | Below 1 V | |||
| A48-3 (IG) - A48-4 (E) | L - W-B | IG power supply | Ignition switch ON | 11 to 14 V |
| Ignition switch off | Below 1 V | |||
| A48-4 (E) - Body ground | W-B - Body ground | Body ground | Always | Below 1 Ω |
| A48-6 (PB) - A48-4 (E) | B - W-B | Headlight cleaner motor operation signal | Ignition switch off | 11 to 14 V |
Reconnect the A48 headlight cleaner control relay connector.
Measure the voltage and resistance according to the value(s) in the table below.
- HINT:
-
The standard normal voltage between each pair of the headlight cleaner control relay terminals is shown in the table below. The appropriate conditions for checking each pair of the terminals are also indicated. The result of checks should be compared with the standard normal voltage for that pair of the terminals, displayed in the Specified Condition column. The illustration above can be used as a reference to identify the headlight cleaner control relay terminal locations.
| Terminal No. (Symbol) | Wiring Color | Terminal Description | Condition | Specified Condition |
|---|---|---|---|---|
| A48-5 (FRWA) - A48-4 (E) | W - W-B | Front washer switch signal | Ignition switch ON, front washer switch off | 11 to 14 V |
| Ignition switch ON, front washer switch on | Below 1 V |
CHECK MAIN BODY ECU (MULTIPLEX NETWORK BODY ECU) AND INSTRUMENT PANEL JUNCTION BLOCK ASSEMBLY
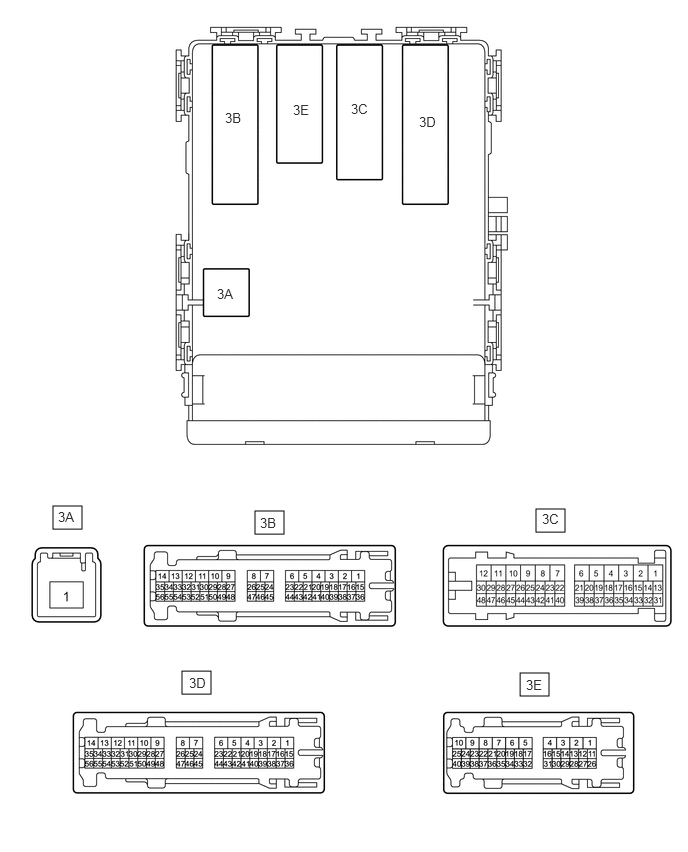
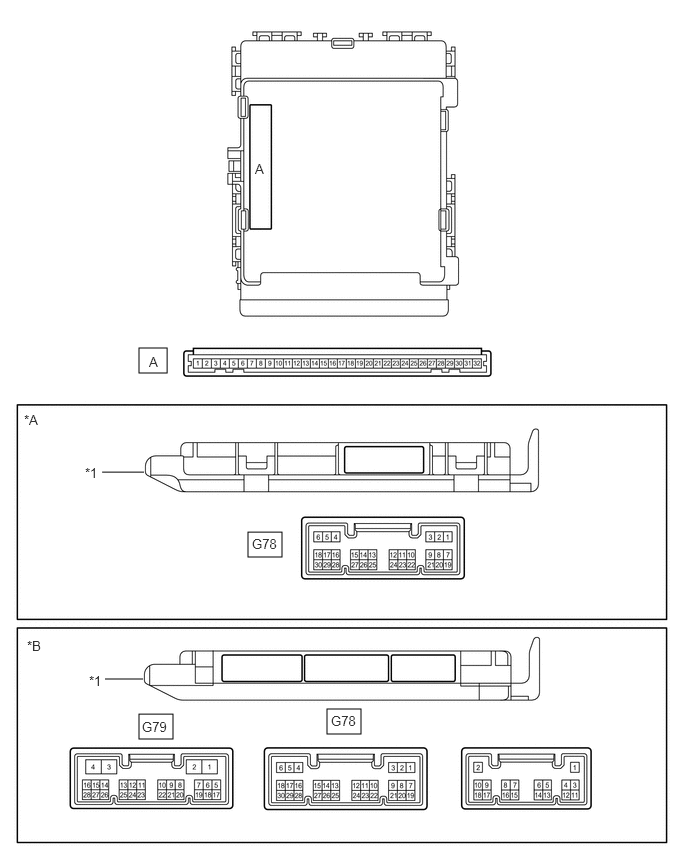
| *A | Main Body ECU (Multiplex Network Body ECU) with 1 Connector | *B | Main Body ECU (Multiplex Network Body ECU) with 3 Connectors |
| *1 | Main Body ECU (Multiplex Network Body ECU) | - | - |
Remove the main body ECU (multiplex network body ECU).
for LHD: Click herePower Source / Network>POWER DISTRIBUTION>MAIN BODY ECU(for LHD)>REMOVAL
for RHD: Click herePower Source / Network>POWER DISTRIBUTION>MAIN BODY ECU(for RHD)>REMOVAL
Connect the instrument panel junction block assembly connectors.
Measure the voltage and resistance according to the value(s) in the table below.
| Terminal No. (Symbol) | Wiring Color | Terminal Description | Condition | Specified Condition |
|---|---|---|---|---|
| A-30 (BECU) -Body ground | None - Body ground | Battery power supply | Always | 11 to 14 V |
| A-29 (ACC) -Body ground | None - Body ground | ACC power supply | Ignition switch ACC | 11 to 14 V |
| Ignition switch off | Below 1 V | |||
| A-32 (IG) - Body ground | None - Body ground | IG power supply | Ignition switch ON | 11 to 14 V |
| Ignition switch off | Below 1 V | |||
| A-11 (GND1) - Body ground | None - Body ground | Body ground | Always | Below 1 Ω |
Install the main body ECU (multiplex network body ECU).
for LHD: Click herePower Source / Network>POWER DISTRIBUTION>MAIN BODY ECU(for LHD)>INSTALLATION
for RHD: Click herePower Source / Network>POWER DISTRIBUTION>MAIN BODY ECU(for RHD)>INSTALLATION
Measure the voltage according to the value(s) in the table below.
| Terminal No. (Symbol) | Wiring Color | Terminal Description | Condition | Specified Condition |
|---|---|---|---|---|
| 3B-37 (HRLY) - Body ground | BR - Body ground | Low beam headlight signal | Light control switch in head position | Below 1 V |
| Light control switch off | 11 to 14 V |