NAVIGATION / MULTI INFO DISPLAY NAVIGATION SYSTEM(for HDD) Microphone Circuit between Microphone and Navigation Receiver Assembly
DESCRIPTION
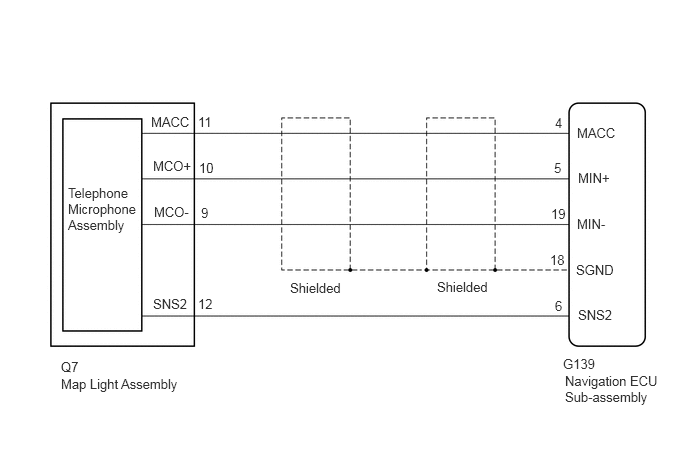
The navigation ECU sub-assembly and map light assembly (telephone microphone assembly) are connected to each other using the microphone connection detection signal lines.
Using this circuit, the navigation ECU sub-assembly sends power to the map light assembly (telephone microphone assembly), and the map light assembly (telephone microphone assembly) sends microphone signals to the navigation ECU sub-assembly.
WIRING DIAGRAM
PROCEDURE
Disconnect the G139 navigation ECU sub-assembly connector.
Disconnect the Q7 map light assembly (telephone microphone assembly) connector.
Measure the resistance according to the value(s) in the table below.
- Standard Resistance:
Tester Connection Condition Specified Condition G139-4 (MACC) - Q7-11 (MACC) Always Below 1 Ω G139-5 (MIN+) - Q7-10 (MCO+) Always Below 1 Ω G139-19 (MIN-) - Q7-9 (MCO-) Always Below 1 Ω G139-6 (SNS2) - Q7-12 (SNS2) Always Below 1 Ω G139-4 (MACC) - Body ground Always 10 kΩ or higher G139-5 (MIN+) - Body ground Always 10 kΩ or higher G139-19 (MIN-) - Body ground Always 10 kΩ or higher G139-18 (SGND) - Body ground Always 10 kΩ or higher G139-6 (SNS2) - Body ground Always 10 kΩ or higher
- Result:
Proceed to OK NG
OK
NG
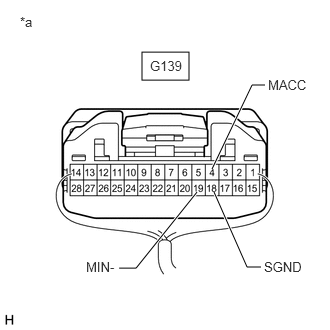
| *a | Component with harness connected
(Navigation ECU Sub-assembly) |
Measure the resistance according to the value(s) in the table below.
- Standard Resistance:
Tester Connection Condition Specified Condition G139-18 (SGND) - Body ground Always Below 1 Ω G139-19 (MIN-) - Body ground Always Below 1 Ω
Measure the voltage according to the value(s) in the table below.
- Standard Voltage:
Tester Connection Switch Condition Specified Condition G139-4 (MACC) - Body ground Engine switch on (ACC) 4 to 6 V
- Result:
Proceed to OK NG
OK
NG
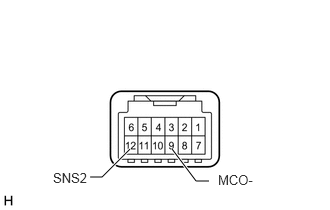
Remove the map light assembly (telephone microphone assembly).
Click hereAudio / Visual / Telematics>AUDIO / VIDEO>AMPLIFIER MICROPHONE ASSEMBLY>REMOVAL
Measure the resistance according to the value(s) in the table below.
- Standard Resistance:
Tester Connection Condition Specified Condition 12 (SNS2) - 9 (MCO-) Always Below 1 Ω
- Result:
Proceed to OK NG
OK
NG
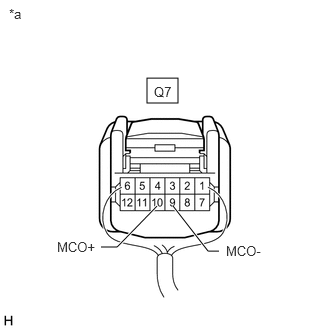
| *a | Component with harness connected
(Map Light Assembly) |
Remove the map light assembly with its connector still connectoed.
Click hereAudio / Visual / Telematics>AUDIO / VIDEO>AMPLIFIER MICROPHONE ASSEMBLY>REMOVAL
Turn the engine switch on (ACC).
Connect an oscilloscope to terminals 10 (MCO+) and 9 (MCO-) of the map light assembly connector.
Check the waveform of the telephone microphone assembly using the oscilloscope.
- Result:
Result Proceed to A waveform synchronized with the voice input to the map light assembly is output A A waveform synchronized with the voice input to the map light assembly is not output B
A
B
Replace the telephone microphone assembly with a new or normally functioning one.
Click hereAudio / Visual / Telematics>AUDIO / VIDEO>AMPLIFIER MICROPHONE ASSEMBLY>REMOVAL
Check if the same problem occurs again.
- Result:
Proceed to Malfunction disappears Malfunction does not disappear
Malfunction disappears
Malfunction does not disappear
Replace the map light assembly with a new or normally functioning one.
Click hereAudio / Visual / Telematics>AUDIO / VIDEO>AMPLIFIER MICROPHONE ASSEMBLY>REMOVAL
Check if the same problem occurs again.
- Result:
Proceed to Malfunction disappears Malfunction does not disappear
Malfunction disappears
Malfunction does not disappear
Replace the telephone microphone assembly with a new or normally functioning one.
Click hereAudio / Visual / Telematics>AUDIO / VIDEO>AMPLIFIER MICROPHONE ASSEMBLY>REMOVAL
Check if the same problem occurs again.
- Result:
Proceed to Malfunction disappears Malfunction does not disappear
Malfunction disappears
Malfunction does not disappear