3ZR-FAE ENGINE MECHANICAL CYLINDER BLOCK DISASSEMBLY
PROCEDURE

 12211
1.REMOVE NO. 1 VENTILATION CASE
- HINT:
-
There are 2 installation methods for the No. 1 ventilation case.
-
Depending on the installation method, the number of bolts, nuts and stud bolts used will vary.
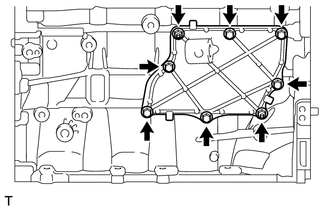
for Type A:
Remove the 6 bolts and 2 nuts.
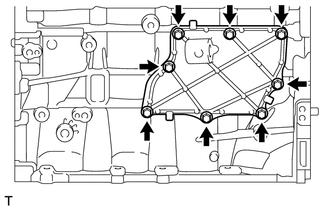
for Type B:
Remove the 8 bolts.
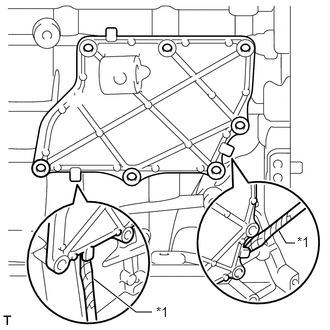
| *1 | Protective Tape |
Remove the No. 1 ventilation case by prying between the No. 1 ventilation case and cylinder block assembly with a screwdriver as shown in the illustration.
- NOTICE:
-
Be careful not to damage the contact surfaces of the cylinder block and No. 1 ventilation case.
- HINT:
-
Tape the screwdriver tip before use.
2.INSPECT CONNECTING ROD THRUST CLEARANCE
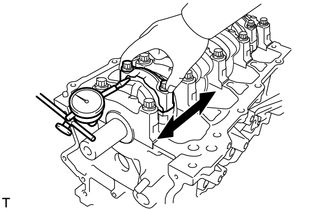
Using a dial indicator, measure the thrust clearance while moving the connecting rod back and forth.
- Standard thrust clearance:
0.160 to 0.342 mm (0.00630 to 0.0135 in.)
- Maximum thrust clearance:
0.342 mm (0.0135 in.)
If the thrust clearance is more than the maximum, replace the connecting rod assemblies as necessary. If necessary, replace the crankshaft.
3.INSPECT CONNECTING ROD OIL CLEARANCE
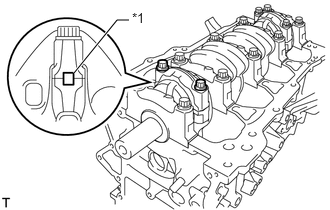
| *1 | Matchmark |
Check that the matchmarks on the connecting rod and cap are aligned to ensure correct reassembly.
- HINT:
-
The matchmarks on the connecting rods and caps are provided to ensure correct reassembly.
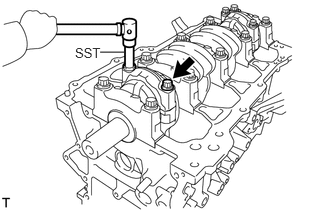
Using SST, uniformly loosen and remove the 2 bolts.
- SST
- 09205-16011
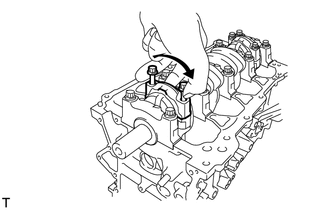
Using the 2 removed connecting rod cap bolts, remove the connecting rod cap and connecting rod bearing by wiggling the connecting rod cap right and left.
- HINT:
-
Keep the connecting rod bearing inserted in the connecting rod cap.
Clean the crank pin and bearing.
Check the crank pin and bearing for pitting and scratches.
If the crank pin or bearing is damaged, replace the bearings. If necessary, replace the crankshaft.
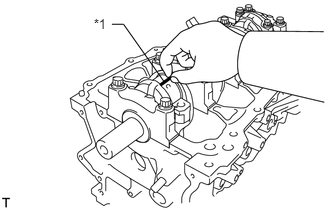
| *1 | Plastigage |
Lay a strip of Plastigage on the crank pin.
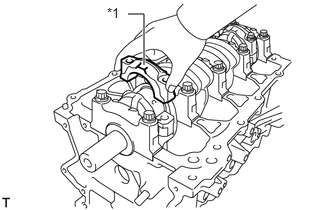
| *1 | Front Mark |
Check that the front mark of the connecting rod cap is facing forward and install the connecting rod cap.
Apply a light coat of engine oil to the threads and under the heads of the connecting rod cap bolts.
Install the connecting rod cap bolts.
- NOTICE:
-
The connecting rod cap bolts should be tightened in 2 progressive steps.
Step 1:
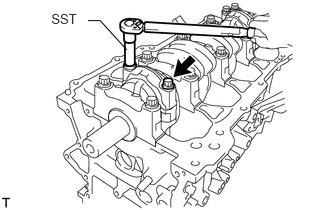
Using SST, install and alternately tighten the bolts of the connecting rod cap in several steps.
- SST
- 09205-16011
- Torque:
- 20 N*m (204 kgf*cm, 15 ft.*lbf)
- NOTICE:
-
Do not turn the crankshaft.
Mark the front side of each connecting rod cap bolt with paint.
Step 2:
Tighten the cap bolts 90°.
- NOTICE:
-
Do not turn the crankshaft.
Check that the paint marks are now at a 90° angle to the front.
Remove the 2 bolts and connecting rod cap.
- HINT:
-
Keep the lower bearing inserted in the connecting rod cap.
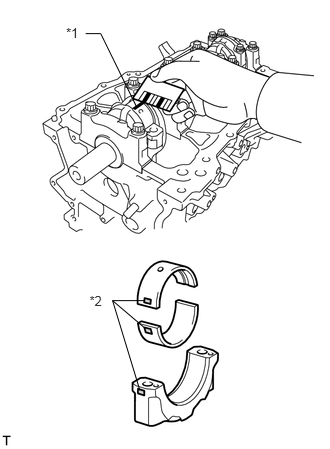
| *1 | Plastigage |
| *2 | 1, 2 or 3 Mark |
Measure the Plastigage at its widest point.
- Standard oil clearance:
0.014 to 0.038 mm (0.000551 to 0.00150 in.)
- Maximum oil clearance:
0.070 mm (0.00276 in.)
If the oil clearance is more than the maximum, replace the connecting rod bearings. If necessary, inspect the crankshaft.
- NOTICE:
-
Remove the Plastigage completely after the measurement.
- HINT:
-
If replacing a bearing, replace it with one that has the same number as its respective connecting rod cap. Each bearing standard thickness is indicated by a 1, 2, or 3 mark on its surface.
- Standard Connecting Rod Large End Bore Diameter:
Item Specified Condition Mark 1 50.000 to 50.008 mm (1.9685 to 1.9688 in.) Mark 2 50.009 to 50.016 mm (1.9689 to 1.9691 in.) Mark 3 50.017 to 50.024 mm (1.9692 to 1.9694 in.)
- Standard Connecting Rod Bearing Thickness:
Item Specified Condition Mark 1 1.489 to 1.493 mm (0.05862 to 0.05878 in.) Mark 2 1.494 to 1.497 mm (0.05882 to 0.05894 in.) Mark 3 1.498 to 1.501 mm (0.05898 to 0.05909 in.)
- Standard crankshaft pin diameter:
46.992 to 47.000 mm (1.8501 to 1.8504 in.)
Perform the inspection above for each cylinder.
4.REMOVE PISTON SUB-ASSEMBLY WITH CONNECTING ROD
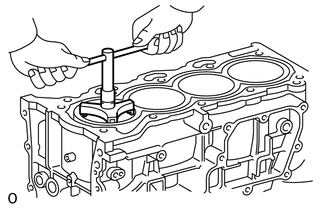
Using a ridge reamer, remove all the carbon from the top of the cylinder.
Push the piston, connecting rod and connecting rod bearing through the top of the cylinder block assembly.
- HINT:
- ·
Keep the bearing, connecting rod and cap together.
·Arrange the piston and connecting rod assemblies in the correct order.
·Be sure to arrange the removed piston and connecting rod assemblies in such a way that they can be reinstalled exactly as before.
13041
5.REMOVE CONNECTING ROD BEARING
Remove the connecting rod bearings.
- HINT:
-
Arrange the removed parts in the correct order.
13011
6.REMOVE PISTON RING SET
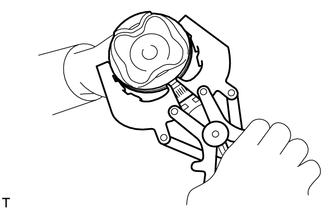
Using a piston ring expander, remove the 2 compression rings.
for Type A:
Remove the oil ring and oil ring expander by hand.
- HINT:
-
Arrange the removed parts in the correct order.
for Type B:
Remove the 2 side rails and oil ring expander by hand.
- HINT:
-
Arrange the removed parts in the correct order.
13101
7.REMOVE PISTON
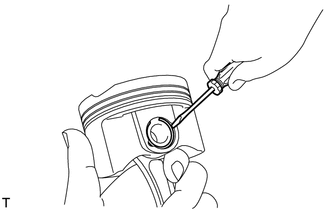
Using a screwdriver, pry out the 2 snap rings.
Gradually heat each piston to approximately 80 to 90°C (176 to 194°F).
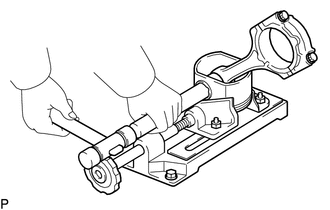
Using a plastic-faced hammer and brass bar, lightly tap out the piston pin and remove the connecting rod.
- HINT:
- ·
The piston and piston pin are a matched set.
·Arrange the pistons, piston pins, rings, connecting rods and bearings in the correct order.
8.INSPECT CRANKSHAFT THRUST CLEARANCE
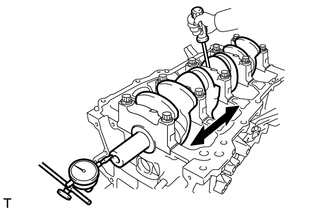
Using a dial indicator, measure the thrust clearance while prying the crankshaft back and forth with a screwdriver.
- Standard thrust clearance:
0.04 to 0.14 mm (0.00157 to 0.00551 in.)
- Maximum thrust clearance:
0.18 mm (0.00709 in.)
If the thrust clearance is more than the maximum, replace the thrust washers as a set. If necessary, replace the crankshaft.
- HINT:
-
The thrust washer thickness is 2.43 to 2.48 mm (0.0957 to 0.0976 in.).
13411
9.REMOVE CRANKSHAFT
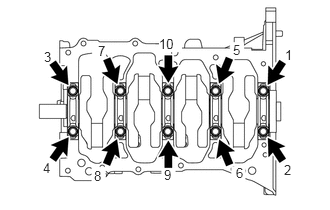
Uniformly loosen and remove the 10 crankshaft bearing cap bolts in the sequence shown in the illustration.
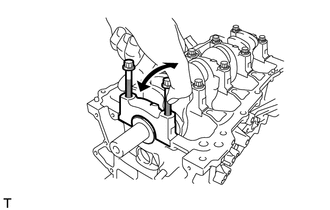
Use the 2 removed crankshaft bearing cap bolts, remove the 5 crankshaft bearing caps and 5 crankshaft bearings.
- NOTICE:
-
Install the bolts to the caps one by one. Ease the cap out by gently pulling up and applying force toward the front and back sides of the cylinder block as shown in the illustration. Take care not to damage the contact surfaces of the cap and cylinder block.
- HINT:
- ·
Keep each crankshaft bearing and crankshaft bearing cap together as a set.
·Arrange the crankshaft bearing caps in the correct order.
Lift out the crankshaft.
Check each crankshaft journal and bearing for pitting and scratches.
If the journal or bearing is damaged, replace the bearings. If necessary, replace the crankshaft.
11791
10.REMOVE UPPER CRANKSHAFT THRUST WASHER
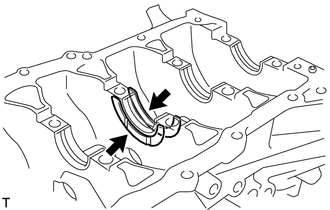
Remove the 2 upper crankshaft thrust washers from the cylinder block assembly.
11711
11.REMOVE CRANKSHAFT BEARING
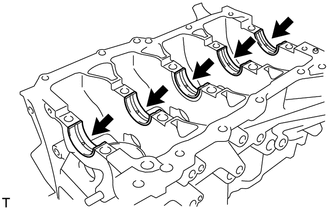
Remove the 5 upper crankshaft bearings from the cylinder block assembly.
- HINT:
-
Arrange the bearings in the correct order.
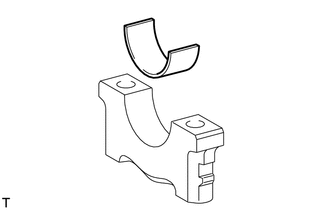
Remove the 5 lower crankshaft bearings from the 5 crankshaft bearing caps.
- HINT:
-
Arrange the bearings in the correct order.
15708
12.REMOVE NO. 1 OIL NOZZLE SUB-ASSEMBLY
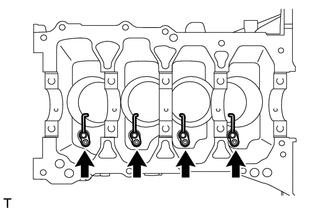
Using a 5 mm socket hexagon wrench, remove the 4 bolts and 4 No. 1 oil nozzle sub-assemblies.
11432A
13.REMOVE NO. 1 TAPER SCREW PLUG
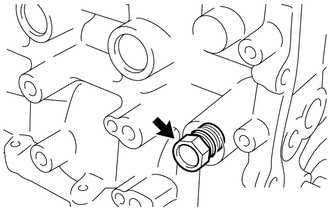
Remove the No. 1 taper screw plug.
11401
14.CLEAN CYLINDER BLOCK SUB-ASSEMBLY
- NOTICE:
-
If the cylinder is washed at high temperatures, the cylinder liner will stick out beyond the cylinder block assembly. Always wash the cylinder block assembly at a temperature of 45°C (113°F) or less.
15.REMOVE STUD BOLT
- NOTICE:
-
If a stud bolt is deformed or its threads are damaged, replace it.