STEERING GEAR / LINKAGE STEERING GEAR REASSEMBLY
PROCEDURE

 45536
1.INSTALL NO. 2 STEERING RACK BOOT
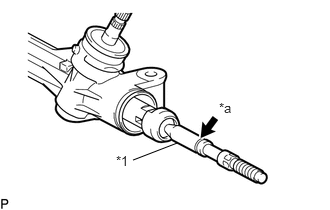
| *1 | Steering Rack End |
| *a | Grease Application Area |
Apply lithium soap base glycol grease to the inside of the steering rack end.
Install the No. 2 steering rack boot to the groove on the rack housing.
- NOTICE:
- ·
Be careful not to damage or twist the boot.
·Make sure that the boot is free of rust and foreign matter.
45535
2.INSTALL NO. 1 STEERING RACK BOOT
- HINT:
-
Use the same procedure as for the No. 2 steering rack boot.
45536A
3.TIGHTEN NO. 2 STEERING RACK BOOT CLAMP
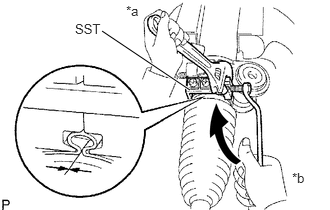
| *a | Hold |
| *b | Turn |
Using SST, tighten a new No. 2 steering rack boot clamp as shown in the illustration.
- SST
- 09616-00011
- Clearance:
3.0 mm (0.118 in.) or less
- NOTICE:
-
Be careful not to damage or twist the boot.
45535D
4.TIGHTEN NO. 1 STEERING RACK BOOT CLAMP
- HINT:
-
Use the same procedure as for the No. 2 steering rack boot clamp.
45535B
5.INSTALL STEERING RACK BOOT CLIP
Using pliers, install the 2 boot clips.
45510
6.INSPECT STEERING GEAR ASSEMBLY
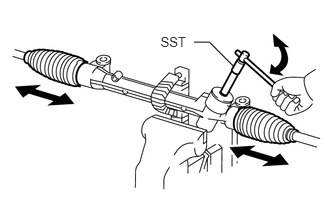
Using SST, rotate the pinion shaft to see if both the left and right steering rack boots expand and contract smoothly.
- SST
- 09616-00011
- HINT:
-
If the result is not as specified, use a new steering rack boot clamp and reinstall the steering rack boots.
45047
7.INSTALL TIE ROD END SUB-ASSEMBLY LH
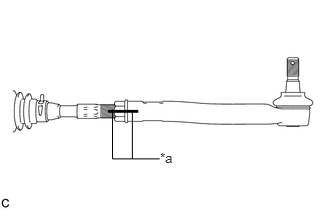
| *a | Matchmark |
Install the lock nut and tie rod end sub-assembly LH to the steering gear assembly so that the matchmarks align.
- HINT:
-
After adjusting toe-in, tighten the lock nut to the specified torque.
45046
8.INSTALL TIE ROD END SUB-ASSEMBLY RH
- HINT:
-
Use the same procedure described for the LH side.
9.CHECK TIE ROD END SUB-ASSEMBLY
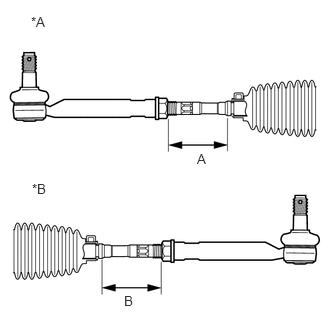
| *A | for LH Side |
| *B | for RH Side |
Adjust the tie rod end sub-assembly LH and RH so that distance A and distance B are within the specified ranges.
- Reference Values:
Tire size Dimension Standard Range 225/65R17 A 74.9 to 76.9 mm (2.949 to 3.028 in.) B 74.9 to 76.9 mm (2.949 to 3.028 in.) 235/55R18
225/60R18A 78.6 to 80.6 mm (3.094 to 3.173 in.) B 78.6 to 80.6 mm (3.094 to 3.173 in.)
- HINT:
- ·
The values listed above are reference values.
·The toe-in is adjusted in a later step.