EXTERIOR PANELS / TRIM REAR BUMPER INSTALLATION
PROCEDURE

 52563A
1.INSTALL REAR BUMPER UPPER RETAINER LH
Attach the 2 claws to install the rear bumper upper retainer LH.
Install the clip.
52562B
2.INSTALL REAR BUMPER UPPER RETAINER RH
- HINT:
-
Use the same procedure described for the LH side.
52156A
3.INSTALL REAR BUMPER SIDE SUPPORT LH
Attach the 3 claws to install the rear bumper side support LH.
Install the screw.
Install the clip.
52155A
4.INSTALL REAR BUMPER SIDE SUPPORT RH
- HINT:
-
Use the same procedure described for the LH side.
52016A
5.INSTALL REAR BUMPER ARM SUB-ASSEMBLY LH
Install the rear bumper arm sub-assembly with the 3 bolts.
- Torque:
- 37 N*m (377 kgf*cm, 27 ft.*lbf)
52015A
6.INSTALL REAR BUMPER ARM SUB-ASSEMBLY RH
- HINT:
-
Use the same procedure described for the LH side.
52023
7.INSTALL REAR BUMPER REINFORCEMENT SUB-ASSEMBLY
for Step Type:
Install the rear bumper reinforcement sub-assembly with the 6 bolts.
- Torque:
- 37 N*m (377 kgf*cm, 27 ft.*lbf)
w/ TOYOTA Parking Assist-sensor System:
Install the rear bumper reinforcement sub-assembly with the 6 bolts.
- Torque:
- 37 N*m (377 kgf*cm, 27 ft.*lbf)
for Standard Type:
Install the rear bumper reinforcement sub-assembly with the 6 bolts.
- Torque:
- 37 N*m (377 kgf*cm, 27 ft.*lbf)
58724
8.INSTALL NO. 2 LUGGAGE COMPARTMENT SERVICE COVER PROTECTOR
Install the No. 2 luggage compartment service cover protector with the 2 clips.
58723
9.INSTALL NO. 1 LUGGAGE COMPARTMENT SERVICE COVER PROTECTOR
- HINT:
-
Use the same procedure described for the LH side.
52159
10.INSTALL REAR BUMPER COVER
Connect each connector.
Attach the 10 claws to install the rear bumper cover.
Install the 2 bolts.
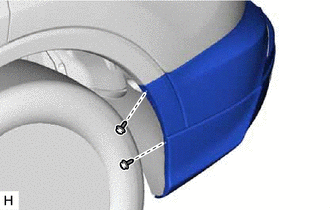
w/o Mudguard
Install the 2 screws.
- HINT:
-
Use the same procedure for the other side.
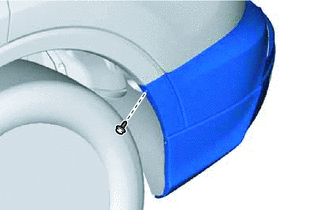
w/ Mudguard
Install the screws.
- HINT:
-
Use the same procedure for the other side.
Install the 2 screws and 6 clips.
76626E
11.INSTALL REAR QUARTER PANEL MUDGUARD LH (w/ Mudguard)
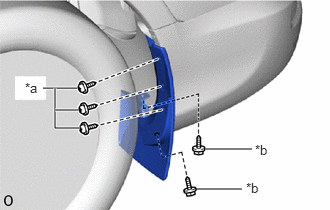
| *a | Screw A |
| *b | Screw B |
Install the rear quarter panel mudguard LH with the 3 screws labeled A.
Install the 2 screws labeled B.
76625G
12.INSTALL REAR QUARTER PANEL MUDGUARD RH (w/ Mudguard)
- HINT:
-
Use the same procedure described for the LH side.
13.CONNECT CABLE TO NEGATIVE BATTERY TERMINAL (w/ Touchless Power Back Door)
- NOTICE:
-
When disconnecting the cable, some systems need to be initialized after the cable is reconnected.
-
Click hereGeneral>INTRODUCTION>REPAIR INSTRUCTION>INITIALIZATION
14.CHECK SRS WARNING LIGHT (w/ Touchless Power Back Door)
15. CHECK TOUCHLESS POWER BACK DOOR OPENING OPERATION (w/ Touchless Power Back Door)