RM3090E
_56
Audio / Visual / Telematics
_057499
TELEMATICS
_0280331
MAYDAY SWITCH
G
TELEMATICS MAYDAY SWITCH INSPECTION
PROCEDURE

 81260A
1.REMOVE MAP LIGHT ASSEMBLY
81260A
2.INSPECT MAP LIGHT ASSEMBLY
a.
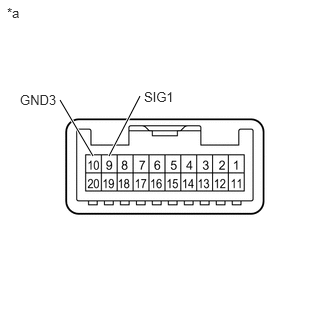
Check the resistance.
i.
1.135,1.625 1.458,1
true
0.969,1.625 0.625,1.042
true
1.5,0.927 2.115,1.125
0.615,0.198
10
false
SIG1
0.208,0.958 0.823,1.156
0.615,0.198
10
false
GND3
0.073,0.052 0.385,0.25
0.313,0.198
10
false
*a
| *a | Component without harness connected
(Map Light Assembly) |
Measure the resistance according to the value(s) in the table below.
- Resistance:
Tester Connection Condition Specified Condition 9 (SIG1) - 10 (GND3) Mayday switch not pressed 410 to 414 Ω 9 (SIG1) - 10 (GND3) Mayday switch pressed 81 to 83 Ω
b.
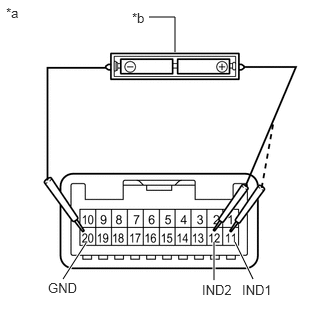
Check the operation (indicator).
i.
1.823,0.542 1.823,0.177
1.823,0.177 1.552,0.177
false
0.896,2.531 0.656,2.906
true
2.229,2.521 2.229,2.917
true
2.448,2.521 2.635,2.906
true
0.063,0.052 0.375,0.25
0.313,0.198
10
false
*a
1.375,0.104 1.688,0.302
0.313,0.198
10
false
*b
0.5,2.917 0.958,3.115
0.458,0.198
10
false
GND
2.521,2.938 2.854,3.146
0.333,0.208
10
false
IND1
2.104,2.938 2.458,3.115
0.354,0.177
10
false
IND2
| *a | Component without harness connected
(Map Light Assembly) |
| *b | Two 1.5 V dry cell batteries |
Check that each indicator illuminates when 2 dry cell batteries are connected to the map light assembly connector terminals as shown in the illustration.
- NOTICE:
-
Do not apply more than 3 V.
- OK:
Tester Connection Condition Specified Condition 11 (IND1) - 20 (GND) Positive (+) dry cell battery - Negative (-) dry cell battery HELP RED indicator illuminates 12 (IND2) - 20 (GND) Positive (+) dry cell battery - Negative (-) dry cell battery HELP GREEN indicator illuminates
c.
2.302,1.635 2.5,1.063
true
0.771,2.542 0.969,1.969
true
2.542,0.99 3.156,1.188
0.615,0.198
10
false
RRID
0.615,2.563 1.073,2.76
0.458,0.198
10
false
GND
0.063,0.052 0.375,0.25
0.313,0.198
10
false
*a
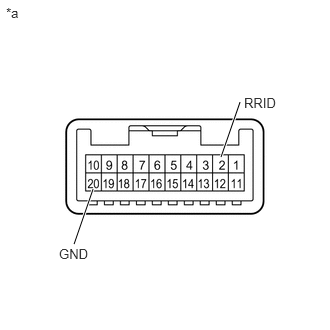
| *a | Component without harness connected
(Map Light Assembly) |
Check that the HELP indicator illuminates when the battery is connected to the map light assembly connector terminals as shown in the illustration.
- OK:
Tester Connection Condition Specified Condition 2 (RRID) - 20 (GND) Positive (+) battery terminal - Negative (-) battery terminal HELP indicator illuminates
81260A
3.INSTALL MAP LIGHT ASSEMBLY