P710 HYBRID TRANSMISSION / TRANSAXLE HYBRID TRANSAXLE FLUID ON-VEHICLE INSPECTION
PROCEDURE

 53896B
1.REMOVE FRONT FENDER FRONT SPLASH SHIELD LH
53895B
2.REMOVE FRONT FENDER FRONT SPLASH SHIELD RH
51441
3.REMOVE NO. 1 ENGINE UNDER COVER
51420
4.REMOVE NO. 2 ENGINE UNDER COVER ASSEMBLY
53737D
5.REMOVE FRONT FENDER APRON SEAL LH
6.INSPECT HYBRID TRANSAXLE FLUID
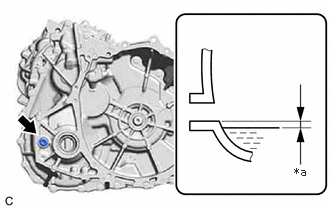
| *a | 0 to 10 mm (0 to 0.394 in.) |
Using a 10 mm hexagon socket wrench, remove the filler plug and gasket from the hybrid vehicle transaxle assembly.
Check that the hybrid transaxle fluid level is between 0 to 10 mm (0 to 0.394 in.) from the bottom lip of the filler plug opening.
- NOTICE:
- ·
When inspecting the hybrid transaxle fluid, make sure that the vehicle is level.
·Be sure to directly check that the hybrid transaxle fluid level is within the specified range.
·Driving the vehicle with an insufficient or excessive amount of hybrid transaxle fluid may damage the hybrid vehicle transaxle assembly.
·If the hybrid transaxle fluid was replaced or if hybrid transaxle fluid was added, make sure to recheck the hybrid transaxle fluid level after driving the vehicle.
Check for leaks if the hybrid transaxle fluid level is low. (If there are no hybrid transaxle fluid leaks but the hybrid transaxle fluid level is low, add hybrid transaxle fluid.)
Click hereDrivetrain>P710 (HYBRID TRANSMISSION / TRANSAXLE)>HYBRID TRANSAXLE FLUID>ADJUSTMENT
Using a 10 mm hexagon socket wrench, install the filler plug and a new gasket to the hybrid vehicle transaxle assembly.
- Torque:
- 50 N*m (510 kgf*cm, 37 ft.*lbf)
7.INSPECT FOR HYBRID TRANSAXLE FLUID LEAK
53737D
8.INSTALL FRONT FENDER APRON SEAL LH
51420
9.INSTALL NO. 2 ENGINE UNDER COVER ASSEMBLY
51441
10.INSTALL NO. 1 ENGINE UNDER COVER
53895B
11.INSTALL FRONT FENDER FRONT SPLASH SHIELD RH
53896B
12.INSTALL FRONT FENDER FRONT SPLASH SHIELD LH