P710 HYBRID TRANSMISSION / TRANSAXLE SHIFT LEVER POSITION SENSOR INSTALLATION
PROCEDURE

 89451A
1.INSTALL SHIFT LEVER POSITION SENSOR
Move the shift lever to N.
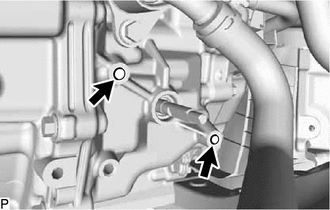
Clean and degrease the 2 bolt holes of the hybrid vehicle transaxle assembly.
Temporarily install the shift lever position sensor to the hybrid vehicle transaxle assembly with 2 new bolts.
- NOTICE:
- ·
Do not reuse the shift lever position sensor if it has been dropped or subjected to a severe impact.
·Do not allow moisture to adhere to the connector terminal.
Install the lock plate to the shift lever position sensor with the lock nut.
- Torque:
- 6.9 N*m (70 kgf*cm, 61 in.*lbf)
Temporarily install the transmission control shaft lever to the shift lever position sensor.
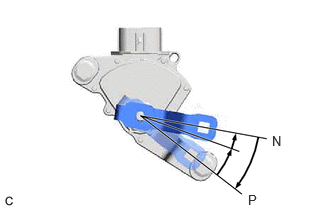
Turn the transmission control shaft lever clockwise until it stops, then turn it counterclockwise 2 notches.
Remove the transmission control shaft lever from the shift lever position sensor.
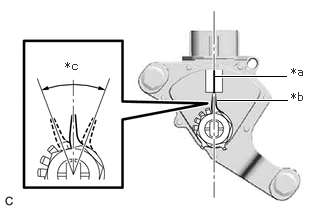
| *a | Neutral Basic Line |
| *b | Indicator |
| *c | Range of Play |
Align the indicator with the neutral basic line.
- NOTICE:
-
The indicator of the lock plate has a certain amount of play. Align the center point of the range of play with the neutral basic line.
Tighten the 2 bolts.
- Torque:
- 11 N*m (112 kgf*cm, 8 ft.*lbf)
Using a screwdriver with its tip wrapped with protective tape, secure the lock nut with the lock plate.
Install the transmission control shaft lever and washer to the shift lever position sensor with the nut.
- Torque:
- 12.7 N*m (130 kgf*cm, 9 ft.*lbf)
Connect the shift lever position sensor connector.
33820B
2.CONNECT TRANSMISSION CONTROL CABLE ASSEMBLY
Engage the 2 claws to install a new clip to the transmission control cable assembly.
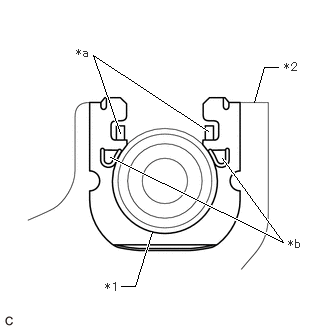
| *1 | Transmission Control Cable Assembly |
| *2 | No. 1 Transmission Control Cable Bracket |
| *a | Claw (A) |
| *b | Claw (B) |
Using a screwdriver, engage the 4 claws and install the transmission control cable assembly to the No. 1 transmission control cable bracket.
- NOTICE:
- ·
Make sure that the claws (A) of the clip are securely engaged in the grooves of the bracket.
·Make sure that the transmission control cable assembly is securely installed inside of the claws (B) of the clip.
Connect the transmission control cable assembly to the transmission control shaft lever with the nut.
- Torque:
- 12 N*m (122 kgf*cm, 9 ft.*lbf)
G125A
3.CONNECT MOTOR COOLING COOLER
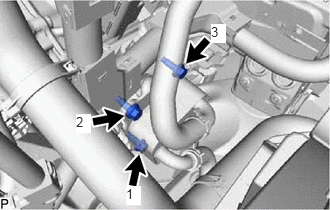
Temporarily connect the motor cooling cooler to the No. 1 transmission control cable bracket with the 3 bolts.
Tighten the 3 bolts in the order shown in the illustration.
- Torque:
- 11.5 N*m (117 kgf*cm, 8 ft.*lbf)
4.INSTALL AIR CLEANER ASSEMBLY WITH AIR CLEANER HOSE
12601B
5.INSTALL NO. 1 ENGINE COVER SUB-ASSEMBLY
17750A
6.INSTALL INLET AIR CLEANER ASSEMBLY
7.INSPECT SHIFT LEVER POSITION SENSOR POSITION
8.ADJUST SHIFT LEVER POSITION SENSOR POSITION
9.INSPECT SHIFT LEVER POSITION
10.ADJUST SHIFT LEVER POSITION
51420
11.INSTALL NO. 2 ENGINE UNDER COVER ASSEMBLY
51441
12.INSTALL NO. 1 ENGINE UNDER COVER
53895B
13.INSTALL FRONT FENDER FRONT SPLASH SHIELD RH
53896B
14.INSTALL FRONT FENDER FRONT SPLASH SHIELD LH