HYBRID / BATTERY CONTROL WATER PUMP WITH MOTOR INSTALLATION
PROCEDURE

 G9031A
1.INSTALL HV WATER PUMP BRACKET SUB-ASSEMBLY
- HINT:
-
This procedure is only performed when the HV water pump bracket sub-assembly is being replaced with a new one.
Install the HV water pump bracket sub-assembly to the front side member sub-assembly with the 2 bolts.
- Torque:
- 5.0 N*m (51 kgf*cm, 44 in.*lbf)
G9040
2.INSTALL INVERTER WATER PUMP ASSEMBLY
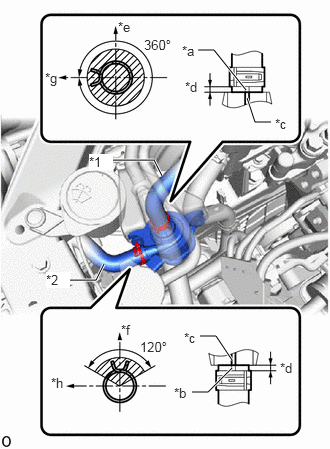
| *1 | No. 2 Inverter Cooling Hose |
| *2 | No. 3 Inverter Cooling Hose |
| *a | Alignment Mark (White) |
| *b | Alignment Mark (Yellow) |
| *c | Rib |
| *d | 2 to 7 mm (0.0788 to 0.2755 in.) |
| *e | Front of Vehicle |
| *f | Up |
| *g | LH Side |
| *h | RH Side |
Connect the No. 2 inverter cooling hose and No. 3 inverter cooling hose to the inverter water pump assembly and slide the 2 clips to secure them.
- NOTICE:
- ·
Make sure to align the alignment marks of the hoses with the ribs of the inverter water pump assembly.
·To prevent foreign matter from entering the inverter water pump assembly and inverter cooling system, do not remove the pieces of cloth from the pipes and disconnected hoses until installation.
·If the inverter water pump assembly has been struck or dropped, replace it.
- HINT:
-
Make sure that the clips are positioned as shown in the illustration.
Temporarily install the inverter water pump assembly to the HV water pump bracket sub-assembly with the 2 bolts.
Fully tighten the 2 bolts.
- Torque:
- 7.0 N*m (71 kgf*cm, 62 in.*lbf)
- NOTICE:
-
As overtightening the bolts may damage the fan shroud assembly, make sure to use a torque wrench.
Engage the No. 5 inverter cooling hose clamp.
Connect the inverter water pump assembly connector.
- NOTICE:
-
If a dustproof cap is installed to the inverter water pump assembly connector, do not remove it until the connector is to be connected.
3.ADD COOLANT (for Inverter)
4.INSPECT FOR COOLANT LEAK (for Inverter)