M20A-FKS STARTING STARTER(for Transaxle CVT with Stop and Start System) INSPECTION
PROCEDURE

 28100
1.INSPECT STARTER ASSEMBLY
- CAUTION:
-
As a large electric current passes through the cable during this inspection, a thick cable must be used. If not, the cable may become hot and cause injury.
- NOTICE:
-
Perform each of the following tests within 3 to 5 seconds to prevent the coil from burning out.
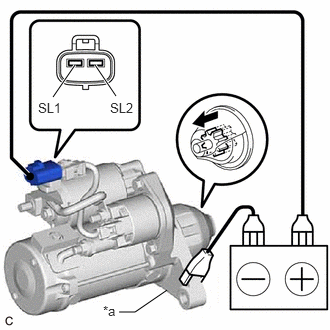
Perform a no-load performance test.
| *a | Starter Body |

|
Moves outward |
Connect the positive (+) lead to terminal SL1.
Connect the negative (-) lead to the starter body and check that the clutch pinion gear moves outward.
- NOTICE:
-
If the positive (+) and negative (-) leads are connected incorrectly, the IC inside the starter inrush current reduction relay will be damaged. Be sure to connect them correctly.
If the result is not as specified, replace the repair service starter kit.
| *a | Starter Body |
|
|
Disconnect |

|
Returns inward |
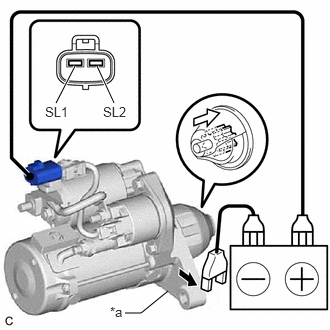
With the clutch pinion gear in the outward position, disconnect the negative (-) lead and check that the clutch pinion gear returns inward.
If the result is not as specified, replace the repair service starter kit.
| *a | Starter Body |
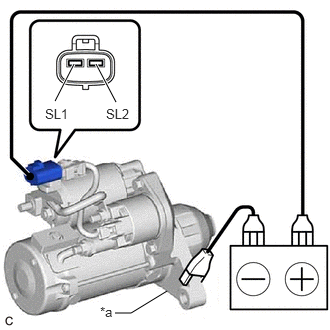
Connect the positive (+) lead to terminal SL2 of the connector and the negative (-) lead to the starter body. Check that a clicking sound is heard from the magnet switch.
If the result is not as specified, replace the repair service starter kit.
Secure the starter assembly in a vise between aluminum plates.
- NOTICE:
-
Ensure that the starter assembly is secured in the vise to prevent it from falling out.
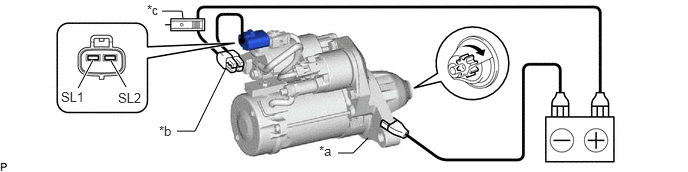
Connect the battery and an AC/DC 400A probe to the starter assembly as shown in the illustration.
| *a | Starter Body | *b | Terminal 30 |
| *c | AC/DC 400A Probe | - | - |
|
|
Rotates | - | - |
Connect terminal SL2 and measure the current after the AC/DC 400A probe reading has stabilized.
- Standard Current:
Tester Connection Condition Specified Condition Battery positive (+) terminal - Terminal 30 - Terminal SL2 11.5 V Below 130 A
- HINT:
-
If the starter assembly does not operate when terminal SL2 is connected, replace the repair service starter kit and starter inrush current reduction relay.
28160
2.INSPECT STARTER ARMATURE ASSEMBLY
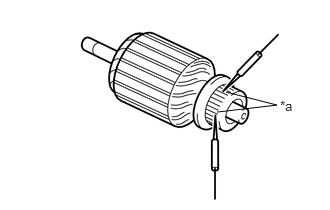
| *a | Segment |
Check the commutator for an open circuit.
Measure the resistance according to the value(s) in the table below.
- Standard Resistance:
Tester Connection Condition Specified Condition Segment - Segment Always Below 1 Ω
If the result is not as specified, replace the starter armature assembly.
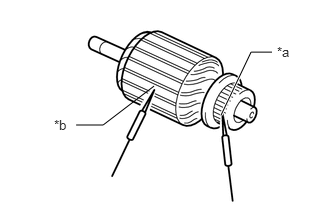
| *a | Segment |
| *b | Starter Armature Core |
Check the commutator for a short circuit.
Measure the resistance according to the value(s) in the table below.
- Standard Resistance:
Tester Connection Condition Specified Condition Segment - Starter armature core Always 10 kΩ or higher
If the result is not as specified, replace the starter armature assembly.
Check the commutator appearance.
If the surface is dirty or burnt, replace the stater armature assembly.
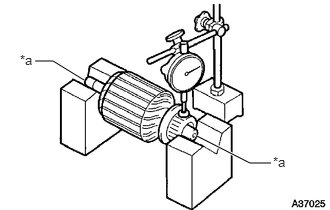
| *a | Armature Shaft |
Check the commutator for runout.
Place the armature shaft on V-blocks.
Using a dial indicator, measure the runout.
- Maximum Runout:
0.05 mm (0.00197 in.)
If the runout is greater than the maximum, replace the starter armature assembly.
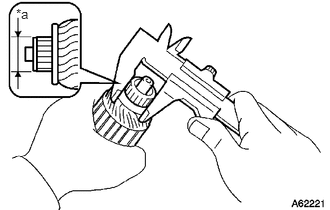
| *a | Diameter |
Using a vernier caliper, measure the commutator diameter.
- Standard Diameter (convex part):
29 mm (1.1417 in.)
- Minimum Diameter (convex part):
28 mm (1.1024 in.)
If the diameter is less than the minimum, replace the starter armature assembly.
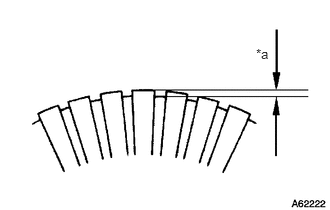
| *a | Undercut Depth |
Check that the undercut portion between the segments is free of foreign matter and measure its depth.
- Standard Undercut Depth (convex part):
0.4 mm (0.0157 in.)
- Minimum Undercut Depth (convex part):
0.2 mm (0.0079 in.)
If the undercut depth is less than the minimum, replace the starter armature assembly.
28140
3.INSPECT STARTER BRUSH HOLDER ASSEMBLY
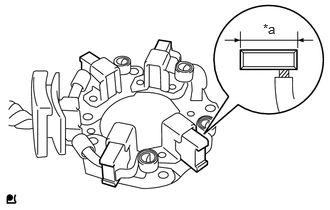
| *a | Length |
Check the brush length.
Using a vernier caliper, measure the brush length.
- Standard Length (convex part):
14.4 mm (0.567 in.)
- Minimum Length (convex part):
9.0 mm (0.354 in.)
If the length is less than the minimum, replace the starter brush holder assembly.
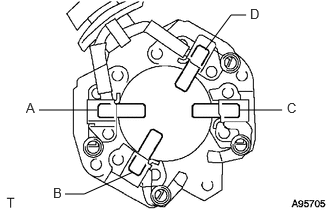
Check the brush holder resistance.
Measure the resistance according to the value(s) in the table below.
- Standard Resistance:
Tester Connection Condition Specified Condition A - B
A - C
B - D
C - DAlways 10 kΩ or higher A - D
B - CBelow 1 Ω
If the result is not as specified, replace the starter brush holder assembly.
Check the brush spring load.
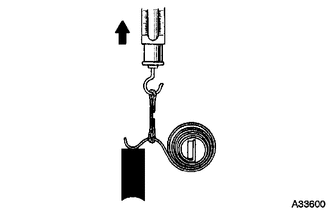
Take a pull scale reading the instant the brush spring separates from the brush.
- Standard Spring Load:
22.3 to 27.3 N (2.27 to 2.78 kgf, 5.01 to 6.14 lbf)
- Minimum Spring Load:
13.8 N (1.41 kgf, 3.1 lbf)
If the spring load is less than the minimum, replace the starter brush holder assembly.
28021
4.INSPECT STARTER CENTER BEARING CLUTCH SUB-ASSEMBLY
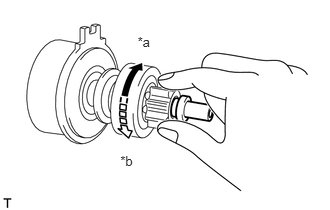
| *a | Free |
| *b | Lock |
Check the clutch pinion gear.
While holding the starter center bearing clutch sub-assembly, rotate the clutch pinion gear clockwise, and check that it turns freely. Try to rotate the clutch pinion gear counterclockwise and check that it locks.
If the clutch pinion gear does not operate as specified, replace the starter center bearing clutch sub-assembly.
28226B
5.INSPECT REPAIR SERVICE STARTER KIT
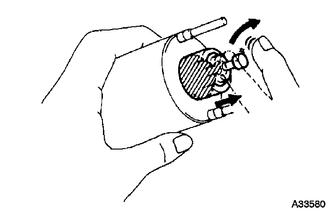
Check the plunger.
Push in the plunger and check that it returns quickly to its original position.
- NOTICE:
- ·
Do not drop the plunger.
·To avoid damaging the inside of the magnet switch, do not release the plunger quickly.
If the plunger does not operate as specified, replace the repair service starter kit.
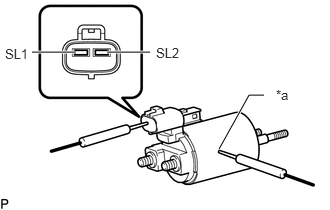
| *a | Magnet Switch Body |
Check the repair service starter kit resistance.
Measure the resistance according to the value(s) in the table below.
- Standard Resistance:
Tester Connection Condition Specified Condition Terminal SL1 - Magnet switch body Always Below 1 Ω Terminal SL2 - Magnet switch body Below 2 Ω
If the result is not as specified, replace the repair service starter kit.