M20A-FKS ENGINE CONTROL SFI SYSTEM ECM Power Source Circuit
DESCRIPTION
When the ignition switch is turned to ON, the battery voltage is applied to IGSW of the ECM. When the transistor in the MREL circuit operates, current flows from the battery to ground through the drive circuit of the EFI-MAIN NO. 1 relay, thus operating the relay which supplies power to the +B and +B2 terminals of the ECM.
WIRING DIAGRAM
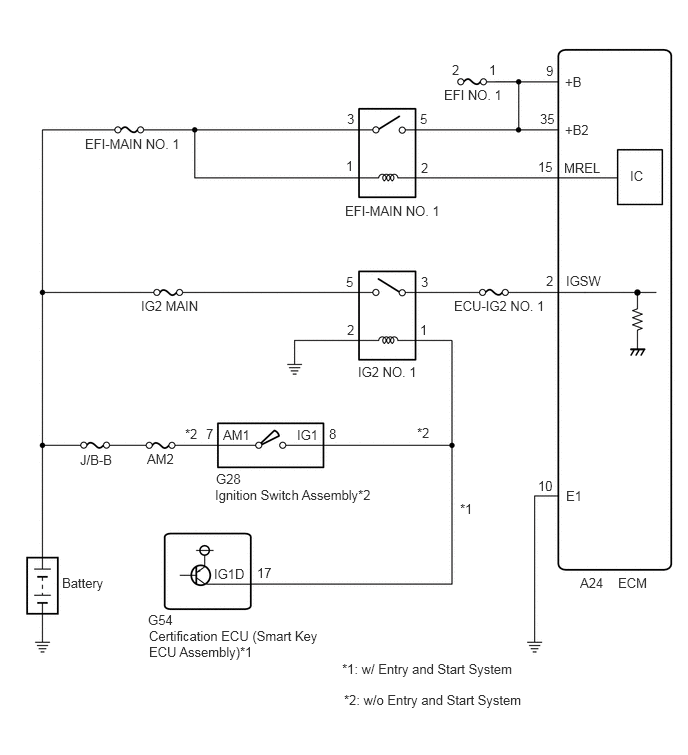
CAUTION / NOTICE / HINT
- NOTICE:
-
Inspect the fuses for circuits related to this system before performing the following procedure.
PROCEDURE
Disconnect the ECM connector.
Measure the resistance according to the value(s) in the table below.
- Standard Resistance:
Tester Connection Condition Specified Condition A24-10 (E1) - Body ground Always Below 1 Ω
- Result:
Proceed to OK NG
OK
NG
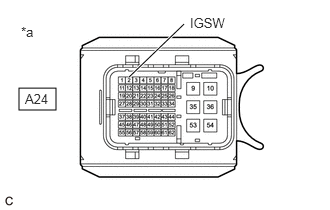
| *a | Front view of wire harness connector
(to ECM) |
Disconnect the ECM connector.
Turn the ignition switch to ON.
Measure the voltage according to the value(s) in the table below.
- Standard Voltage:
Tester Connection Condition Specified Condition A24-2 (IGSW) - Body ground Ignition switch ON 11 to 14 V
- Result:
Proceed to OK NG
OK
NG
Inspect the EFI-MAIN NO. 1 relay.
Click hereEngine / Hybrid System>M20A-FKS (ENGINE CONTROL)>RELAY>ON-VEHICLE INSPECTION
- Result:
Proceed to OK NG
OK
NG
Remove the EFI-MAIN NO. 1 relay from the No. 1 engine room relay block and junction block assembly.
Remove the VVT relay, EFI-MAIN NO. 2 relay and EFI-MAIN NO. 3 relay from the No. 1 engine room relay block and junction block assembly.
- HINT:
-
Remove the VVT relay, EFI-MAIN NO. 2 relay and EFI-MAIN NO. 3 relay connected between the checked terminals as the coil inside the relay influences the measurement value.
Disconnect the ECM connector.
Measure the resistance according to the value(s) in the table below.
- Standard Resistance:
Tester Connection Condition Specified Condition 2 (EFI-MAIN NO. 1 relay) - A24-15 (MREL) Always Below 1 Ω 5 (EFI-MAIN NO. 1 relay) - A24-9 (+B) Always Below 1 Ω 5 (EFI-MAIN NO. 1 relay) - A24-35 (+B2) Always Below 1 Ω 2 (EFI-MAIN NO. 1 relay) or A24-15 (MREL) - Body ground and other terminals Always 10 kΩ or higher 5 (EFI-MAIN NO. 1 relay), A24-9 (+B) or A24-35 (+B2) - Body ground and other terminals Always 10 kΩ or higher
- Result:
Proceed to OK NG
OK
NG
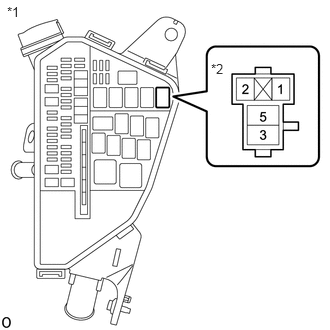
| *1 | No. 1 Engine Room Relay Block and Junction Block Assembly |
| *2 | EFI-MAIN NO. 1 Relay |
Remove the EFI-MAIN NO. 1 relay from the No. 1 engine room relay block and junction block assembly.
Measure the voltage according to the value(s) in the table below.
- Standard Voltage:
Tester Connection Condition Specified Condition 3 (EFI-MAIN NO. 1 relay) - Body ground Always 11 to 14 V 1 (EFI-MAIN NO. 1 relay) - Body ground Always 11 to 14 V
- Result:
Proceed to OK NG
OK
NG
Inspect the IG2 NO. 1 relay.
Click hereEngine / Hybrid System>M20A-FKS (ENGINE CONTROL)>RELAY>ON-VEHICLE INSPECTION
- Result:
Proceed to OK NG
OK
NG
Remove the IG2 NO. 1 relay from the No. 1 engine room relay block and junction block assembly.
Disconnect the ECM connector.
Measure the resistance according to the value(s) in the table below.
- Standard Resistance:
Tester Connection Condition Specified Condition 3 (IG2 NO. 1 relay) - A24-2 (IGSW) Always Below 1 Ω 3 (IG2 NO. 1 relay) or A24-2 (IGSW) - Body ground and other terminals Always 10 kΩ or higher
- Result:
Proceed to OK NG
OK
NG
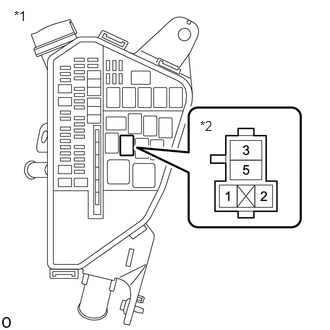
| *1 | No. 1 Engine Room Relay Block and Junction Block Assembly |
| *2 | IG2 NO. 1 Relay |
Remove the IG2 NO. 1 relay from the No. 1 engine room relay block and junction block assembly.
Measure the voltage according to the value(s) in the table below.
- Standard Voltage:
Tester Connection Condition Specified Condition 5 (IG2 NO. 1 relay) - Body ground Always 11 to 14 V
- Result:
Proceed to OK NG
OK
NG
Remove the IG2 NO. 1 relay from the No. 1 engine room relay block and junction block assembly.
Measure the resistance according to the value(s) in the table below.
- Standard Resistance:
Tester Connection Condition Specified Condition 2 (IG2 NO. 1 relay) - Body ground Always Below 1 Ω
- Result:
Result Proceed to OK (w/ Entry and Start System) A OK (w/o Entry and Start System) B NG C
A
B
C
Disconnect the certification ECU (smart key ECU assembly) connector.
Remove the IG2 NO. 1 relay from the No. 1 engine room relay block and junction block assembly.
Measure the resistance according to the value(s) in the table below.
- Standard Resistance:
Tester Connection Condition Specified Condition G54-17 (IG1D) - 1 (IG2 NO. 1 relay) Always Below 1 Ω G54-17 (IG1D) or 1 (IG2 NO. 1 relay) - Body ground and other terminals Always 10 kΩ or higher
- Result:
Proceed to OK NG
OK
NG
Inspect the ignition switch assembly.
Click hereEngine / Hybrid System>M20A-FKS (STARTING)>IGNITION SWITCH>INSPECTION
- Result:
Proceed to OK NG
OK
NG
Disconnect the ignition switch assembly connector.
Remove the IG2 NO. 1 relay from the engine room relay block and junction block assembly.
Measure the resistance according to the value(s) in the table below.
- Standard Resistance:
Tester Connection Condition Specified Condition G28-8 (IG1) - 1 (IG2 NO. 1 relay) Always Below 1 Ω G28-8 (IG1) or 1 (IG2 NO. 1 relay) - Body ground and other terminals Always 10 kΩ or higher
- Result:
Proceed to OK NG
OK
NG