LIGHTING (EXT) HEIGHT CONTROL SENSOR INSTALLATION
PROCEDURE

 89408C
1.INSTALL REAR HEIGHT CONTROL SENSOR SUB-ASSEMBLY LH
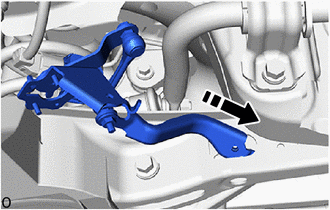

|
Insert in this Direction |
Insert the rear height control sensor bracket into the No. 2 lower arm.
- NOTICE:
-
If the rear height control sensor sub-assembly LH has been dropped, replace it with a new one.
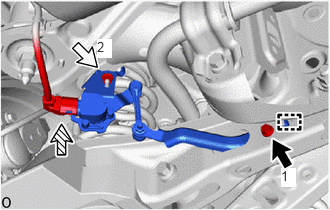

|
Bolt |

|
Nut |

|
Connector |
Attach the hook.
Temporarily install the rear height control sensor sub-assembly LH with the bolt and nut.
Tighten the bolt and nut order shown in the illustration.
- Torque:
- for Bolt : 8.0 N*m (82 kgf*cm, 71 in.*lbf)
- for Nut : 8.0 N*m (82 kgf*cm, 71 in.*lbf)
Connect the connector.
2.PERFORM INITIALIZATION
- NOTICE:
-
If any of the work in the table below has been performed, initialization of the headlight ECU sub-assembly LH is necessary.
Performed Work or System Condition Necessary Procedures Link Work that changes the vehicle height such as replacement or removal/installation of the rear height control sensor sub-assembly LH or replacement of suspension components Initialization of the headlight ECU sub-assembly LH (  )
3.INSPECT HEADLIGHT AIMING
for Triple Beam Headlight:
Click hereVehicle Exterior>LIGHTING (EXT)>HEADLIGHT ASSEMBLY (for Triple Beam Headlight)>ADJUSTMENT
for Single Beam Headlight:
Click hereVehicle Exterior>LIGHTING (EXT)>HEADLIGHT ASSEMBLY(for Single Beam Headlight)>ADJUSTMENT