EXTERIOR PANELS / TRIM WHEEL OPENING MOULDING(for Front) REASSEMBLY
PROCEDURE

 53855C
1.INSTALL FRONT NO. 5 WHEEL OPENING EXTENSION PAD (for Off Road Package)
- HINT:
-
When installing a new front No. 5 wheel opening extension pad, heat the front fender moulding LH using a heat light.
- Standard:
Item Temperature Front Fender Moulding LH 20 to 30°C (68 to 86°F)
- CAUTION:
-
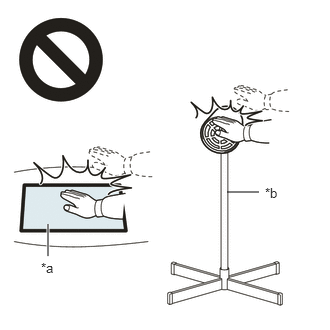 2.365,2 2.698,2 false 0.5,2.333 0.5,2.667 true 0.427,2.708 0.74,2.865 0.313,0.156 10 false *a 2.76,1.927 3.073,2.083 0.313,0.156 10 false *b
*a Heated Part *b Heat Light
- ·
Do not touch the heat light and heated parts.
·Touching the heat light may result in burns.
·Touching heated parts for a long time may result in burns.
- NOTICE:
-
Do not heat the front fender moulding LH excessively.
When reusing the front fender moulding LH:
Using a heat light, heat the front fender moulding LH surface.
Remove any remaining double-sided tape from the front fender moulding LH.
Wipe off any tape adhesive residue with cleaner.
- NOTICE:
- ·
Installing the front No. 5 wheel opening extension pad with some double-sided tape remaining may cause poor adhesion. Perform this procedure until the tape is sufficiently removed.
·Make sure to use a cloth when removing. Using a screwdriver, etc., may cause damage and poor adhesion.
·Also, clean a new front fender moulding LH surface.
Apply primer to the front fender moulding LH on the installation area of the front No. 5 wheel opening extension pad using a brush or felt.
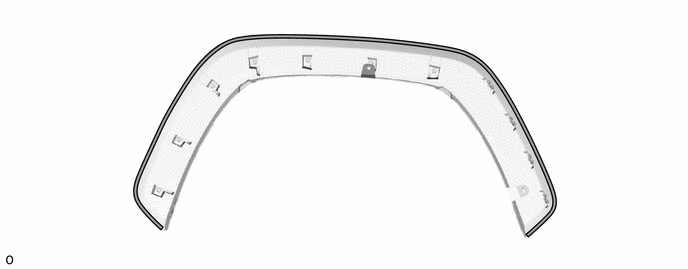

|
Primer | - | - |
- NOTICE:
- ·
Replace the brush or felt if it is dirty or has become hardened.
·Keep any painted surface free from primer.
·If the primer contacts a painted surface, it may leave light primer marks. Therefore, use protective tape when using liquid primer.
·Do not touch surfaces to which primer has been applied until the front No. 5 wheel opening extension pad has been attached.
Let the primer dry sufficiently.
- NOTICE:
-
Do not touch applied surfaces until the primer is dry.
- Recommended drying time:
10 minutes or more (at 23°C (73°F))
Remove the peeling paper of a new front No. 5 wheel opening extension pad trying not to touch the adhesional surface.
Install the front No. 5 wheel opening extension pad as shown in the illustration.
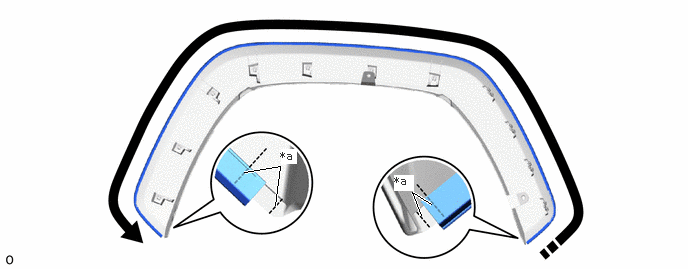
| *a | Mark-off Line | - | - |

|
Install in this Direction | - | - |
- HINT:
-
Make sure that the end of the front No. 5 wheel opening extension pad is between the mark-off lines.
75798B
2.INSTALL REAR DOOR REAR OUTSIDE MOULDING PAD (except Off Road Package)
- HINT:
-
When installing a new rear door rear outside moulding pad, heat the front fender moulding LH using a heat light.
- Standard:
Item Temperature Front Fender Moulding LH 20 to 30°C (68 to 86°F)
- CAUTION:
-
2.365,2 2.698,2 false 0.5,2.333 0.5,2.667 true 0.427,2.708 0.74,2.865 0.313,0.156 10 false *a 2.76,1.927 3.073,2.083 0.313,0.156 10 false *b
*a Heated Part *b Heat Light
- ·
Do not touch the heat light and heated parts.
·Touching the heat light may result in burns.
·Touching heated parts for a long time may result in burns.
- NOTICE:
-
Do not heat the front fender moulding LH excessively.
When reusing the front fender moulding LH:
Using a heat light, heat the front fender moulding LH surface.
Remove any remaining double-sided tape from the front fender moulding LH.
Wipe off any tape adhesive residue with cleaner.
- NOTICE:
- ·
Installing the rear door rear outside moulding pad with some double-sided tape remaining may cause poor adhesion. Perform this procedure until the tape is sufficiently removed.
·Make sure to use a cloth when removing. Using a screwdriver, etc., may cause damage and poor adhesion.
·Also, clean a new front fender moulding LH surface.
Apply primer to the front fender moulding LH on the installation area of the rear door rear outside moulding pad using a brush or felt.
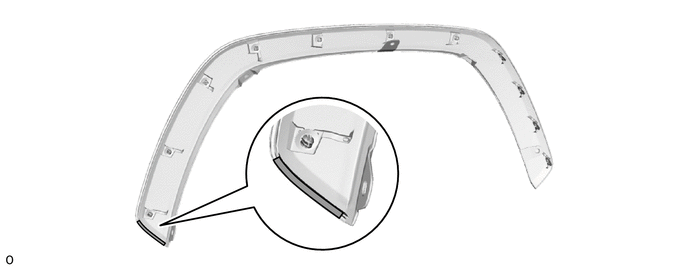
|
|
Primer | - | - |
- NOTICE:
- ·
Replace the brush or felt if it is dirty or has become hardened.
·Keep any painted surface free from primer.
·If the primer contacts a painted surface, it may leave light primer marks. Therefore, use protective tape when using liquid primer.
·Do not touch surfaces to which primer has been applied until the rear door rear outside moulding pad has been attached.
Let the primer dry sufficiently.
- NOTICE:
-
Do not touch applied surfaces until the primer is dry.
- Recommended drying time:
10 minutes or more (at 23°C (73°F))
Remove the peeling paper of a new rear door rear outside moulding pad trying not to touch the adhesional surface.
Install the front rear door rear outside moulding pad as shown in the illustration.
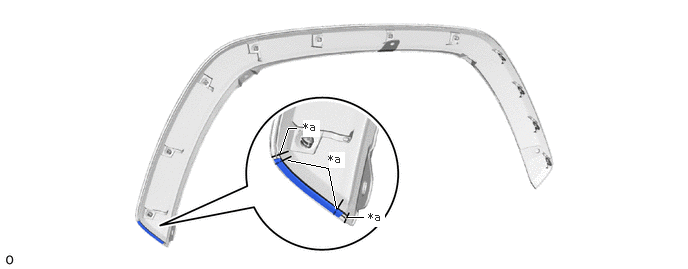
| *a | Mark-off Line | - | - |
- HINT:
-
Make sure that the end of the rear door rear outside moulding pad is between the mark-off lines.
53853B
3.INSTALL FRONT NO. 1 WHEEL OPENING EXTENSION PAD (except Off Road Package)
- HINT:
-
When installing a new front No. 1 wheel opening extension pad, heat the front fender moulding LH using a heat light.
- Standard:
Item Temperature Front Fender Moulding LH 20 to 30°C (68 to 86°F)
- CAUTION:
-
2.365,2 2.698,2 false 0.5,2.333 0.5,2.667 true 0.427,2.708 0.74,2.865 0.313,0.156 10 false *a 2.76,1.927 3.073,2.083 0.313,0.156 10 false *b
*a Heated Part *b Heat Light
- ·
Do not touch the heat light and heated parts.
·Touching the heat light may result in burns.
·Touching heated parts for a long time may result in burns.
- NOTICE:
-
Do not heat the front fender moulding LH excessively.
When reusing the front fender moulding LH:
Using a heat light, heat the front fender moulding LH surface.
Remove any remaining double-sided tape from the front fender moulding LH.
Wipe off any tape adhesive residue with cleaner.
- NOTICE:
- ·
Installing the front No. 1 wheel opening extension pad with some double-sided tape remaining may cause poor adhesion. Perform this procedure until the tape is sufficiently removed.
·Make sure to use a cloth when removing. Using a screwdriver, etc., may cause damage and poor adhesion.
·Also, clean a new front fender moulding LH surface.
Apply primer to the front fender moulding LH on the installation area of the front No. 1 wheel opening extension pad using a brush or felt.
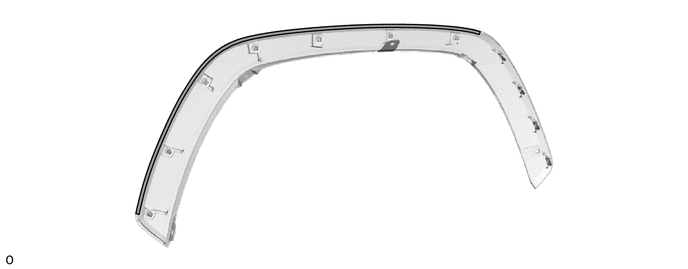
|
|
Primer | - | - |
- NOTICE:
- ·
Replace the brush or felt if it is dirty or has become hardened.
·Keep any painted surface free from primer.
·If the primer contacts a painted surface, it may leave light primer marks. Therefore, use protective tape when using liquid primer.
·Do not touch surfaces to which primer has been applied until the front No. 1 wheel opening extension pad has been attached.
Let the primer dry sufficiently.
- NOTICE:
-
Do not touch applied surfaces until the primer is dry.
- Recommended drying time:
10 minutes or more (at 23°C (73°F))
Remove the peeling paper of a new front No. 1 wheel opening extension pad trying not to touch the adhesional surface.
Install the front No. 1 wheel opening extension pad as shown in the illustration.
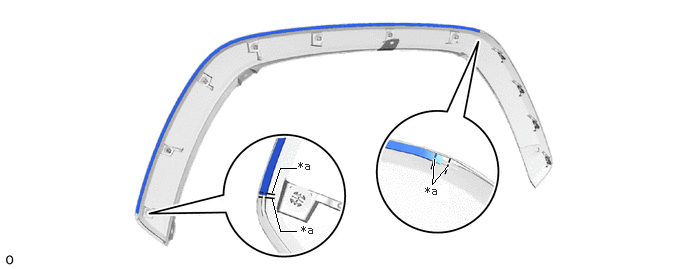
| *a | Mark-off Line | - | - |
- HINT:
-
Make sure that the end of the front No. 1 wheel opening extension pad is between the mark-off lines.