PARKING BRAKE ELECTRIC PARKING BRAKE SYSTEM(w/o Vacuum Brake Booster) C13A6 Open or Short Circuit in Motor
DESCRIPTION
| DTC No. | Detection Item | DTC Detection Condition | Trouble Area | Memory | Note |
|---|---|---|---|---|---|
| C13A6 | Open or Short Circuit in Motor | One of the following conditions are met:
Detection conditions (1)
1.
Power switch on (IG) or electric parking brake switch (integration control and panel assembly) assembly pulled to lock side with power switch off. 2.
Power supply voltage and +B voltage are normal, but motor circuit is malfunctioning for approximately 1 to 2 seconds. Detection conditions (2)
With the power switch off, an overcurrent malfunction is continuously detected for 1 second or more Detection conditions (3)
With the power switch on (IG) and an overcurrent malfunction being continuously detected, the parking brake is locked and released 3 times |
·
Wire harness or connector ·
Parking brake wire assembly ·
Parking brake actuator assembly ·
Parking brake ECU assembly |
Yes | An electric parking brake system malfunction is displayed on the multi-information display. |
| Vehicle Condition | |||||
| Pattern 1 | Pattern 2 | Pattern 3 | Pattern 4 | ||
| Diagnosis Condition | Electric parking brake switch (integration control and panel assembly) is operated to lock side with power switch off | ○ | - | - | - |
| Power switch on (IG) | - | ○ | - | - | |
| Power switch off | - | - | ○ | - | |
| With the power switch on (IG) and an overcurrent malfunction being continuously detected, the parking brake is locked and released | - | - | - | ○ | |
| Malfunction Status | Parking brake motor circuit malfunction when power supply voltage and +B voltage are normal | ○ | ○ | - | - |
| An overcurrent malfunction is continuously detected | - | - | ○ | - | |
| Detection Time | Approximately 1 to 2 seconds | Approximately 1 to 2 seconds | 1 second or more | 3 times | |
| Trip Count | 1 trip | 1 trip | 1 trip | 1 trip | |
- HINT:
-
If the conditions match either of these patterns, a DTC will be output.
WIRING DIAGRAM
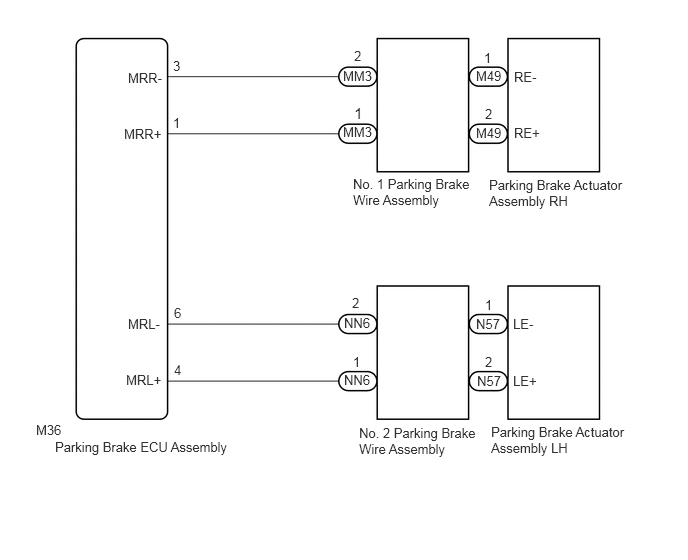
CAUTION / NOTICE / HINT
- NOTICE:
- ·
The electric parking brake may still operate up to 20 seconds after the power switch is turned off. Before disconnecting connectors or fuses, turn the power switch off and wait 20 seconds or more.
·When replacing the parking brake ECU assembly, operate the electric parking brake switch (integration control and panel assembly) from the lock side to the release side, as the parking brake indicator light blinks when the power switch is first turned on (IG).
PROCEDURE
Turn the power switch off.
Connect the GTS to the DLC3.
Turn the power switch on (IG).
Turn the GTS on.
Enter the following menus: Chassis / Electric Parking Brake / Data List.
Read the Data List according to the display on the GTS.
- Chassis > Electric Parking Brake > Data List
-
Tester Display Measurement Item Range Normal Condition Diagnostic Note RH Actuator Current Status RH Actuator Current Status Valid or Inval Valid - LH Actuator Current Status LH Actuator Current Status Valid or Inval Valid -
- Chassis > Electric Parking Brake > Data List
-
Tester Display RH Actuator Current Status LH Actuator Current Status - 50003 184 613,614
- Result:
Proceed to NEXT
NEXT
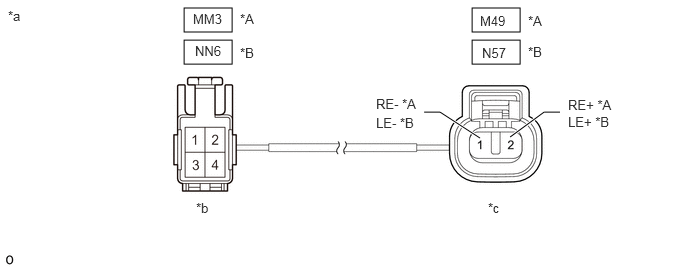
| *A | RH | *B | LH |
| *a | Front view of Parking Brake Wire Assembly | *b | (to Wire Harness Connector) |
| *c | (to Parking Brake Actuator Assembly) | - | - |
Remove the parking brake wire assembly.
Check the parking brake wire assembly for damage.
- OK:
No damage.
- HINT:
-
If damaged, there may be a short in the wire harness or a short to ground.
Inspect the parking brake wire assembly.
- Standard Resistance:
RH Tester Connection Condition Specified Condition MM3-2 - M49-1 (RE-) Always Below 1 Ω MM3-2 - M49-2 (RE+) Always 10 kΩ or higher MM3-2 or M49-1 (RE-) - Body ground Always 10 kΩ or higher MM3-1 - M49-2 (RE+) Always Below 1 Ω MM3-1 - M49-1 (RE-) Always 10 kΩ or higher MM3-1 or M49-2 (RE+) - Body ground Always 10 kΩ or higher
LH Tester Connection Condition Specified Condition NN6-2 - N57-1 (LE-) Always Below 1 Ω NN6-2 - N57-2 (LE+) Always 10 kΩ or higher NN6-2 or N57-1 (LE-) - Body ground Always 10 kΩ or higher NN6-1 - N57-2 (LE+) Always Below 1 Ω NN6-1 - N57-1 (LE-) Always 10 kΩ or higher NN6-1 or N57-2 (LE+) - Body ground Always 10 kΩ or higher
- Result:
Proceed to OK NG
OK
NG
Turn the power switch off.
Make sure the parking brake wire assembly is securely installed.
Disconnect the M36 parking brake ECU assembly connector.
Disconnect the M49 or N57 parking brake actuator assembly connector.
Measure the resistance according to the value(s) in the table below.
- Standard Resistance:
RH Tester Connection Condition Specified Condition M36-1 (MRR+) - M49-2 (RE+) Always Below 1 Ω M36-3 (MRR-) - M49-1 (RE-) Always Below 1 Ω M36-1 (MRR+) or M49-2 (RE+) - Body ground Always 10 kΩ or higher M36-3 (MRR-) or M49-1 (RE-) - Body ground Always 10 kΩ or higher
LH Tester Connection Condition Specified Condition M36-4 (MRL+) - N57-2 (LE+) Always Below 1 Ω M36-6 (MRL-) - N57-1 (LE-) Always Below 1 Ω M36-4 (MRL+) or N57-2 (LE+) - Body ground Always 10 kΩ or higher M36-6 (MRL-) or N57-1 (LE-) - Body ground Always 10 kΩ or higher
- Result:
Proceed to OK NG
OK
NG
Remove the parking brake actuator assembly.
Click hereBrake>PARKING BRAKE>ELECTRIC PARKING BRAKE ACTUATOR>REMOVAL
Inspect the parking brake actuator assembly.
Click hereBrake>PARKING BRAKE>ELECTRIC PARKING BRAKE ACTUATOR>INSPECTION
- Result:
Proceed to OK NG
OK
NG