Home › Engine / Hybrid System ยท 2UZ-FE › FUEL › FUEL TANK

FUEL TANK > INSTALLATION

for Preparation Click here


1. INSTALL FUEL SUCTION WITH PUMP AND GAUGE TUBE ASSEMBLY
  1. Apply a light coat of gasoline or grease to a new gasket, and install it to the fuel tank.


    A152236E01
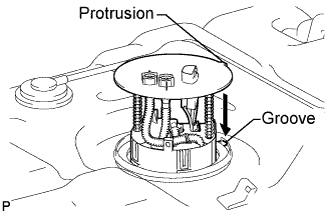
  1. Install the fuel suction with pump and gauge tube assembly into the fuel tank.

    NOTICE:
    1. Be careful not to bend the arm of the fuel suction with pump and gauge tube assembly.
    2. Align the protrusion of the fuel suction with pump and gauge tube assembly with the groove of the fuel tank.
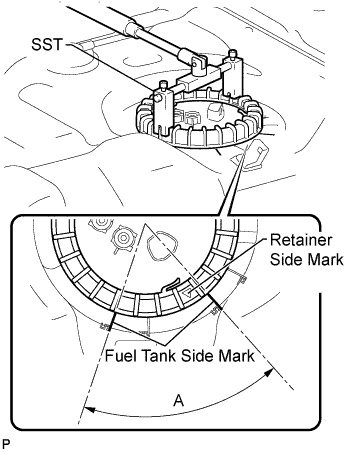
  1. Put the retainer on the fuel tank. While holding the fuel suction with pump and gauge tube assembly, tighten the retainer one complete turn by hand.


    A156395E01
  1. Using SST, tighten the retainer until the mark on the retainer is within range A on the fuel tank, as shown in the illustration.

    SST
    09808-14020  

    HINT:
    Fit the tips of SST onto the ribs of the retainer.


    A152247
    A118171E02
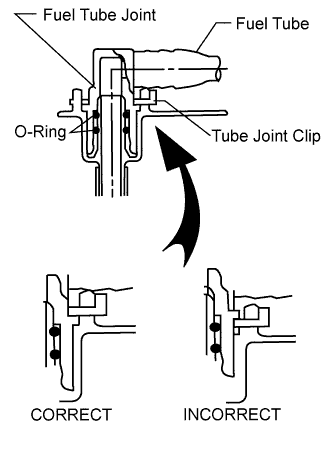
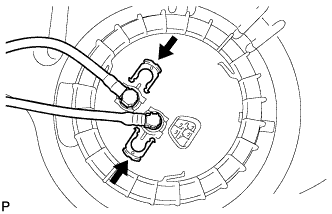
  1. Install the 2 fuel tank tubes with the 2 tube joint clips.

    NOTICE:
    1. Check that there are no scratches or foreign objects on the connecting parts.
    2. Check that the fuel tube joints are inserted securely.
    3. Check that the tube joint clips are on the collars of the fuel tube joints.
    4. After installing the tube joint clips, check that the fuel tube joints have not been pulled off.


2. INSTALL NO. 1 FUEL TANK HEAT INSULATOR


    A152250E01
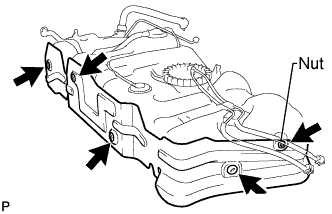
  1. Install the No. 1 fuel tank heat insulator with the 4 clips and nut.

    Torque:
    6.0 N*m{ 61 kgf*cm , 53 in.*lbf }


3. INSTALL FUEL TANK ASSEMBLY
  1. Set the fuel tank on a transmission jack and raise the fuel tank assembly.


    A185651
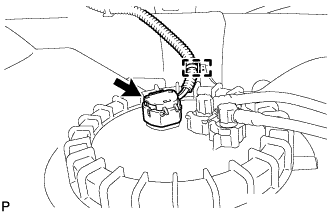
  1. Connect the wire harness clamp and fuel pump connector to the fuel tank assembly.

    NOTICE:
    Be careful not to cut the wiring.

  1. Raise the transmission jack.


    A152248
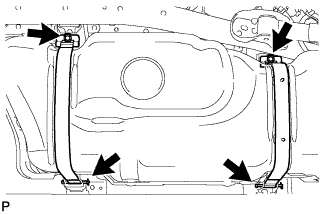
  1. Install the 2 fuel tank bands with the 2 pins and 2 clips.

  1. Connect the 2 fuel tank bands with the 2 bolts.

    Torque:
    40 N*m{ 408 kgf*cm , 30 ft.*lbf }


    A185652E01
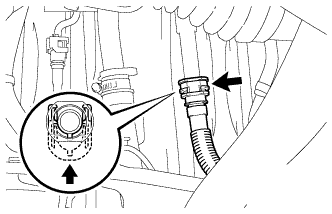
  1. Connect the fuel tank breather tube to the fuel tank inlet pipe sub-assembly.

    HINT:
    Push the parts together firmly until a "click" sound is heard.

    NOTICE:
    1. Before installing the tube connectors to the pipes, check if there is any damage or foreign matter in the connectors.
    2. After the connection, check if the connectors and pipes are securely connected by trying to pull them apart.


    A185653
  1. Connect the vent line hose and install the retainer.

    NOTICE:
    1. Before installing the hose, make sure that it is not damaged. Make sure that there is no foreign matter present on the connecting surfaces.
    2. After connecting, check if the hose and the connector are securely connected by pulling on them.


    A185648
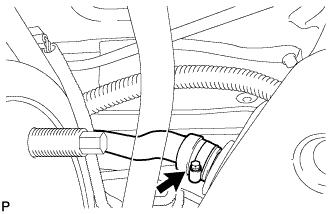
  1. Connect the fuel tank to filler pipe hose to the fuel tank assembly.


4. CONNECT FUEL TANK RETURN TUBE


A185654E01
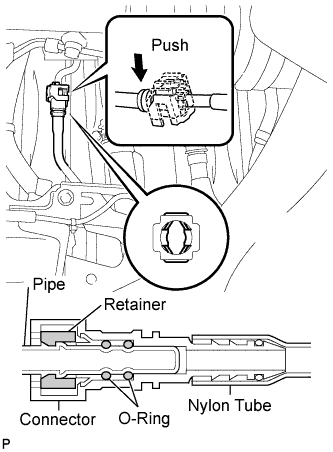
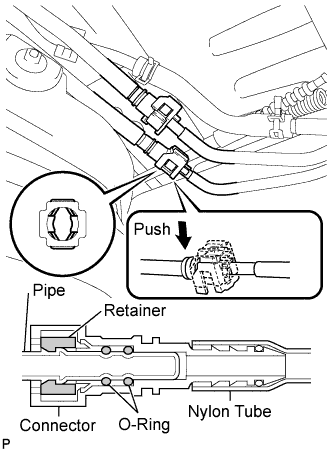
  1. Connect the fuel tank return tube.

    HINT:
    Push the parts together firmly until a "click" sound is heard.

    NOTICE:
    1. Before installing the tube connectors to the pipes, check if there is any damage or foreign matter in the connectors.
    1. After the connection, check if the connectors and pipes are securely connected by trying to pull them apart.

  1. Attach the lock claws to the connector by pushing down on the cover, as shown in the illustration.


5. CONNECT FUEL TANK MAIN TUBE SUB-ASSEMBLY


    A185655E01
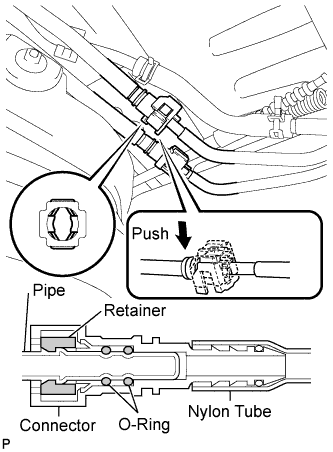
  1. Connect the fuel tank main tube.

    HINT:
    Push the parts together firmly until a "click" sound is heard.

    NOTICE:
    1. Before installing the tube connectors to the pipes, check if there is any damage or foreign matter in the connectors.
    1. After the connection, check if the connectors and pipes are securely connected by trying to pull them apart.

  1. Attach the lock claws to the connector by pushing down on the cover, as shown in the illustration.


6. INSTALL FUEL TANK CAP


7. INSPECT FOR FUEL LEAK
  1. Connect the Techstream to the DLC3.

  1. Turn the ignition switch to ON and turn the Techstream ON.

    NOTICE:
    Do not start the engine.

  1. Techstream:
    Enter the following menus: Powertrain / Engine and ECT / Active Test / Control the Fuel Pump / Speed.

  1. Check that there are no fuel leaks after doing maintenance anywhere on the fuel system.


    A133618E01
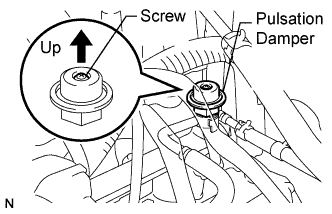
  1. Check that the pulsation damper screw rises up when the fuel pump operates.
    If the operation is not as specified, check the following parts:

    1. Fusible link
    2. Fuses
    3. Circuit opening relay
    4. Fuel pump
    5. ECM
    6. Wiring connections
    If no malfunctions are found in the aforementioned components, replace the pulsation damper.

  1. Turn the ignition switch off.

  1. Disconnect the Techstream from the DLC3.