Home › Vehicle Exterior › WINDOW / GLASS › POWER WINDOW MASTER SWITCH

POWER WINDOW MASTER SWITCH > INSPECTION

for Preparation Click here


1. INSPECT POWER WINDOW MASTER SWITCH


  1. Check the resistance.
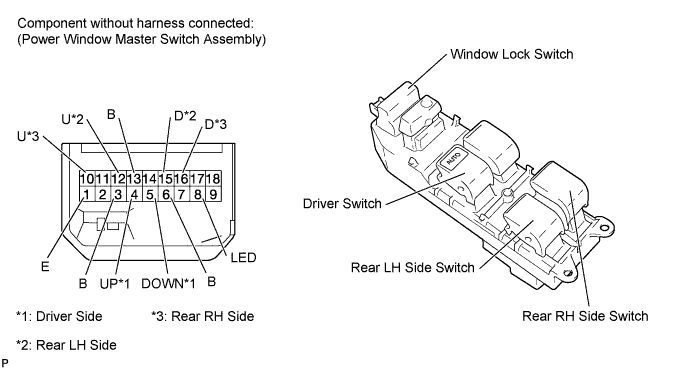

    B174702E03


    1. Measure the resistance according to the value(s) in the table below.

      HINT:
      Window motors other than the driver MANUAL and rear seat window motors use LIN communication, and therefore this inspection cannot be performed for those windows.


      Standard Resistance:

      Driver Switch 
      Tester Connection
      Window Lock Switch Condition
      Power Window Switch Condition
      Specified Condition
      1 (E) - 4 (UP)
      5 (DOWN) - 13 (B)
      Always
      (ON/OFF)
      UP
      Below 1 Ω
      4 (UP) - 13 (B)
      5 (DOWN) - 13 (B)
      Always
      (ON/OFF)
      OFF
      Below 1 Ω
      1 (E) - 5 (DOWN)
      4 (UP) - 13 (B)
      Always
      (ON/OFF)
      DOWN MANUAL
      Below 1 Ω

      If the result is not as specified, replace the power window master switch.

      Standard Resistance:

      Rear LH Side Switch 
      Tester Connection
      Window Lock Switch Condition
      Power Window Switch Condition
      Specified Condition
      13 (B) - 12 (U)
      1 (E) - 15 (D)
      OFF
      UP
      Below 1 Ω
      1 (E) - 12 (U)
      1 (E) - 15 (D)
      OFF
      OFF
      Below 1 Ω
      13 (B) - 15 (D)
      1 (E) - 12 (U)
      OFF
      DOWN
      Below 1 Ω
      13 (B) - 12 (U)
      ON
      UP
      Below 1 Ω
      1 (E) - 15 (D)
      ON
      UP
      10 kΩ or higher
      12 (U) - 15 (D)
      ON
      OFF
      Below 1 Ω
      13 (B) - 15 (D)
      ON
      DOWN
      Below 1 Ω
      1 (E) - 12 (U)
      ON
      DOWN
      10 kΩ or higher

      If the result is not as specified, replace the power window master switch.

      Standard Resistance:

      Rear RH Side Switch 
      Tester Connection
      Window Lock Switch Condition
      Power Window Switch Condition
      Specified Condition
      13 (B) - 10 (U)
      1 (E) - 16 (D)
      OFF
      UP
      Below 1 Ω
      1 (E) - 10 (U)
      1 (E) - 16 (D)
      OFF
      OFF
      Below 1 Ω
      13 (B) - 16 (D)
      1 (E) - 10 (U)
      OFF
      DOWN
      Below 1 Ω
      13 (B) - 10 (U)
      ON
      UP
      Below 1 Ω
      1 (E) - 16 (D)
      ON
      UP
      10 kΩ or higher
      10 (U) - 16 (D)
      ON
      OFF
      Below 1 Ω
      13 (B) - 16 (D)
      ON
      DOWN
      Below 1 Ω
      1 (E) - 10 (U)
      ON
      DOWN
      10 kΩ or higher

      If the result is not as specified, replace the power window master switch.

  1. Check the illumination operation.

    1. Apply battery voltage to the power window master switch and check that the illumination comes on.

      OK:
      Measurement Condition
      Specified Condition
      Battery positive (+) → Terminal 8 (LED)
      Battery negative (-) → Terminal 1 (E)
      Illumination comes on

      If the result is not as specified, replace the power window master switch.