PARKING BRAKE CABLE > INSTALLATION |
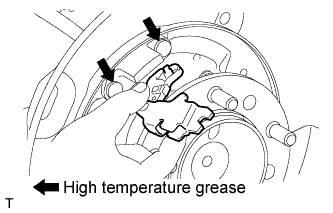
| 1. INSTALL PARKING BRAKE SHOE LEVER LH |
|
Apply high temperature grease to the parking brake shoe lever.
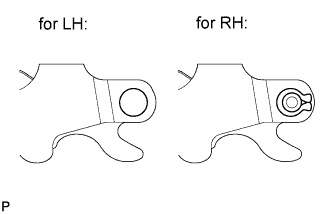 |
Install the parking brake shoe lever to the No. 3 parking brake cable.
| 2. INSTALL PARKING BRAKE SHOE LEVER RH |
| 3. INSTALL NO. 2 PARKING BRAKE SHOE ASSEMBLY LH |
Apply high temperature grease to the areas of the backing plate that contact the shoe.
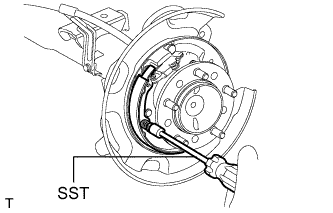 |
Using SST, install the No. 2 parking brake shoe with the shoe hold down spring pin, compression spring and shoe hold down spring cup.
| 4. INSTALL NO. 2 PARKING BRAKE SHOE ASSEMBLY RH |
| 5. INSTALL NO. 1 PARKING BRAKE SHOE ASSEMBLY LH |
Apply high temperature grease to the areas of the backing plate that contact the shoe.
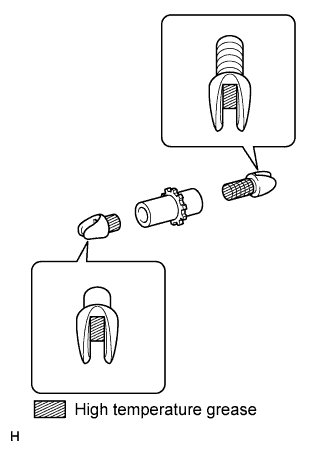 |
Apply high temperature grease to the areas of the shoe adjuster screw set shown in the illustration.
Set the parking brake shoe and shoe adjuster screw set in place.
Connect the tension spring.
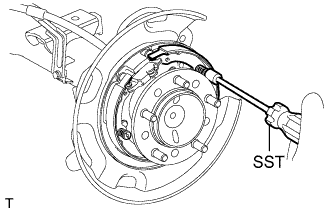 |
Using SST, install the No. 1 parking brake shoe with the shoe hold down spring pin, compression spring and shoe hold down spring cup.
| 6. INSTALL NO. 1 PARKING BRAKE SHOE ASSEMBLY RH |
| 7. INSTALL PARKING BRAKE SHOE RETURN SPRING LH |
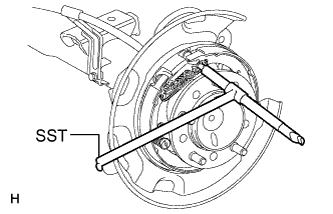 |
Using SST, install the shoe return spring.
| 8. INSTALL PARKING BRAKE SHOE RETURN SPRING RH |
| 9. CHECK PARKING BRAKE INSTALLATION |
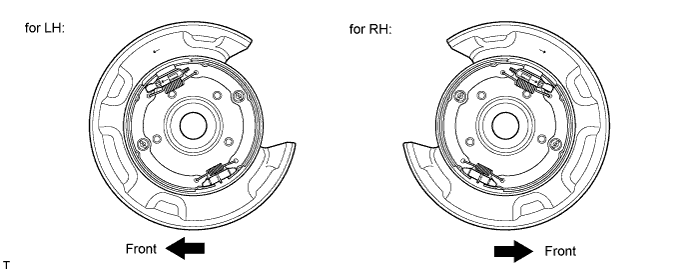
Check that each part is installed properly.
| 10. INSTALL REAR DISC LH |
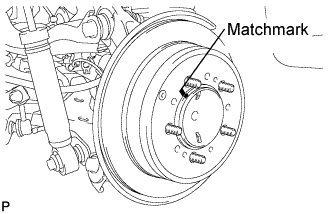 |
Align the matchmarks and install the rear disc.
| 11. INSTALL REAR DISC RH |
| 12. INSTALL NO. 3 PARKING BRAKE CABLE ASSEMBLY |
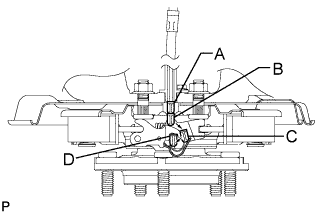 |
Attach the inner cable end to the carrier assembly and tighten the bolt to the specified torque. The inner cable end will be in position A.
Push the inner cable from the opposite end. The inner cable end that is inside the brake assembly will move inbound as shown in B. From there, it will follow the lever shape and push open the guide spring, as shown in C. Finally, after the inner cable end moves in enough, the guide spring will force the cable end to seat in the final operation location, as shown in D.
After connecting the inner cable end to the brake assembly, push and pull the opposite end of the inner cable 2 or 3 times to confirm that the inner cable end and brake assembly are securely connected.
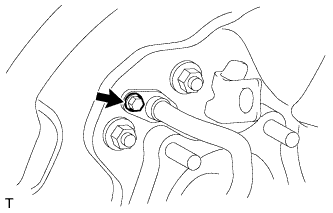 |
Install the No. 3 parking brake cable to the rear axle carrier with the bolt.
Install the No. 3 parking brake cable to the frame with the 4 bolts.
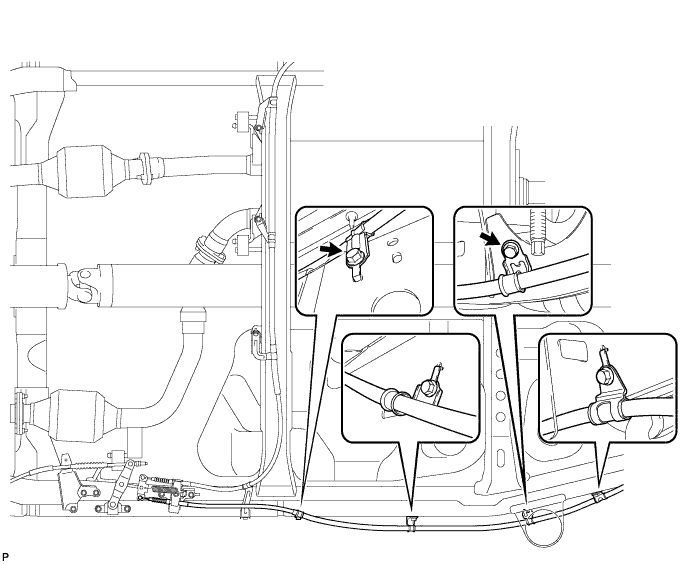
Apply MP grease to the areas where the cable contact the intermediate lever.
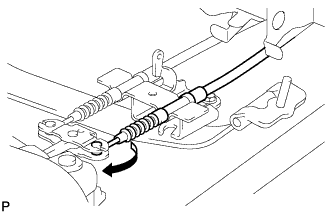 |
Connect the No. 3 parking brake cable to the intermediate lever.
| 13. INSTALL NO. 2 PARKING BRAKE CABLE ASSEMBLY |
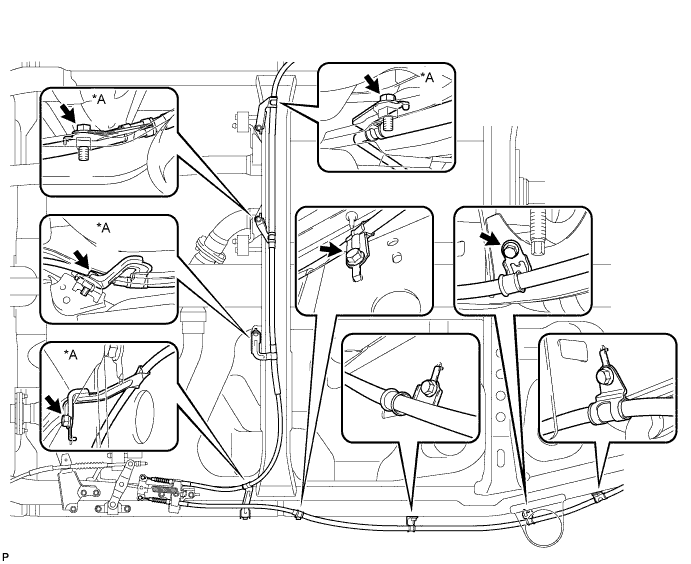
Install the No. 2 parking brake cable to the rear axle carrier with the bolt.
Install the No. 2 parking brake cable to the frame with the 8 bolts.
Connect the No. 2 parking brake cable to the intermediate lever.
| 14. INSTALL NO. 2 CABLE RETAINER |
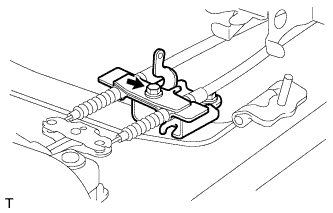 |
Install the retainer with the bolt.
| 15. INSTALL INTERMEDIATE LEVER TENSION SPRING |
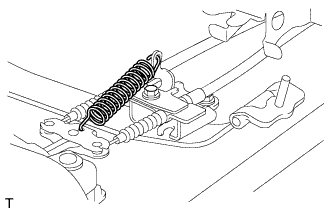 |
Install the tension spring.
| 16. ADJUST PARKING BRAKE SHOE CLEARANCE |
Temporarily install the hub nuts.
Remove the hole plug.
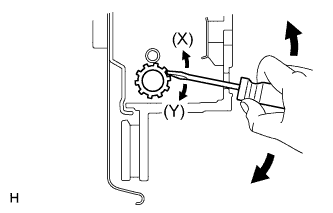 |
Insert an adjustment tool into the adjustment hole of the disc. Rotate the adjustment wheel in the "X" direction until the shoes are locked. Then rotate the adjustment wheel in the "Y" direction 8 notches.
Check that the disc can be rotated smoothly. If not, rotate the adjustment wheel in the "Y" direction and check again.
Install the hole plug.
Remove the hub nuts.
| 17. CONNECT REAR DISC BRAKE CYLINDER ASSEMBLY LH |
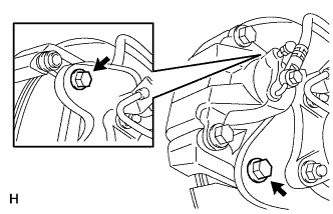 |
Connect the rear disc brake cylinder with 2 new bolts.
| 18. CONNECT REAR DISC BRAKE CYLINDER ASSEMBLY RH |
| 19. INSTALL REAR WHEEL LH |
| 20. INSTALL REAR WHEEL RH |
| 21. CONNECT NO. 1 PARKING BRAKE CABLE ASSEMBLY |
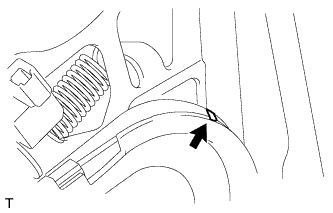 |
Connect the parking brake cable to the control pedal.
Using needle-nose pliers, slowly bend down the claw.
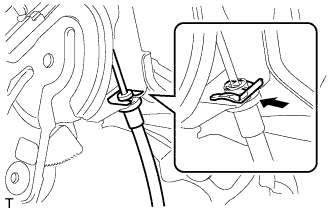 |
Install a new clip to the control pedal.
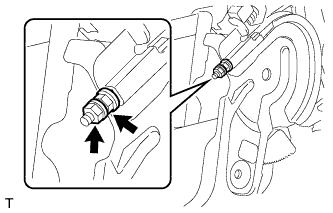 |
Temporarily install the adjustment nut and lock nut.
| 22. INSTALL NO. 1 PARKING BRAKE CABLE ASSEMBLY |
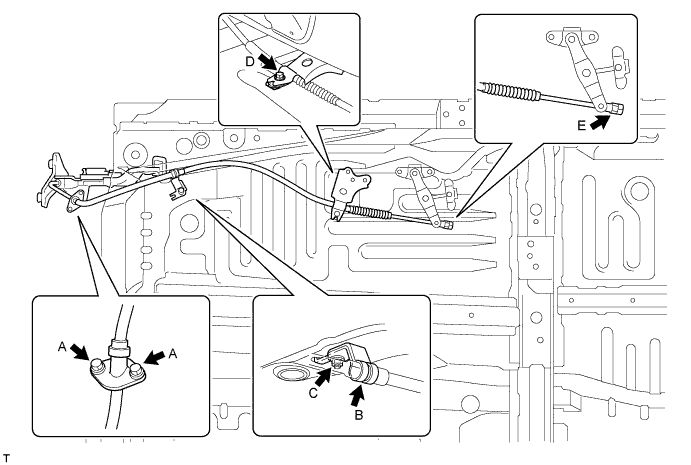
Install the No. 1 parking brake cable to the inside of the vehicle with the 2 bolts (labeled A).
Connect the clamp (labeled B) to the No. 1 parking brake cable.
Install the clamp with the nut (labeled C).
Install the No. 1 parking brake cable and cable retainer with the bolt (labeled D).
Temporarily install the adjustment nut and lock nut (labeled E).
| 23. INSTALL FRONT NO. 2 EXHAUST PIPE ASSEMBLY (for 3UR-FE) |
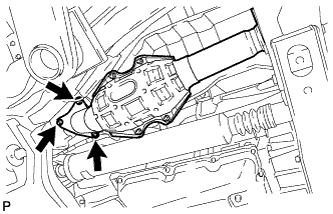 |
Install a new gasket and the front No. 2 exhaust pipe to the exhaust manifold LH with 3 new nuts.
Connect the air fuel ratio sensor connector.
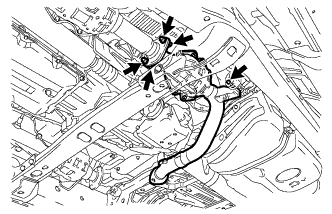 |
Connect the front No. 3 exhaust pipe to the exhaust pipe support.
Install a new gasket and the front No. 3 exhaust pipe sub-assembly to the No. 2 exhaust pipe sub-assembly with the 2 bolts and 2 new nuts.
| 24. INSTALL FRONT NO. 2 EXHAUST PIPE ASSEMBLY (for 2UZ-FE) |
Install the new gasket to the front No. 2 exhaust pipe assembly.
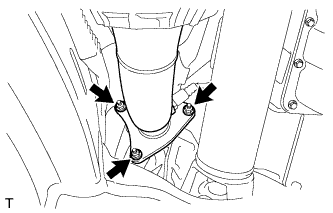 |
Install the front No. 2 exhaust pipe assembly with the 3 new nuts.
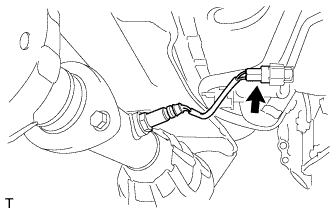 |
Connect the heated oxygen sensor connector.
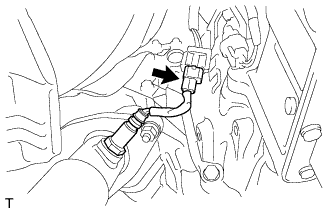 |
Connect the air fuel ratio sensor connector.
| 25. INSTALL FRONT NO. 3 EXHAUST PIPE SUB-ASSEMBLY (for 2UZ-FE) |
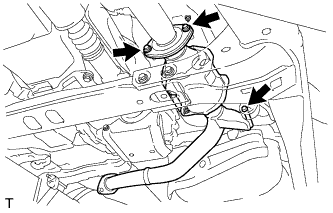 |
Install the new gasket to the front No. 2 exhaust pipe assembly.
Connect the front No. 3 exhaust pipe sub-assembly to the exhaust pipe support.
Install the front No. 3 exhaust pipe sub-assembly with the 2 bolts and 2 nuts.
| 26. SETTLE PARKING BRAKE SHOE AND DISC |
Drive the vehicle for approximately 400 m (0.25 miles) under the following conditions.
The vehicle speed is approximately 50 km/h (31 mph) and the vehicle is on a safe, level and dry road.
The parking brake pedal is being depressed with a force of 150 N (15 kgf, 33.7 lbf).
Repeat the procedures above 2 or 3 times.
| 27. CHECK PARKING BRAKE PEDAL TRAVEL |
Firmly depress the parking brake pedal.
Release the parking brake.
Slowly depress the parking brake pedal with a force of approximately 300 N (31 kgf, 67.4 lbf) and count the number of clicks.
| 28. ADJUST PARKING BRAKE PEDAL TRAVEL |
Depress the parking brake pedal.
Release the parking brake pedal to the original position.
|
Loosen the pedal side No. 1 parking brake cable lock nut.
Turn the pedal side No. 1 parking brake cable adjustment nut until the parking brake pedal travel is correct.
| Pedal Load | Click Number |
| 300 N (31 kgf, 67.4 lbf) | 6 to 9 |
Using a wrench or equivalent to hold the adjustment nut, tighten the lock nut.
Additionally, excessive pedal travel can be adjusted on the No. 1 parking brake cable underbody side as follows.
Release the parking brake pedal to the original position.
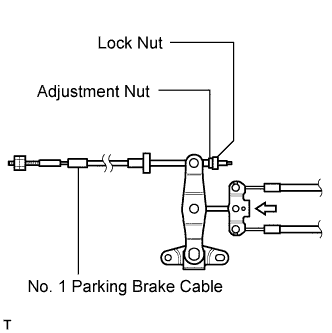 |
Loosen the underbody side No. 1 parking brake cable lock nut.
Turn the underbody side No. 1 parking brake cable adjustment nut until the parking brake pedal travel is correct.
| Pedal Load | Click Number |
| 300 N (31 kgf, 67.4 lbf) | 6 to 9 |
Tighten the No. 1 parking brake cable underbody lock nut.
Depress to full stroke and release the parking brake pedal 3 or 4 times. Then check the number of clicks when depressing the pedal.
Check whether the parking brake drags or not.
If the parking brake drags, adjust the shoe clearance.
When operating the parking brake pedal, check that the parking brake pedal indicator light comes on at the first notch.
If not, adjust the parking brake switch installation position.
| 29. INSTALL NO. 1 INSTRUMENT PANEL SAFETY PAD INSERT |
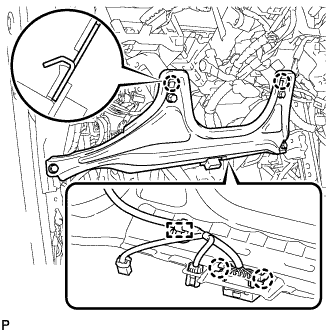 |
Connect the connector and engage the clamp.
Engage the 2 claws to install the safety pad insert.
Install the 4 <A> bolts.
| 30. INSTALL LOWER INSTRUMENT PANEL FINISH PANEL SUB-ASSEMBLY LH |
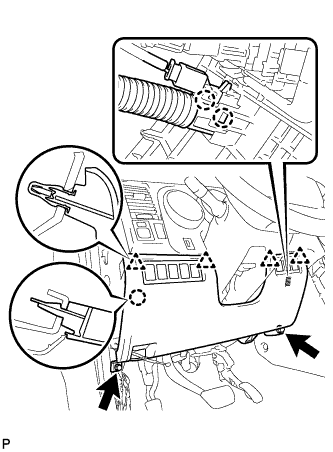 |
Engage the 2 claws and install the sensor.
Connect the connectors.
Engage the 4 clips and claw and install the finish panel.
Install the 2 <A> bolts.
| 31. INSTALL HOOD LOCK CONTROL LEVER SUB-ASSEMBLY |
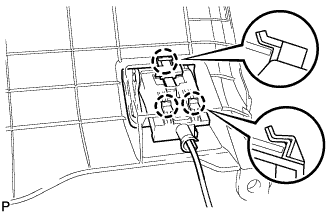 |
Connect the hood lock control cable assembly to the hood lock control lever sub-assembly.
engage the 3 claws to install the hood lock lever
| 32. INSTALL INSTRUMENT SIDE PANEL LH |
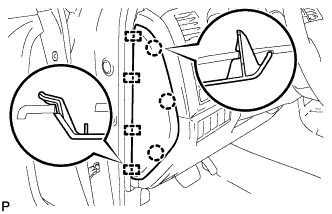 |
Engage the 4 guides and 3 claws and install the side panel.
| 33. INSTALL COWL SIDE TRIM BOARD LH |
| 34. INSTALL FRONT DOOR SCUFF PLATE LH |
| 35. INSPECT FOR EXHAUST GAS LEAK |