Home › Vehicle Interior › HEATING / AIR CONDITIONING › AIR CONDITIONING PRESSURE SENSOR

AIR CONDITIONING PRESSURE SENSOR > INSTALLATION

for Preparation Click here


1. INSTALL AIR CONDITIONER PRESSURE SENSOR


I104383
  1. Sufficiently apply compressor oil to O-ring and the fitting surface of the pressure sensor.

    Compressor oil:
    ND-OIL 8 or equivalent

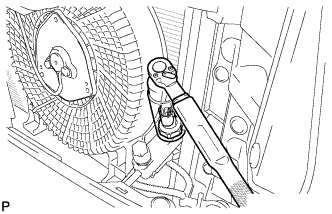
  1. Using a deep socket wrench 27 mm, install the pressure sensor.

    Torque:
    11 N*m{ 110 kgf*cm , 8 ft.*lbf }

  1. Connect the connector.


2. CHARGE REFRIGERANT


I100449E02

NOTICE:
Charge refrigerant in accordance with the equipment manual.

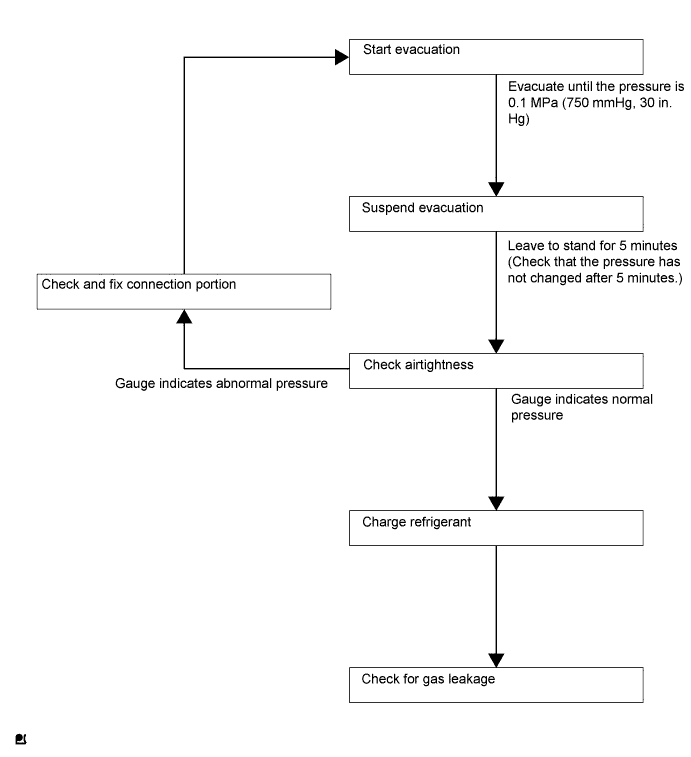
  1. Perform vacuum purging using a vacuum pump.

  1. Charge refrigerant HFC-134a (R134a).

    SST
    09985-20010   (09985-02010, 09985-02050, 09985-02060, 09985-02070, 09985-02080, 09985-02090, 09985-02110, 09985-02130, 09985-02140, 09985-02150)

    Standard:
    860 to 920 g (30.3 to 32.5 oz.)

    NOTICE:
    Do not start the engine before charging it with refrigerant as the cooler compressor does not work properly without sufficient refrigerant. This could cause the compressor to overheat.

    HINT:

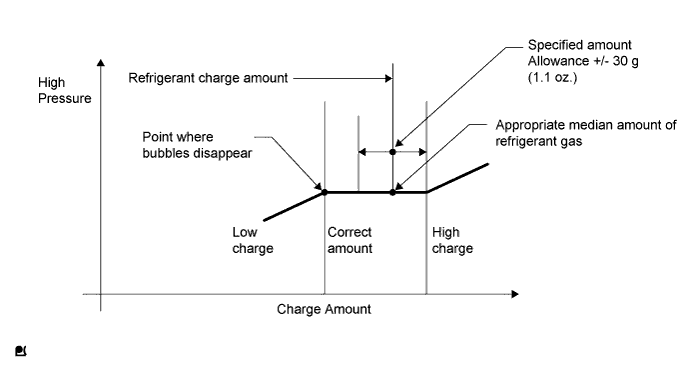
    1. The relationship between the refrigerant charge amount and the pressure is as follows.


      I103968E01

    2. High Charge Range:
      If the refrigerant is overcharged, the pressure rises on the high-pressure side. High-pressure cut off frequently occurs. This causes insufficient cooling performance and also insufficient compressor lubrication.
    3. Low Charge Range:
      A shortage of refrigerant causes insufficient cooling performance and low circulation of refrigerant oil, which shortens the compressor life. Operation with insufficient coolant raises the refrigerant temperature and causes heat deterioration of the rubber seals and hoses. Cracking and subsequent refrigerant leakage may occur.


    1. Install the caps onto the service valves on the refrigerant line.


3. WARM UP ENGINE

NOTICE:
Warm up the engine at less than 2000 rpm for 1 minute or more after charging it with refrigerant.


4. INSPECT FOR REFRIGERANT LEAK
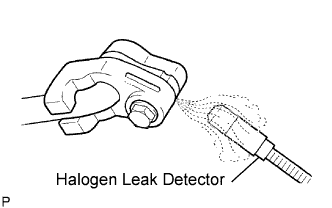
  1. After recharging the refrigerant gas, check for refrigerant gas leakage using a halogen leak detector.

  1. Perform the operation as follows:

    1. Stop the engine.
    2. Secure good ventilation (the halogen leak detector may react to volatile gases other than refrigerant, such as evaporated gasoline or exhaust gas).
    3. Repeat the test 2 or 3 times.
    4. Make sure that some refrigerant remains in the refrigeration system.
      When the compressor is off: approximately 392 to 588 kPa (4 to 6 kgf*cm2, 57 to 85 psi)

    HINT:
    It is impossible for the above pressure to be maintained if there is leakage.


    I042222E14
  1. Using the halogen leak detector, check the refrigerant line, especially at the connection points, for leakage.

  1. If no gas leakage is detected from the drain hose, remove the blower motor from the cooling unit. Insert the halogen leak detector sensor into the unit and perform the test.

  1. Disconnect the pressure switch connector and leave it for approximately 20 minutes. Bring the halogen leak detector close to the pressure switch and perform the test.