REPAIR INSTRUCTION > INITIALIZATION |
| PROCEDURES NECESSARY WHEN BATTERY TERMINAL IS DISCONNECTED / RECONNECTED |
| Necessary Procedures | Procedure Details | Effects / Inoperative Functions When Necessary Procedures are not Performed | Notes |
| Power back door system initialization | To initialize, close the back door completely by hand. | Jam protection function | If the back door is closed when disconnecting the cable from the battery terminal, it is not necessary to reset it. |
| PROCEDURES NECESSARY WHEN ECU OR OTHER PARTS ARE REPLACED |
| Replacement Part | Necessary Procedures | Effects / Inoperative Functions When Necessary Procedures are not Performed | Notes |
| ECM | Register VIN | DTC P0630 is output | - |
| Fuel with different alcohol concentration is used (for 3UR-FBE) | Reset fuel density learning value |
| - |
| Distance control ECU | Initialize distance control ECU | Dynamic radar cruise control system | Do not turn the headlight dimmer switch on at this time because the optical axis automatic adjustment mode has already started, which may lead to an incorrect optical axis setting. If the headlight dimmer switch is turned on by mistake, readjust the optical axis. |
| Reset memory | Large shift shock | - |
| Tire pressure warning ECU |
|
| - |
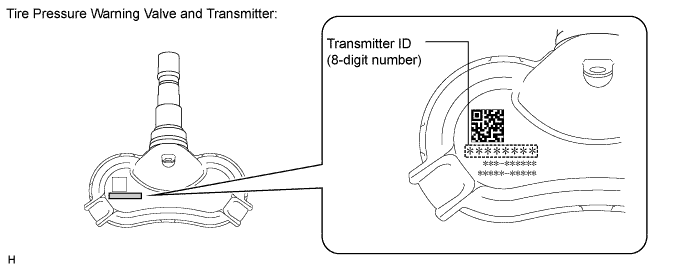
| Tire pressure warning valve and transmitter |
|
| Even if only one wheel is replaced, IDs for all 4 wheels must be registered. |
| Suspension control ECU | Registration | Air suspension system | - |
| Skid control ECU |
|
| - |
| Yaw rate sensor |
|
| - |
| Front Wheel Alignment Adjustment |
|
| Complete the adjustment of the steering wheel and wheel alignment, and then initialize the steering angle sensor. If the order is reversed, the steering wheel and wheel alignment will become misaligned. |
| Occupant classification ECU |
|
| - |
| Registration | Engine starting | - |
| Register recognition code | Wireless door lock operation | - |
| Inner rear view mirror |
|
| - |
| Inner rear view mirror (Garage door opener transmitter) | Registration | Garage door does not operative | - |
| Initialize the motor |
| - |
| Initialize sliding roof system |
| - |
| DESCRIPTION |
Read VIN: Explains the VIN reading process in a flowchart. This process allows the VIN stored in the ECM to be read in order to confirm that the two VINs, the one provided with the vehicle and the one stored in the vehicle's ECM, are the same.
Write VIN: Explains the VIN writing process in a flowchart. This process allows the VIN to be input into the ECM. If the ECM is changed, or the ECM VIN and vehicle VIN do not match, the VIN can be registered or overwritten in the ECM by following this procedure.
| READ VIN |
Confirm the vehicle VIN.
Connect the Techstream to the DLC3.
Turn the ignition switch to ON.
Turn the Techstream on.
Enter the following menus: Powertrain / Engine and ECT / Utility / VIN / VIN Read.
| WRITE VIN |
Confirm the vehicle VIN.
Connect the Techstream to the DLC3.
Turn the ignition switch to ON.
Turn the Techstream on.
Enter the following menus: Powertrain / Engine and ECT / Utility / VIN / VIN Write.
| Fuel Density Learning Value Reset (for 3UR-FBE) |
Connect the intelligent tester to the DLC3.
Turn the ignition switch to ON.
Turn the tester on.
Enter the following menus: Powertrain / Engine and ECT / Utility / Fuel Density Learning Value Reset.
Check that the following conditions are met.
Ignition switch: ON
Engine: stopped
Battery voltage: 9 V or higher
Press "Next".
Press "Exit".
| INITIALIZE DISTANCE CONTROL ECU |
Perform the following procedures after replacing the distance control ECU.
Turn the ignition switch to ON.
Turn the cruise main switch on.
With the brake pedal depressed, push the cruise control main switch to RES/ACC 3 times within 3 seconds. Check that the buzzer sounds at this time.
| RESET MEMORY (for A760E) |
Connect the Techstream to the DLC3.
Turn the ignition switch to ON.
Turn the Techstream on.
Enter the following menus: Powertrain / Engine and ECT / Utility / Reset Memory.
| RESET MEMORY (for A760F) |
Connect the Techstream to the DLC3.
Turn the ignition switch to ON.
Turn the Techstream on.
Enter the following menus: Powertrain / Engine and ECT / Utility / Reset Memory.
| RESET MEMORY (for AB60E) |
Connect the Techstream to the DLC3.
Turn the ignition switch to ON.
Turn the Techstream on.
Enter the following menus: Powertrain / Engine and ECT / Utility / Reset Memory.
| RESET MEMORY (for AB60F) |
Connect the Techstream to the DLC3.
Turn the ignition switch to ON.
Turn the Techstream on.
Enter the following menus: Powertrain / Engine and ECT / Utility / Reset Memory.
| REGISTRATION OF VEHICLE IDENTIFICATION INFORMATION |
Turn the ignition switch off.
Connect the Techstream to the DLC3.
Turn the ignition switch to ON.
Turn the Techstream on.
Enter the following menus: Chassis / Air suspension / Utility / Signal Check.
Check that the height control MAN. indicator light in the combination meter indicates that the system has entered Test Mode.
| DESCRIPTION OF CODE REGISTRATION |
Before registration
If replacing the tire pressure warning ECU:
If replacing the tire pressure warning valve and transmitter:

| REGISTER TRANSMITTER ID |
Set the air pressure of all tires to the specified value.
Turn the ignition switch off.
Connect the Techstream to the DLC3.
Turn the ignition switch to ON and turn the Techstream on.
Enter the following menus: Chassis / Tire Pressure Monitor / Utility / ID Registration.
Perform the following procedures displayed on the screen.
Confirmation of transmitter ID registration.
Enter the following menus: Chassis / Tire Pressure Monitor / Data List.
Read the "ID Tire Inflation Pressure" values.
Confirm that the data of tire pressure of all tires are displayed on the screen.
| DESCRIPTION OF INITIALIZATION |
Perform initialization in the following cases:
Before initialization
Set the air pressure of all tires to the specified value.
| INITIALIZATION PROCEDURE |
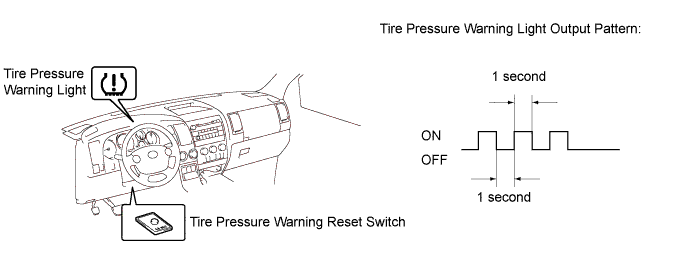
Turn the ignition switch to ON.
Press and hold the tire pressure warning reset switch for 3 seconds or more so that the tire pressure warning light blinks 3 times.

Turn the ignition switch off.
Connect the Techstream to the DLC3.
Turn the ignition switch to ON and the Techstream on.
Enter the following menus: Chassis / Tire Pressure Monitor / Data List.
![]() |
Confirm that the tire pressure data of all tires are displayed on the Techstream screen in order to check the completion.
| Tester Display | Measurement Item/Range | Normal Condition | Diagnostic Note |
| ID1 Tire Inflation Pressure | ID1 tire inflation pressure / min.: Absolute pressure / 100 kPa (1 kgf/cm2, 14 psi), Relative pressure / 0 kPa (0 kgf/cm2, 0 psi) max.: Absolute pressure / 449.35 kPa (4.6 kgf/cm2, 65 psi), Relative pressure / 349.35 kPa (3.6 kgf/cm2, 51 psi) | Actual tire inflation pressure | If 100 kPa (1 kgf/cm2, 14 psi) for the absolute pressure or 0 kPa (0 kgf/cm2, 0 psi) is displayed for the relative pressure, data has not been received.* |
| ID2 Tire Inflation Pressure | ID2 tire inflation pressure / min.: Absolute pressure / 100 kPa (1 kgf/cm2, 14 psi), Relative pressure / 0 kPa (0 kgf/cm2, 0 psi) max.: Absolute pressure / 449.35 kPa (4.6 kgf/cm2, 65 psi), Relative pressure / 349.35 kPa (3.6 kgf/cm2, 51 psi) | Actual tire inflation pressure | If 100 kPa (1 kgf/cm2, 14 psi) for the absolute pressure or 0 kPa (0 kgf/cm2, 0 psi) is displayed for the relative pressure, data has not been received.* |
| ID3 Tire Inflation Pressure | ID3 tire inflation pressure / min.: Absolute pressure / 100 kPa (1 kgf/cm2, 14 psi), Relative pressure / 0 kPa (0 kgf/cm2, 0 psi) max.: Absolute pressure / 449.35 kPa (4.6 kgf/cm2, 65 psi), Relative pressure / 349.35 kPa (3.6 kgf/cm2, 51 psi) | Actual tire inflation pressure | If 100 kPa (1 kgf/cm2, 14 psi) for the absolute pressure or 0 kPa (0 kgf/cm2, 0 psi) is displayed for the relative pressure, data has not been received.* |
| ID4 Tire Inflation Pressure | ID4 tire inflation pressure / min.: Absolute pressure / 100 kPa (1 kgf/cm2, 14 psi), Relative pressure / 0 kPa (0 kgf/cm2, 0 psi) max.: Absolute pressure / 449.35 kPa (4.6 kgf/cm2, 65 psi), Relative pressure / 349.35 kPa (3.6 kgf/cm2, 51 psi) | Actual tire inflation pressure | If 100 kPa (1 kgf/cm2, 14 psi) for the absolute pressure or 0 kPa (0 kgf/cm2, 0 psi) is displayed for the relative pressure, data has not been received.* |
| CLEAR ZERO POINT CALIBRATION DATA (WHEN USING TECHSTREAM) |
Connect the Techstream to the DLC3.
Turn the ignition switch to ON.
Turn the Techstream on.
Select the skid control ECU to clear the zero point calibration date using the Techstream.
Enter the following menus: Chassis / ABS/VSC/TRAC / Utility / Reset Memory.
| PERFORM ZERO POINT CALIBRATION OF MASTER CYLINDER PRESSURE SENSOR AND DECELERATION SENSOR (WHEN USING TECHSTREAM) |
Enter Test Mode.
Turn the ignition switch off.
Check that the shift lever is in P or N and apply the parking brake.
Connect the Techstream to the DLC3.
Turn the ignition switch to ON.
Turn the Techstream on.
Enter the following menus: Chassis / ABS/VSC/TRAC / Utility / Test Mode.
Obtain the zero points of the master cylinder pressure sensor and deceleration sensor.
Keep the vehicle stationary on a level surface for 1 second or more.
Check that DTC C1336 is cleared.
Turn the ignition switch off.
| CLEAR ZERO POINT CALIBRATION DATA (WHEN USING SST CHECK WIRE) |
Turn the ignition switch to ON.
![]() |
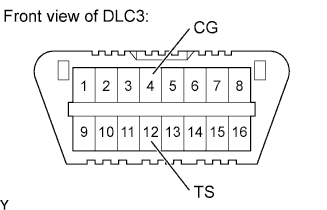
Using SST, connect and disconnect terminals 12 (TS) and 4 (CG) of the DLC3 4 times or more within 8 seconds.
Check that the slip indicator light comes on.
Using a check wire, perform the zero point calibration of the deceleration sensor.
| PERFORM ZERO POINT CALIBRATION OF MASTER CYLINDER PRESSURE SENSOR AND DECELERATION SENSOR (WHEN USING SST CHECK WIRE) |
Enter Test Mode.
Turn the ignition switch off.
Check that the shift lever is in P or N and apply the parking brake.
![]() |
Using SST, connect terminals 12 (TS) and 4 (CG) of the DLC3.
Turn the ignition switch to ON.
Obtain the zero points of the master cylinder pressure sensor and deceleration sensor.
Keep the vehicle stationary on a level surface for 1 second or more.
Check that DTC C1336 is cleared.
Turn the ignition switch off.
| PERFORM INITIALIZATION OF STEERING ANGLE SENSOR |
Check that the steering wheel is in the centered position.
Disconnect the negative battery terminal for more than 2 seconds.
Reconnect the negative battery terminal.
| ZERO POINT CALIBRATION |
Zero point calibration procedures:
Check that all of the following conditions are met:
Adjust the seat position in accordance with the table below.
| Adjustment Item | Position |
| Slide Direction | Rearmost position |
| Reclining Angle | Upright position |
| Headrest Height | Lowest position |
| Lifter Height | Lowest position |
Turn the ignition switch off.
Connect the Techstream to the DLC3.
Turn the ignition switch ON and turn the Techstream on.
Enter the following menus: Body Electrical / Occupant Detection / Utility / Zero Point Calibration.
Perform the zero point calibration by following the prompts on the Techstream screen.
| SENSITIVITY CHECK |
Sensitivity check procedures:
Turn the ignition switch off.
Connect the Techstream to the DLC3.
Turn the ignition switch ON and turn the Techstream on.
Enter the following menus: Body Electrical / Occupant Detection / Utility / Sensitivity Check.
Perform the sensitivity check by following the prompts on the Techstream screen.
Confirm that the beginning sensor reading is within the standard range.
Place a 30 kg (66.2 lb) weight (e.g. a lead mass) onto the front passenger seat.
Confirm that the sensitivity is within the standard range.
| DESCRIPTION OF CODE REGISTRATION |
When adding master keys or sub-keys (additional registration).
Register key code in the transponder key ECU.
| Target ECU | See Procedure |
| Transponder key ECU | Procedure "A" |
After replacing the transponder key ECU (New key code registration).
Register the key code (immobiliser code) in the new transponder key ECU.
| Target ECU | See Procedure |
| Transponder key ECU | Procedure "B" |
Register the ECU - ECM COMMUNICATION ID between the ECM and the new transponder key ECU.
| Target ECU | See Procedure |
| ECM | Procedure "C" |
After replacing the ECM.
Reregister the ECU - ECM COMMUNICATION ID between the new ECM and the transponder key ECU.
| Target ECU | See Procedure |
| Transponder key ECU | Procedure "C" |
After replacing the transponder key ECU and ECM.
Register the ECU - ECM COMMUNICATION ID between the new ECM and the new transponder key ECU.
| Target ECU | See Procedure |
| Transponder key ECU | Procedure "C" |
Erasure of key codes.
Erase all of the key codes except master key.
| Target ECU | See Procedure |
| Transponder key ECU | Procedure "D" |
Erase all of the key codes.
| Target ECU | See Procedure |
| Transponder key ECU | Procedure "D" |
| NEW KEY REGISTRATION (PROCEDURE "B") |
New key code registration
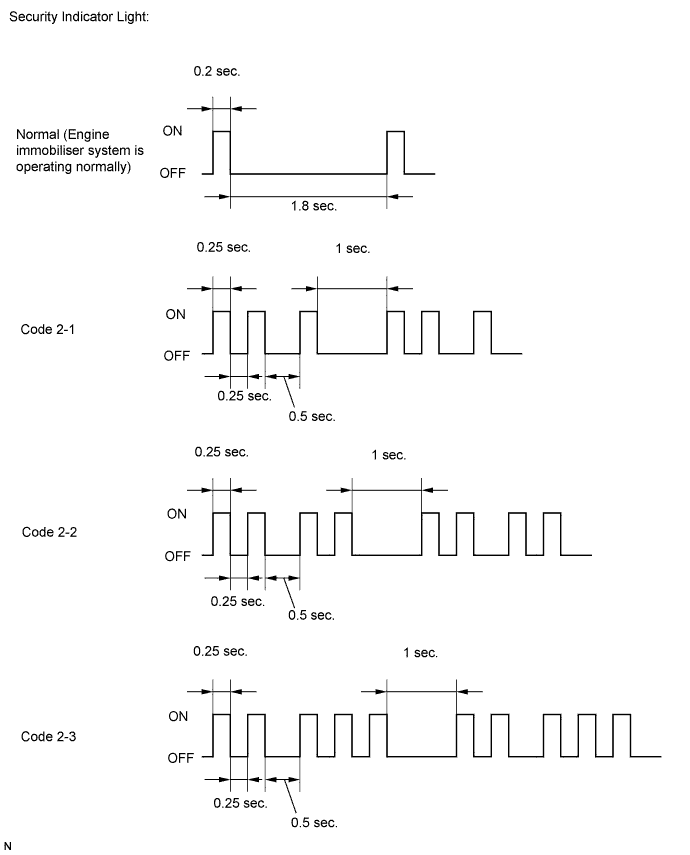
| Procedure | Security Indicator Light Condition |
| 1. Start registration. | Security indicator light is blinking. |
| 2. Insert one of master keys into the ignition key cylinder. | Security indicator light turned on. |
| 3. Select following items on the Techstream: (1) Body (2) Immobiliser (3) ID Utility (4) Immobiliser Code Registration
| Security indicator light turned off for 1 sec. and then turned on. |
| 4. Remove the key. | Security indicator light turned on.
|
| 5. Register another key? YES: Go to step 6. NO: Go to step 7.
| |
| 6. Insert another key into the ignition key cylinder. Then go to step 4. | Security indicator light turned off for 1 sec. and then turned on. |
| 7. End of registration. | |
End the new key code registration mode (when not using Techstream)
Turn the ignition switch to ON and OFF 5 times within 10 seconds using a master key that has already been registered.
End the new key code registration mode (when using Techstream)
Insert the key into the ignition key cylinder and turn the Techstream ON.
Follow the instructions on the Techstream screen to end the new key code registration mode.

| REGISTRATION OF ADDITIONAL KEY (PROCEDURE "A") |
Additional key code registration
| Procedure | Security Indicator Light Condition | Time (Completion of operation) |
| 1. Start registration. | Security indicator light is blinking. | - |
| 2. Insert an already registered master key into the ignition key cylinder, turn the ignition switch ON, and turn the Techstream ON. | Security indicator light turned off. | Within 120 sec. |
| 3. Select following items on the Techstream: (1) Body Electrical (2) Immobiliser (3) ID Utility (4) Immobiliser Code Registration | Security indicator light turned on. | |
| 4. Remove the master key and then push NEXT button on the Techstream. | Security indicator light turned on. | Within 20 sec. of the instruction on the Techstream. |
| 5. Insert unregistered key into the ignition key cylinder. | Security indicator light is blinking.
| Within 10 sec. |
6. After 60 sec., key is registered.
| Security indicator light turned off. | - |
| 7. Remove the key. | Security indicator light is blinking. | |
| 8. Techstream screen displays number of registered keys. | ||
| 9. Register another key? YES: Go to step 2. NO: Go to step 10. | ||
| 10. End of registration. | ||
| ERASURE OF KEY CODE (PROCEDURE "D") |
Erasure all key codes except master key
| Procedure | Security Indicator Light Condition | Time (Completion of operation) |
| 1. Start of erasure. | Security indicator light is blinking. | - |
| 2. Insert previously registered master key into ignition key cylinder and turn ignition switch ON. | Security indicator light turned off. | Within 120 sec. |
| 3. Select following items on the Techstream: (1) Body Electrical (2) Immobiliser (3) ID Utility (4) Immobiliser Code Erasure | Security indicator light turned on for 1 sec. then turned off. | |
4. Remove the master key.
| Security indicator light turned on. | Within 10 sec. of the instruction on the Techstream. |
| 5. End of erasure. | ||
Erasure all of key codes
| Procedure | Security Indicator Light Condition | Time (Completion of operation) |
| 1. Using TIS, confirm that user and vehicle match. | Security indicator light is blinking. | - |
| 2. Start of erasure. | Security indicator light is blinking. | - |
| 3. Insert previously registered master key or unregistered key into ignition key cylinder and turn ignition switch to ON. | Security indicator light turned off. | Within 120 sec. |
| 4. Select following items on the Techstream: (1) Body Electrical (2) Immobiliser (3) ID Utility (4) Immobiliser Code Erasure | Security indicator light turned on for 1 sec. then turned off. | Within 15 min. |
| 5. Completion of erasure of all key codes is displayed. | Security indicator light turned on. | - |
| 6. End of erasure. | ||
| ECU - ECM COMMUNICATION ID REGISTRATION (PROCEDURE "C") |
After replacing the transponder key ECU

Register the key code(s) by following the new key code registration procedure (procedure "B").
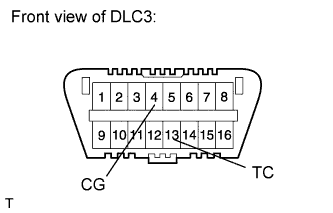
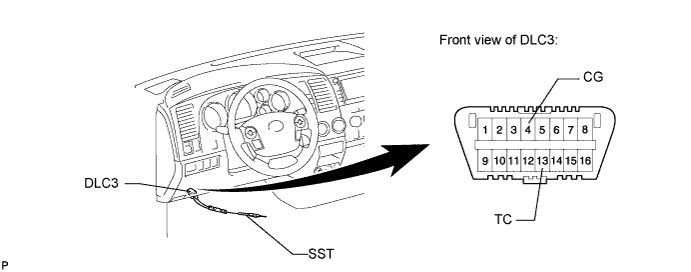
Using SST, connect terminals 13 (TC) and 4 (CG) of the DLC3 before inserting the key into the key cylinder.
| Procedure | Security Indicator Light Condition |
1. Insert previously registered key into ignition key cylinder and turn ignition switch ON.
| Security indicator light turned off. |
| 2. Leave vehicle as is for 30 min. | |
| 3. Turn the ignition switch OFF and disconnect terminals TC and CG. | |
| 4. Start engine. | |
| 5. Check that engine starts and stays on for more than 3 sec. Registration is complete. |
After replacing the ECM
Register the ECU - ECM communication ID.
| Procedure | Security Indicator Light Condition |
| 1. Insert previously registered key into ignition key cylinder. | Security indicator light turned off. |
| 2. Start engine. | |
| 3. Check that engine starts and stays on for more than 3 sec. Registration is complete. |
After replacing the transponder key ECU and ECM
Register the key code(s) by following the new key code registration procedure (procedure "B").
Register the ECU - ECM communication ID.
| Procedure | Security Indicator Light Condition |
| 1. Insert previously registered key into ignition key cylinder. | Security indicator light turned off. |
| 2. Start engine. | |
| 3. Check that engine starts and stays on for more than 3 sec. Registration is complete. |
| DESCRIPTION OF CODE REGISTRATION |
| REGISTER RECOGNITION CODE (USING OR TECHSTREAM) |
Turn the ignition switch ON.
Enter the following menus: Body Electrical / Main Body / Wireless Registration.
Press both LOCK and UNLOCK switches between 1 to 1.5 seconds.
Press either switch for more than 1 second within 3 seconds.
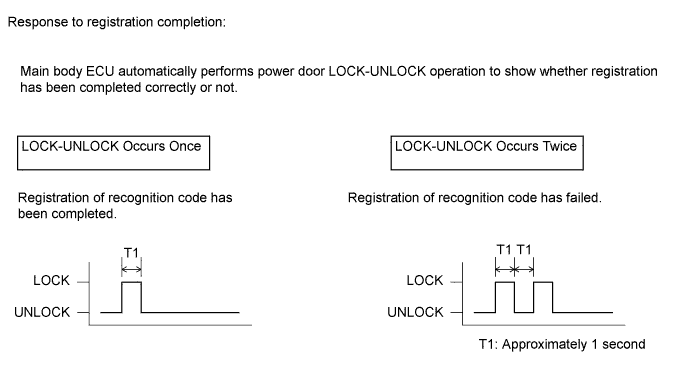
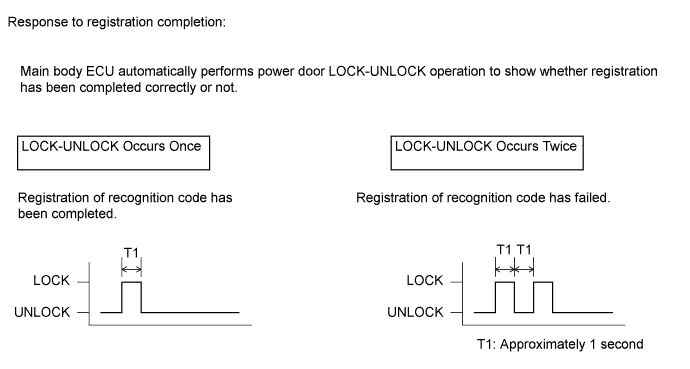
Check the response to the registration completion.

Perform either of the following to complete the registration of recognition codes:
| REGISTER RECOGNITION CODE (USING SWITCH OPERATION) |
The following conditions must be met.
Insert and remove the key into / from the ignition key cylinder twice (Insert → Remove → Insert → Remove) within 5 seconds.
Perform the following operations within 40 seconds.
Close and open the driver side door twice (Close → Open → Close → Open).
Insert and remove the key into / from the ignition key cylinder (Insert → Remove).
Close and open the driver side door twice (Close → Open → Close → Open).
Insert the key into the ignition key cylinder and close all doors.
Perform the following operations within 40 seconds.
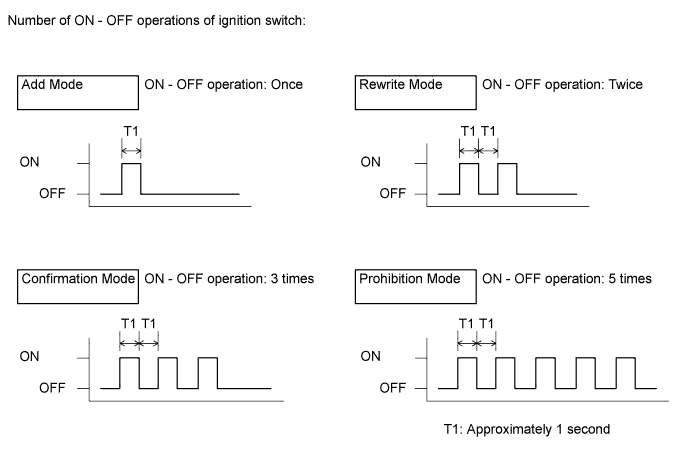
Turn the ignition switch from ON to OFF at approximately 1 second intervals. Operate the ignition switch according to the number of times shown below.

Remove the key from the ignition key cylinder.
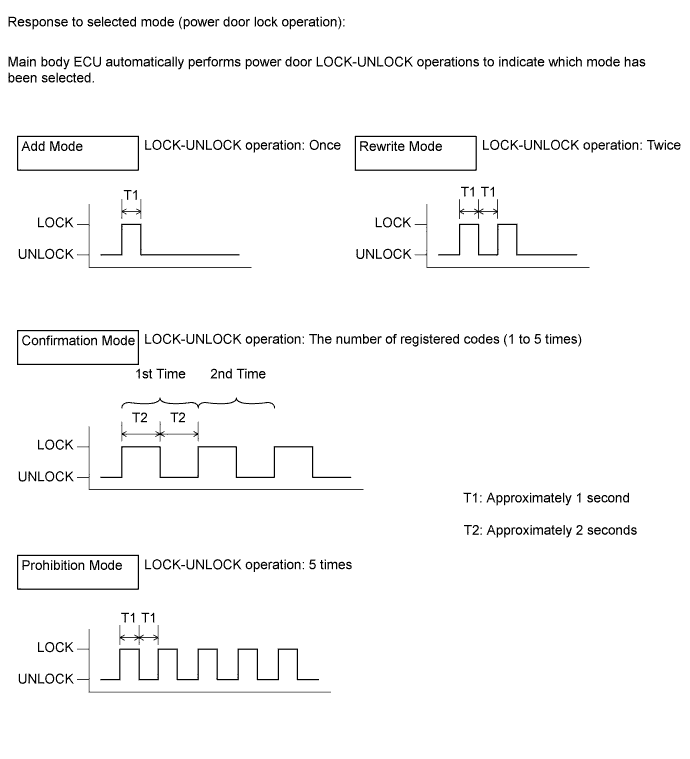
Check the response of the selected mode within 5 seconds.

Within 40 seconds of completing the confirmation mode operation, press the LOCK and UNLOCK switches on the transmitter simultaneously.
After completing the above step, press a shingle switch (LOCK or UNLOCK) within 5 seconds.
After completing the above step, check the response to the registration completion within 3 seconds.

Perform either of the following to complete the registration of recognition codes:
| SELECT COMPASS DISPLAY MODE |
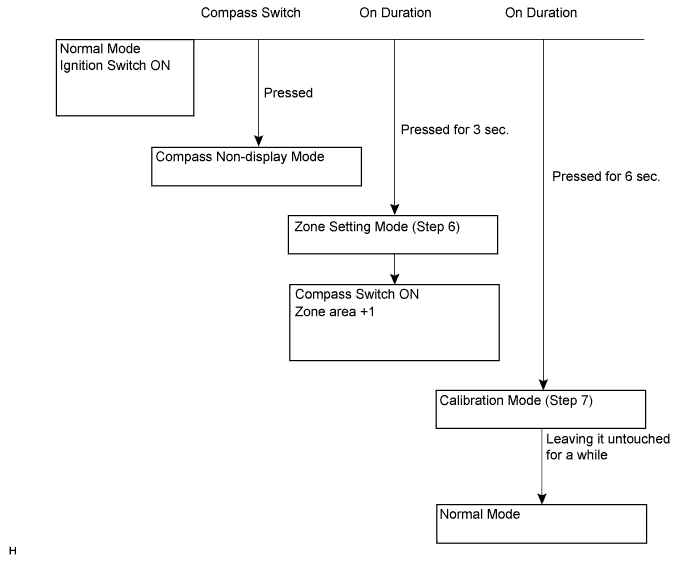
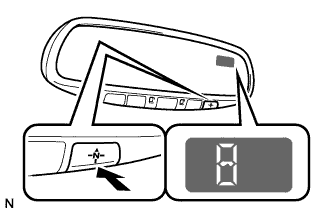
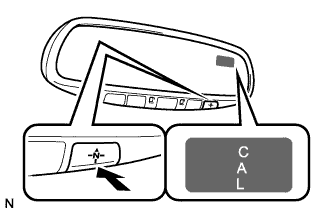
The compass switch allows you to select the Display or Non-display mode of the compass.
| SET ZONE |
Deviation between the "magnetic north" and "actual north" differs depending on the location. Therefore, adjustment of the magnetism is required. As the magnetic condition differs depending on the area where the vehicle is used, it is necessary for each user to set the zone (refer to Compass Zone Map). The zone setting can be changed using the compass switch of the inner mirror.
| PERFORM CALIBRATION |
As each vehicle has its own magnetic field, calibration should be performed for each individual vehicle. This compass function is used when storing the record of the vehicle's magnetic field.
| WHEN COMPASS IS MAGNETIZED |
A compass could be magnetized during shipping by vessels or freight cars. Therefore, make sure to perform calibration and ensure that calibration is performed properly before delivery. If this cannot be done (cannot be completed in spite of driving around several times), it may be caused by magnetization. Demagnetize the vehicle using a demagnetizer and perform calibration again.
| SET COMPASS |

| ZONE SETTING MODE |
![]() |
Pressing the compass switch for 3 seconds in the normal mode will activate the zone setting mode. A number (1 - 15) is displayed on the compass display.
The displayed number increases +1 every time the compass switch is pressed. Referring to the map, check the number for the area where the vehicle will be used and set the zone number.
Leave it untouched for several seconds after setting and check that the compass display shows an azimuthal direction (N, NE, E, SE, S, SW, W or NW) or "CAL".
The zone setting numbers are as follows:

| CALIBRATION SETTING MODE |
![]() |
Pressing the compass switch for 6 seconds in the normal mode will activate the calibration setting mode. "CAL" is displayed on the compass display.
Drive the vehicle at a slow speed of 8 km/h (5 mph) or less in a circular direction.
Driving in a circle 1 to 3 times will display the azimuthal direction on the display, completing the calibration.
| REGISTER TRANSMITTER CODE |
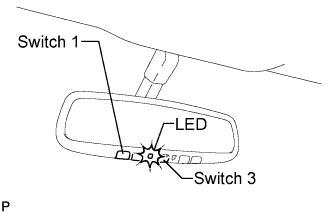
Reregister systems in the garage door opener registration mode.
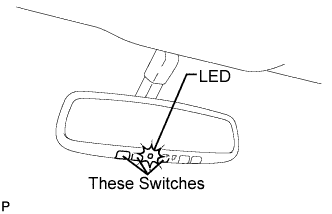
Select a garage door opener switch for transmitter code registration.
![]() |
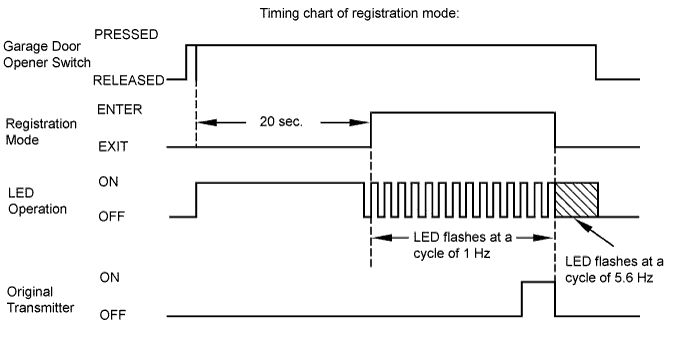
Press and hold the selected switch for 20 seconds. The garage door opener will enter registration mode.
![]() |
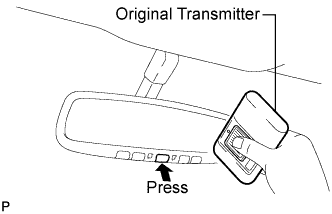
After the garage door opener has entered registration mode, bring the original transmitter of the system to be registered within 1 to 3 inches of the garage door opener and press and hold one of the garage door opener switches. Then press the original transmitter switch.
If the transmitter code registration was successful, the LED of the garage door opener flashes at a cycle of 5.6 Hz (rapidly). If no malfunction occurs, release both the garage door opener switch and the original transmitter switch.

![]() |
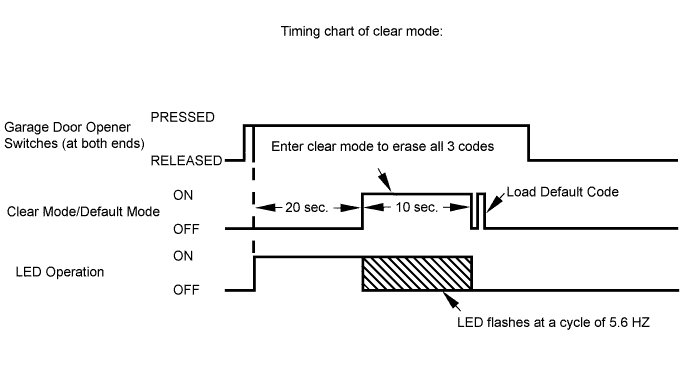
Erase transmitter codes in the garage door opener clear mode.
Press and hold the left and right switches of the garage door opener for 20 seconds. The LED will begin to flash at a cycle of 5.6 Hz. Releasing the switches will end clear mode.

Low power mode:
If a garage door opener switch is held for 100 seconds or more, the garage door opener will enter low power mode to economize on power consumption. When the garage door opener has entered low power mode, the LED turns off.
| INITIALIZATION PROCEDURE |
Press the fold seat switch in the fold position until the third-row seat is completely folded (stowed).
With the third-row seat in the completely folded position (stored), hold the fold seat switch in the fold position for 1 more second.
The buzzer sounds twice when the initialization is complete.
| INITIALIZATION RELEASE PROCEDURE |
While holding the fold seat switch in the return position, press the rear power seat switch in the forward position 5 times before 10 seconds elapse. This will complete the initialization release procedure.
| INITIALIZE POWER WINDOW CONTROL SYSTEM (POWER WINDOW REGULATOR MOTOR (for DRIVER AND PASSENGER SIDE DOORS)) |
Initialization procedures when replacing the power window regulator motor with new one.
Connect the battery and turn the ignition switch to ON. At this time, the LED on the power window switch blinks to indicate that it is ready for initialization.
Fully open the window by fully pushing the power window switch, and hold the switch for 1 second or more after the window is fully opened.
Fully close the power window by fully pulling the power window switch, and hold the switch for 1 second or more after the window is fully closed to reset the glass position. The LED on the power window switch changes from blinking to illuminated to indicate that the initialization is complete.
Initialization procedures when removing/installing the power window regulator motor or power window does not fully open.
Connect the battery and turn the ignition switch to ON.
Fully close the power window by fully pulling the power window switch, and hold the switch up for 6 seconds or more after the window is fully closed. If the power window does not move or stops halfway even when the switch is fully pulled, release the switch and fully pull it again.
Fully open the window by pushing down the power window switch, and hold the switch down for 1 second or more after the window is fully opened.
Release the power window switch. Then fully push and hold the switch 4 seconds or more.
Fully close the power window by fully pulling the power window switch, and hold the switch 1 second or more after the window is fully closed to reset the glass position the initialization is complete.
| INITIALIZE BACK DOOR POWER WINDOW CONTROL SYSTEM (BACK DOOR POWER WINDOW REGULATOR MOTOR) |
Push the DOWN switch (MANUAL DOWN or AUTO DOWN) to lower the back door power window until it is about one-quarter open.
Fully close the back door power window by pulling up the switch (AUTO UP) and then hold the switch up for an additional 1 second or more to reset the power window motor and complete the initialization.
If the back door power window opens after the held switch is released, then the reset failed. Repeat the reset procedure again.
| INITIALIZE SLIDING ROOF DRIVE GEAR SUB-ASSEMBLY |
Turn the ignition switch ON.
By pushing the SLIDE switch to close or the TILT switch to up on the roof console box, make the sliding roof operate as follows: TILT UP → approximately 1 second pause → TILT DOWN (The sliding roof lowers a little after it is fully tilted up.)
Check that the sliding roof stops at the fully closed position.
This completes the initialization.
Check that the AUTO operation works normally.