Home › Engine / Hybrid System · 3UR-FE › ENGINE CONTROL › SFI SYSTEM

DTC    P1613    Secondary Air Injection Driver Malfunction

DTC    P1614    Secondary Air Injection System Driver Bank 2

for Preparation Click here


DESCRIPTION

Refer to DTC P0412 .

DTC Code
DTC Detection Condition
Trouble Area
P1613
P1614
Either of following conditions (1) or (2) met:
(1) All of following conditions met (1 trip detection logic):
  1. Either of air pump or air switching valve not operating
  2. Diagnostic signal from Air Injection Control Driver (AID) 80%
  3. Battery voltage 8 V or more
(2) Both of following conditions met (1 trip detection logic):
  1. Battery voltage 8 V or more
  2. Diagnostic signal from AID abnormal (duty signal other than 0, 20, 40, 80 and 100%)
  1. AID
  2. Open in AID ground circuit
P1613
P1614
  1. All of following conditions met (1 trip detection logic):
    1. Air injection system operating (Air Switching Valve [ASV] ON and air pump ON)
    2. Diagnostic signal from Air Injection Control Driver (AID) 0%
    3. Battery voltage 8 V or more
  1. Short in diagnostic information signal circuit (AID - ECM)
  2. Open or short in air pump and air switching valve command signal circuit (AID - ECM)
  3. Open in AID ground circuit
  4. AID
  5. ECM
P1613
P1614
  1. Both of following conditions met (1 trip detection logic):
    1. Battery voltage 8 V or more
    2. Diagnostic signal from Air Injection Control Driver (AID) 100%
  1. Open or short in AID +B circuit
  2. Open in diagnostic information signal circuit (AID - ECM)
  3. AID
  4. ECM

MONITOR DESCRIPTION

For a short time after cold engine starts, the ECM transmits command signals to the Air Injection Control Driver (AID) to drive the air pump and the Air Switching Valve (ASV). The AID detects open and short circuits according to the voltages at the AID terminals to the air pump and ASV, and the circuit voltage of the AID power source, and transmits diagnostic information as a signal to the ECM.
If the Secondary Air Injection (AIR) system circuit or the AID itself malfunctions, the AID sends a malfunction signal (duty signal) as diagnostic information to the ECM (when the system is normal, a system normal signal is sent). The ECM sets the DTC based on the diagnostic information from the AID.
EXAMPLE:
  1. The duty ratio of the diagnostic signal from the AID is 0 or 100% (remains at 0 V or the same as battery voltage).
  2. The duty ratio of the diagnostic signal from the AID shows an impossible ratio (other than 0, 20, 40, 80 and 100%).
  3. The AID outputs the normal signal (normal duty signal: 80%) while the system is not operating.

MONITOR STRATEGY


Related DTCs
P1613: Secondary air injection system air injection control driver circuit range check
P1614: Secondary air injection system air injection control driver circuit range check
Required Sensors/Components (Main)
Air injection control driver
Required Sensors/Components (Related)
Air switching valve
Frequency of Operation
Once per drive cycle
Duration
3 seconds
MIL Operation
Immediate
Sequence of Operation
None

TYPICAL ENABLING CONDITIONS


Case 1 and 4: 
Monitor runs whenever following DTCs not present
None
Battery voltage
8 V or more
Ignition switch
ON
Starter
OFF

Case 2: 
Monitor runs whenever following DTCs not present
None
Either a or b met:
-
a. Air pump
Not operating
b. Air switching valve
Not operating
Battery voltage
8 V or more
Ignition switch
ON
Starter
OFF

Case 3: 
Monitor runs whenever following DTCs not present
None
Following conditions (a) and (b) met
-
a. Air pump
Operating
b. Air switching valve
Operating
Battery voltage
8 V or more
Ignition switch
ON
Starter
OFF

TYPICAL MALFUNCTION THRESHOLDS


Case 1: 
One of following conditions met:
A, B, C or D
A. Diagnostic signal duty ratio from air injection control driver
1% or more, and 10% or less
B. Diagnostic signal duty ratio from air injection control driver
30%
C. Diagnostic signal duty ratio from air injection control driver
49%
D. Diagnostic signal duty ratio from air injection control driver
91% or more, and 99% or less

Case 2: 
Diagnostic signal duty ratio from air injection control driver
70% or more, and 90% or less

Case 3: 
Diagnostic signal duty ratio from air injection control driver
0%

Case 4: 
Diagnostic signal duty ratio from air injection control driver
100%

COMPONENT OPERATING RANGE


Diagnostic signal duty ratio from air injection control driver
70% or more, and 90% or less when secondary air injection system operating.
0% when secondary air injection system not operating.

CONFIRMATION DRIVING PATTERN


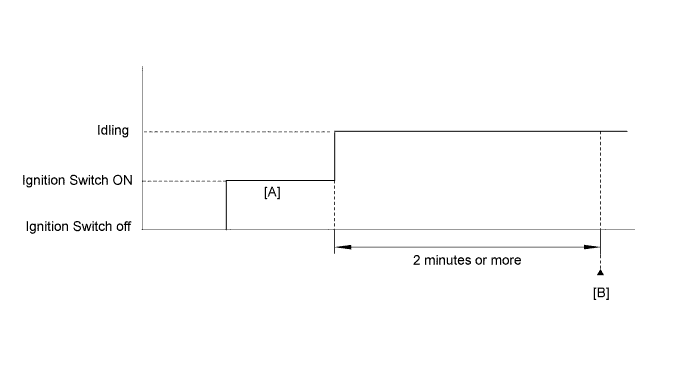
A199319E04

NOTICE:
  1. This Air Injection Check only allows technicians to operate the AIR system for a maximum of 5 seconds.
    Furthermore, the check can only be performed up to 4 times per trip. If the test is repeated, intervals of at least 30 seconds are required between checks.
    While AIR system operation using the Techstream is prohibited, the Techstream display indicates the prohibition (WAIT or ERROR).
    If an ERROR is displayed on the Techstream during the test, stop the engine for 10 minutes, and then try again.
  2. Performing the Air Injection Check repeatedly may cause damage to the AIR system. If necessary, leave an interval of several minutes between System Check operations to prevent the system from overheating.
  3. When performing the Air Injection Check operation after the battery cable has been reconnected, wait for 7 minutes with the ignition switch turned to ON or the engine running.
  4. Turn the ignition switch off when the Air Injection Check operation finishes.

  1. Start the engine and warm it up.
  2. Turn the ignition switch off.
  3. Connect the Techstream to the DLC3.
  4. Turn the ignition switch to ON.
  5. Turn the Techstream on.
  6. Clear DTCs (if set) (Click here).
  7. Turn the ignition switch off and wait for at least 30 seconds.
  8. Turn the ignition switch to ON and turn the Techstream on [A].
  9. Enter the following menus: Powertrain / Engine and ECT / Utility / Air injection check / Automatic Mode.
  10. Start the engine after the Techstream initialization is finished.
  11. Perform the System Check operation by pressing ENTER (Next).
  12. After operating the AIR system, perform the following to confirm the AIR system pending codes: Press the ENTER (Exit).
  13. Check pending DTCs [B].

    OK:
    No pending DTC is output.

  14. After the "Air injection check" is completed, check for All Readiness by entering the following menus: Powertrain / Engine and ECT / Utility / All Readiness.
  15. Input the DTC: P01613 or P1614.
  16. Check the DTC judgment result.

    Tester Display
    Description
    NORMAL
    1. DTC judgment completed
    2. System normal
    ABNORMAL
    1. DTC judgment completed
    2. System abnormal
    INCOMPLETE
    1. DTC judgment not completed
    2. Perform driving pattern after confirming DTC enabling conditions
    N/A
    1. Unable to perform DTC judgment
    2. Number of DTCs which do not fulfill DTC preconditions has reached ECU memory limit

    HINT:
    1. If the judgment result shows NORMAL, the system is normal.
    2. If the judgment result shows ABNORMAL, the system has a malfunction.

  17. If the test result is INCOMPLETE or N/A and no pending DTC is output, perform a universal trip and check for permanent DTCs (Click here).

    HINT:
    1. If no permanent DTC is output, the system is normal.
    2. If a permanent DTC is output, the system is malfunctioning.

  18. Turn the ignition switch off.

WIRING DIAGRAM

Refer to DTC P0412 .

INSPECTION PROCEDURE

NOTICE:
Inspect the fuses for circuits related to this system before performing the following inspection procedure.

HINT:
  1. Bank 1 refers to the bank that includes the No. 1 cylinder*.
    *: The No. 1 cylinder is the cylinder which is farthest from the transmission.
  2. Bank 2 refers to the bank that does not include the No. 1 cylinder.
  3. By using the Techstream to perform the Air Injection Check operation in the System Check, the air-fuel ratio and the pressure in the secondary air injection system passage can be checked while the secondary air injection system is operating. This helps technicians to troubleshoot the system when it malfunctions.
  4. Read freeze frame data using the Techstream. Freeze frame data records the engine condition when malfunctions are detected. When troubleshooting, freeze frame data can help determine if the vehicle was moving or stationary, if the engine was warmed up or not, if the air-fuel ratio was lean or rich, and other data from the time the malfunction occurred.

1.CHECK ANY OTHER DTCS OUTPUT (IN ADDITION TO DTC P1613 OR P1614)
  1. Connect the Techstream to the DLC3.

  1. Turn the ignition switch to ON.

  1. Turn the Techstream on.

  1. Enter the following menus: Powertrain / Engine and ECT / Trouble Codes.

  1. Read DTCs.
    Result 
    Result
    Proceed to
    P1613 and/or P1614 are output
    A
    P1613 and/or P1614 and other DTCs are output
    B
    If any DTCs other than P1613 and P1614 are output, troubleshoot those DTCs first.


B
GO TO DTC CHART (Click here)
A


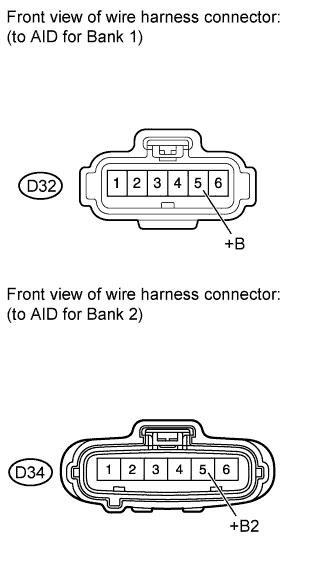
2.CHECK AIR INJECTION CONTROL DRIVER (POWER SOURCE CIRCUIT)


    A162286E16
  1. Disconnect the AID connectors.

  1. Turn the ignition switch to ON.

  1. Measure the voltage according to the value(s) in the table below.

    Standard Voltage:
    Tester Connection
    Switch Condition
    Specified Condition
    D32-5 (+B) - Body ground
    Ignition switch ON
    11 to 14 V (near battery voltage)
    D34-5 (+B2) - Body ground
    Ignition switch ON
    11 to 14 V (near battery voltage)


NG
REPAIR OR REPLACE HARNESS OR CONNECTOR
OK


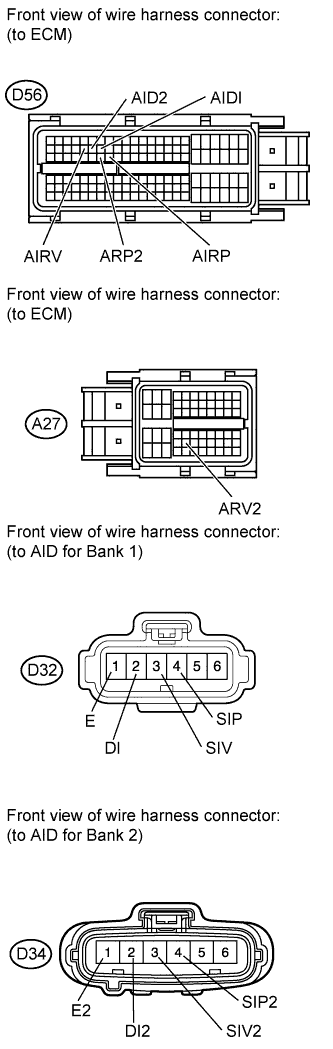
3.CHECK HARNESS AND CONNECTOR (AID - ECM, BODY GROUND)


    A162287E11
  1. Disconnect the ECM connectors.

  1. Disconnect the AID connectors.

  1. Measure the resistance according to the value(s) in the table below.

    Standard Resistance:
    Tester Connection
    Condition
    Specified Condition
    D56-54 (AIRP) - D32-4 (SIP)
    Always
    Below 1 Ω
    D56-28 (AIRV) - D32-3 (SIV)
    Always
    Below 1 Ω
    D56-53 (ARP2) - D34-4 (SIP2)
    Always
    Below 1 Ω
    A27-43 (ARV2) - D34-3 (SIV2)
    Always
    Below 1 Ω
    D56-30 (AIDI) - D32-2 (DI)
    Always
    Below 1 Ω
    D56-29 (AID2) - D34-2 (DI2)
    Always
    Below 1 Ω
    D32-1 (E) - Body ground
    Always
    Below 1 Ω
    D34-1 (E2) - Body ground
    Always
    Below 1 Ω
    D56-54 (AIRP) or D32-4 (SIP) - Body ground
    Always
    10 kΩ or higher
    D56-28 (AIRV) or D32-3 (SIV) - Body ground
    Always
    10 kΩ or higher
    D56-53 (ARP2) or D34-4 (SIP2) - Body ground
    Always
    10 kΩ or higher
    A27-43 (ARV2) or D34-3 (SIV2) - Body ground
    Always
    10 kΩ or higher
    D56-30 (AIDI) or D32-2 (DI) - Body ground
    Always
    10 kΩ or higher
    D56-29 (AID2) or D34-2 (DI2) - Body ground
    Always
    10 kΩ or higher


NG
REPAIR OR REPLACE HARNESS OR CONNECTOR
OK


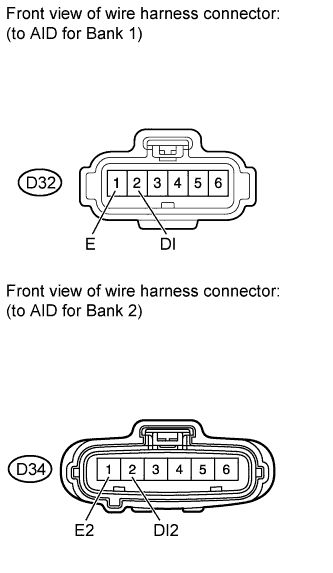
4.INSPECT AIR INJECTION CONTROL DRIVER (DI TERMINAL VOLTAGE)


    A162286E17
  1. Disconnect the AID connectors.

  1. Turn the ignition switch to ON.

  1. Measure the voltage according to the value(s) in the table below.

    Standard Voltage:
    Tester Connection
    Switch Condition
    Specified Condition
    D32-2 (DI) - D32-1 (E)
    Ignition switch ON
    11 to 14 V (near battery voltage)
    D34-2 (DI2) - D34-1 (E2)
    Ignition switch ON
    11 to 14 V (near battery voltage)


NG
REPLACE ECM (Click here)
OK


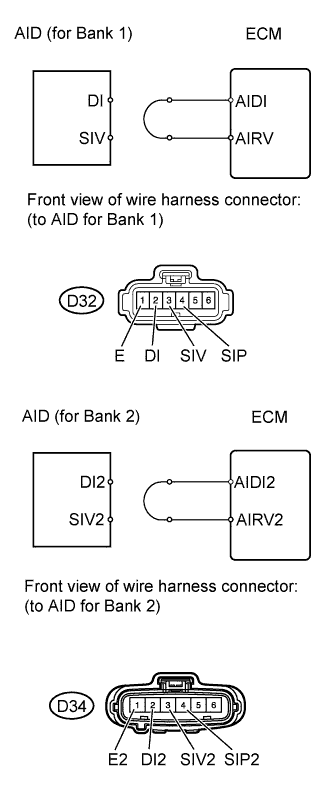
5.PERFORM ACTIVE TEST USING TECHSTREAM
A242126E02
  1. Disconnect the AID connectors.

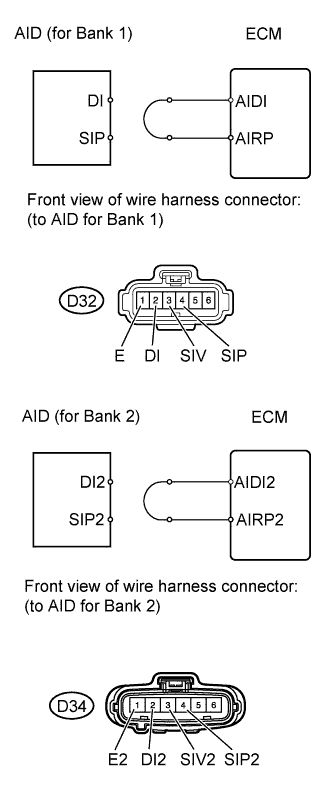
  1. Connect terminals DI and SIV or DI2 and SIV2 of the wire harness connector for the AID.

  1. Connect the Techstream to the DLC3.

  1. Turn the ignition switch to ON.

  1. Turn the Techstream on.

  1. Enter the following menus: Powertrain / Engine and ECT / Utility / Air Injection Check / Manual Mode / AIR PUMP 1: ON, ASV 1: OPEN or AIR PUMP 2: ON, ASV 2: OPEN.

    HINT:
    When Manual Mode is selected, the Techstream initialization (atmospheric pressure measurement) is performed automatically. The initialization takes 10 seconds. After the initialization, AIR PUMP and ASV operation can be selected.

  1. Start the engine.

  1. Perform the AIR system forced operation while the engine is idling.

  1. Measure the voltage between the SIV and E or SIV2 and E2 terminals of the ECM connector when the AIR system is ON and OFF.

  1. Turn the ignition switch off.

    NOTICE:
    1. Performing Air Injection Check repeatedly may cause damage to the secondary air injection system. If it is necessary to repeat the check, leave an interval of several minutes between System Check operations to prevent the system from overheating.
    2. When performing the Air Injection Check operation after the battery cable has been reconnected, wait for 7 minutes with the ignition switch to ON or the engine running.
    3. Turn the ignition switch off when the Air Injection Check operation finishes.


    Standard Voltage:

    Tester Connection
    Condition
    Specified Condition
    D32-3 (SIV) - D32-1 (E)
    AIR PUMP: ON, ASV: OPEN
    0.5 to 2 V
    D34-3 (SIV2) - D34-1 (E2)
    AIR PUMP: ON, ASV: OPEN
    0.5 to 2 V
    D32-3 (SIV) - D32-1 (E)
    AIR PUMP: OFF, ASV: CLOSE
    11 to 14 V
    D34-3 (SIV2) - D34-1 (E2)
    AIR PUMP: OFF, ASV: CLOSE
    11 to 14 V


    A242126E03
  1. Connect terminals DI and SIP or DI2 and SIP2 of the wire harness connector for the AID.

  1. Connect the Techstream to the DLC3.

  1. Turn the ignition switch to ON.

  1. Turn the Techstream on.

  1. Enter the following menus: Powertrain / Engine and ECT / Utility / Air Injection Check / Manual Mode / AIR PUMP 1: ON, ASV 1: OPEN or AIR PUMP 2: ON, ASV 2: OPEN.

    HINT:
    When Manual Mode is selected, the Techstream initialization (atmospheric pressure measurement) is performed automatically. The initialization takes 10 seconds. After the initialization, AIR PUMP and ASV operation can be selected.

  1. Start the engine.

  1. Perform the AIR system forced operation while the engine is idling.

  1. Measure the voltage between the SIP and E or SIP2 and E2 terminals of the ECM connector when the AIR system is ON and OFF.

  1. Turn the ignition switch off.

    NOTICE:
    1. Performing Air Injection Check repeatedly may cause damage to the secondary air injection system. If it is necessary to repeat the check, leave an interval of several minutes between System Check operations to prevent the system from overheating.
    2. When performing the Air Injection Check operation after the battery cable has been reconnected, wait for 7 minutes with the ignition switch to ON or the engine running.
    3. Turn the ignition switch off when the Air Injection Check operation finishes.


    Standard Voltage:

    Tester Connection
    Condition
    Specified Condition
    D32-4 (SIP) - D32-1 (E)
    AIR PUMP: ON, ASV: OPEN
    0.5 to 2 V
    D34-4 (SIP2) - D34-1 (E2)
    AIR PUMP: ON, ASV: OPEN
    0.5 to 2 V
    D32-4 (SIP) - D32-1 (E)
    AIR PUMP: OFF, ASV: CLOSE
    11 to 14 V
    D34-4 (SIP2) - D34-1 (E2)
    AIR PUMP: OFF, ASV: CLOSE
    11 to 14 V


NG
REPLACE ECM (Click here)
OK


6.REPLACE AIR INJECTION CONTROL DRIVER
  1. Replace the air injection control driver for bank 1 or bank 2 (Click here).


NEXT


7.CHECK WHETHER DTC OUTPUT RECURS
  1. Start the engine and warm it up.

  1. Turn the ignition switch off.

  1. Connect the Techstream to the DLC3.

  1. Turn the ignition switch to ON.

  1. Turn the Techstream on.

  1. Clear DTCs (Click here).

  1. Enter the following menus: Powertrain / Engine and ECT / Utility / Air injection check / Automatic Mode.

  1. Start the engine after the Techstream initialization is finished.

  1. Perform the System Check operation by pressing Next.

  1. After operating the AIR system, perform the following to confirm the AIR system pending codes: Press the Exit button.

  1. Enter the following menus: Powertrain / Engine and ECT / Trouble Codes / Pending.

  1. Read DTCs.
    Result 
    Result
    Proceed to
    No DTC is output
    A
    Other DTCs are output
    B

  1. Turn the ignition switch off.

    NOTICE:
    1. When performing the Air Injection Check operation after the battery cable has been reconnected, wait for 7 minutes with the ignition switch turned to ON or the engine running.
    2. Turn the ignition switch off when the Air Injection Check operation finishes.


B
REPLACE ECM (Click here)
A

END