Home › Audio/Visual/Telematics › PARK ASSIST / MONITORING › ULTRASONIC SENSOR (for Front Side)

ULTRASONIC SENSOR (for Front Side) > INSTALLATION

for Preparation Click here


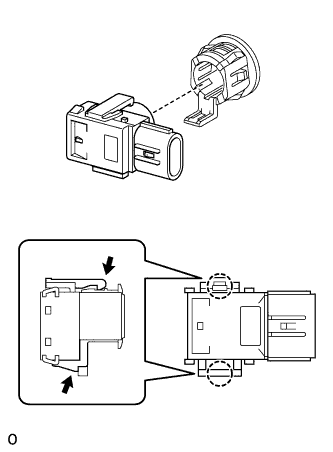
1. INSTALL NO. 1 ULTRASONIC SENSOR RETAINER


    E146465E01
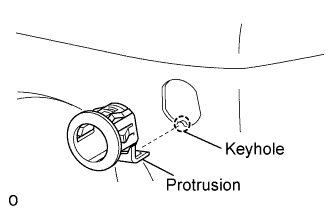
  1. Install the ultrasonic sensor retainer to the front bumper.

    NOTICE:
    Do not damage the bumper with the snap when installing the retainer.

    HINT:
    When installing the retainer, align the keyhole and snap as shown in the illustration.


2. INSTALL NO. 1 ULTRASONIC SENSOR


    E146466
  1. Engage the 2 claws and install the ultrasonic sensor.

  1. Connect the sensor connector.


3. INSTALL FRONT BUMPER COVER
  1. Connect the connectors.

    HINT:
    This procedure is only necessary for vehicles equipped with fog lights or the intuitive parking assist system.


    B194114
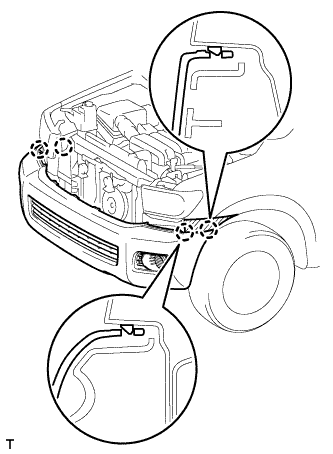
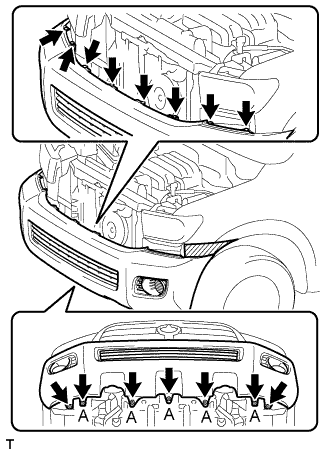
  1. Attach the 4 claws to install the front bumper cover.


    B220208E02
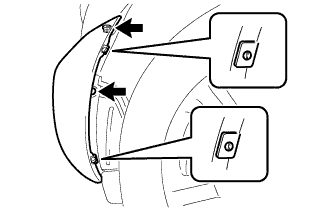
  1. Install the 8 clips.

  1. Install the 7 screws.

    Torque:
    for screws labeled A:
    3.0 N*m{ 31 kgf*cm , 27 in.*lbf }


    B231445
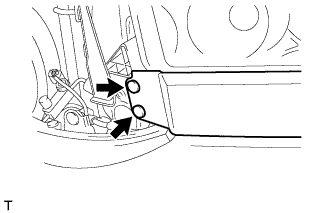
  1. Install the 2 pin hold clips so that their grooves are vertical.

    HINT:
    Use the same procedure for the RH side and LH side.

  1. Install the clip.

    HINT:
    Use the same procedure for the RH side and LH side.

  1. Install the screw.

    HINT:
    Use the same procedure for the RH side and LH side.


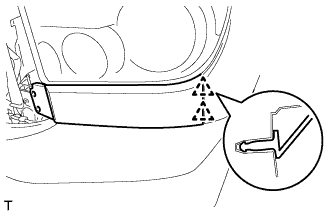
4. INSTALL FRONT END PANEL LH (w/o Headlight Cleaner System)


    B191650
  1. Remove the 2 clips.


    B191651
  1. Disengage the 2 clips and remove the front end panel.


5. INSTALL FRONT END PANEL RH (w/o Headlight Cleaner System)

HINT:
Use the same procedure as for the LH side.


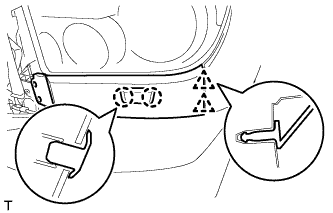
6. INSTALL FRONT END PANEL LH (w/ Headlight Cleaner System)


    B191650
  1. Remove the 2 clips.


    B191652
  1. Disengage the 2 claws and 2 clips and remove the front end panel.


7. INSTALL FRONT END PANEL RH (w/ Headlight Cleaner System)

HINT:
Use the same procedure as for the LH side.


8. PREPARE VEHICLE FOR FOG LIGHT AIMING ADJUSTMENT (w/ Fog Light)
  1. Prepare the vehicle:

    1. Ensure that there is no damage or deformation of the body around the fog lights.
    2. Fill the fuel tank.
    3. Fill the oil to the specified level.
    4. Fill the coolant to the specified level.
    5. Inflate the tires to the appropriate pressure.
    6. Place the spare tire, tools and jack in their original positions.
    7. Unload the trunk.
    8. Sit a person of average weight (68 kg, 150 lb) in the driver seat.


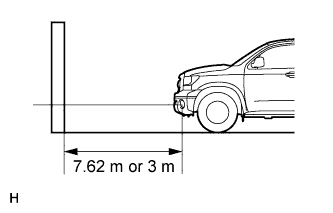
9. PREPARE FOR FOG LIGHT AIMING (w/ Fog Light)


    E143852E03
  1. Prepare the following vehicle conditions:

    1. Place the vehicle in a location that is dark enough to clearly observe the cutoff line. The cutoff line is a distinct line, below which light from the fog lights can be observed and above which it cannot.
    2. Place the vehicle at a 90° angle to the wall.
    3. Keep a 7.62 m (25 ft.) distance between the center of the fog light bulb and the wall.
    4. Place the vehicle on a level surface.
    5. Bounce the vehicle up and down to settle the suspension.

      NOTICE:
      A distance of 7.62 m (25 ft.) between the vehicle (center of the fog light bulb) and the wall is necessary for proper aim adjustment. If unable to secure a distance of 7.62 m (25 ft.), secure a distance of exactly 3 m (9.84 ft.) to check and adjust the fog light aim. (Since target zone will change with the distance, follow the instructions shown in the illustration.)

  1. Prepare a piece of thick white paper (approximately 2 m (6.6 ft.) height x 4 m (13.1 ft.) wide) to use as a screen.

  1. Draw a vertical line down the center of the screen (V line).


  1. Set the screen as shown in the illustration.
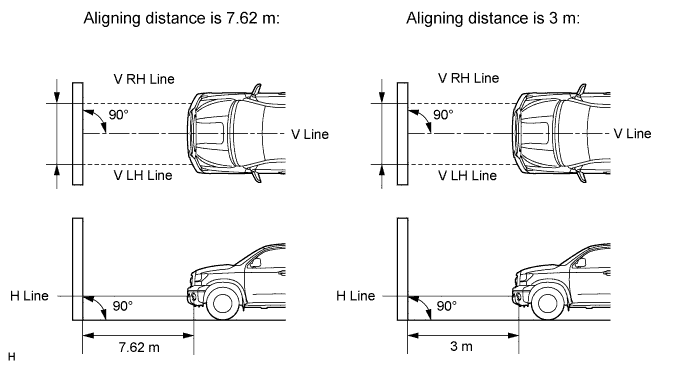

    E143853E02

    HINT:
    1. Stand the screen perpendicular to the ground.
    2. Align the V line on the screen with the center of the vehicle.


    I033423E15
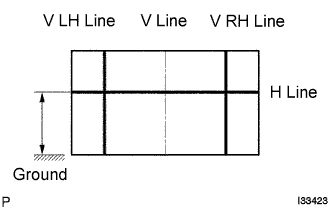
  1. Draw base lines (H line, V LH, V RH lines) on the screen as shown in the illustration.
    HINT:
    Mark the fog light bulb center marks on the screen. If the center mark cannot be observed on the fog light, use the center of the fog light bulb or the manufacturer's name marked on the fog light as the center mark.


    1. H Line (Fog light height):
      Draw a horizontal line across the screen so that it passes through the center marks. The H line should be at the same height as the fog light bulb center marks of the fog lights.

    2. V LH Line, V RH Line (Center mark position of left-hand (LH) and right-hand (RH) fog lights):
      Draw two vertical lines so that they intersect the H line at each center mark.


10. INSPECT FOG LIGHT AIMING (w/ Fog Light)
  1. Cover the fog light or disconnect the connector of the fog light on the opposite side to prevent light from the fog light not being inspected from affecting fog light aiming inspection.

  1. Start the engine.

    NOTICE:
    Engine speed must be 1500 rpm or more.


  1. Turn on the fog light and make sure that the cutoff line falls within the specified area, as shown in the illustration.
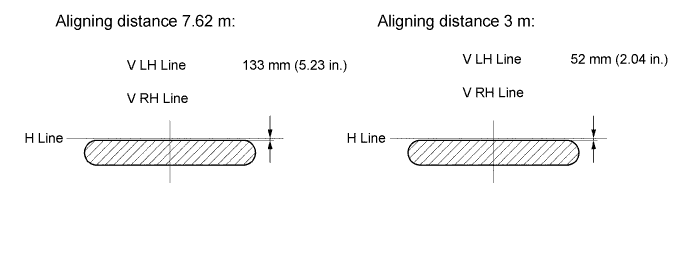

    I041221E32


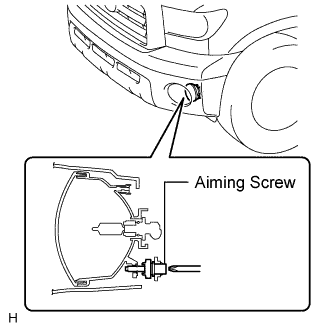
11. ADJUST FOG LIGHT AIMING (w/ Fog Light)


    E143414E01
  1. Adjust the fog light aim to within the specified range by turning the aiming screw with a screwdriver.

    NOTICE:
    The final turn of the aiming screw should be made in the clockwise direction. If the screw is tightened excessively, loosen it and then retighten it, so that the final turn of the screw is in the clockwise direction.