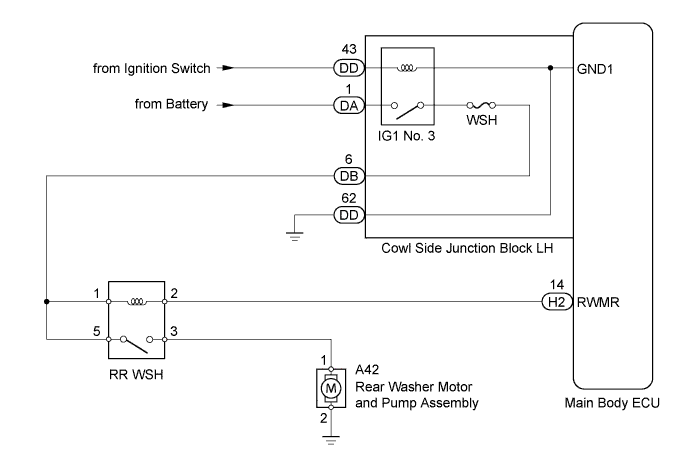
WIPER AND WASHER SYSTEM > Washer Motor Circuit |
| 1.PERFORM ACTIVE TEST USING TECHSTREAM (REAR WIPER WASHER) |
Connect the Techstream to the DLC3.
Turn the ignition switch to ON.
Turn the Techstream on.
Enter the following menus: Body Electrical / Main Body / Active Test.
According to the display on the Techstream, perform the Active Test.
| Tester Display | Test Part | Control Range | Diagnostic Note |
| Rear Wiper Washer Motor Relay | Rear Wiper Washer motor operation | ON/OFF | - |
|
| ||||
| OK | ||
 | ||
| ||
| 2.INSPECT FUSE (WSH) |
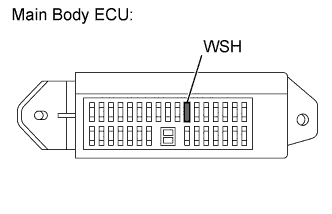 |
Remove the WSH fuse from the main body ECU.
Measure the resistance according to the value(s) in the table below.
| Tester Connection | Condition | Specified Condition |
| WSH fuse | Always | Below 1 Ω |
Reinstall the WSH fuse.
|
| ||||
| OK | |
 |
| 3.CHECK HARNESS AND CONNECTOR (BATTERY - REAR WASHER MOTOR) |
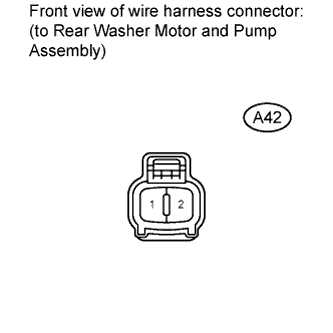 |
Disconnect the A42 rear washer motor and pump assembly connector.
Measure the voltage according to the value(s) in the table below.
| Tester Connection | Switch Condition | Specified Condition |
| A42-1 - Body ground | Ignition switch ON and rear washer switch OFF | Below 1 V |
| Ignition switch ON and rear washer switch ON | 11 to 14 V |
Reconnect the rear washer motor and pump assembly connector.
|
| ||||
| OK | |
|
| 4.INSPECT REAR WASHER MOTOR AND PUMP ASSEMBLY |
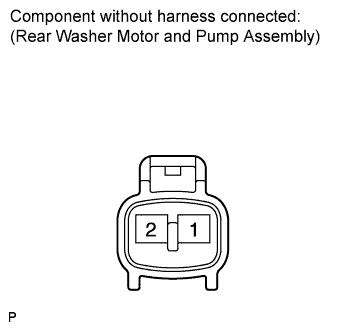 |
Remove the rear washer motor and pump assembly.
Connect the battery positive (+) lead to terminal 1 and the negative (-) lead to terminal 2.
Check that the rear washer motor operates.
Reinstall the rear washer motor and pump assembly.
|
| ||||
| OK | ||
| ||
| ||
| 5.INSPECT RR WSH RELAY |
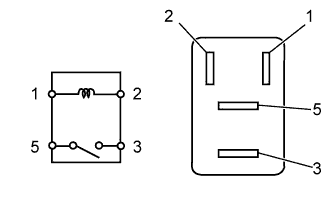 |
Remove the RR WSH relay from the engine room relay block.
Measure the resistance according to the value(s) in the table below.
| Tester Connection | Condition | Specified Condition |
| 3 - 5 | When battery voltage is not applied to terminals 1 and 2 | 10 kΩ or higher |
| When battery voltage is applied to terminals 1 and 2 | Below 1 Ω |
Reinstall the RR WSH relay.
|
| ||||
| OK | |
|
| 6.CHECK HARNESS AND CONNECTOR (RR WSH RELAY - BATTERY) |
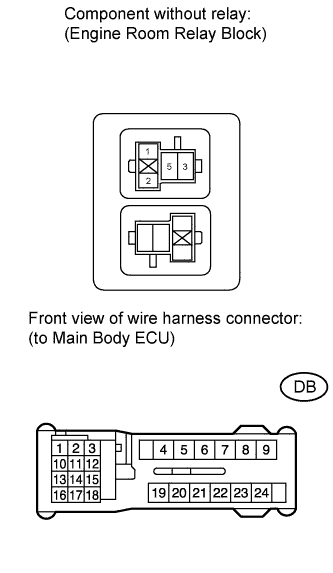 |
Remove the RR WSH relay from the engine room relay block.
Disconnect the DB main body ECU connector.
Measure the resistance according to the value(s) in the table below.
| Tester Connection | Condition | Specified Condition |
| Terminals 1 - DB-6 | Always | Below 1 Ω |
| Terminals 1 or DB-6 - Body ground | Always | 10 kΩ or higher |
| Terminals 5 - DB-6 | Always | Below 1 Ω |
| Terminals 5 - Body ground | Always | 10 kΩ or higher |
Reinstall the RR WSH relay.
|
| ||||
| OK | |
|
| 7.CHECK HARNESS AND CONNECTOR (RR WSH RELAY - REAR WASHER MOTOR) |
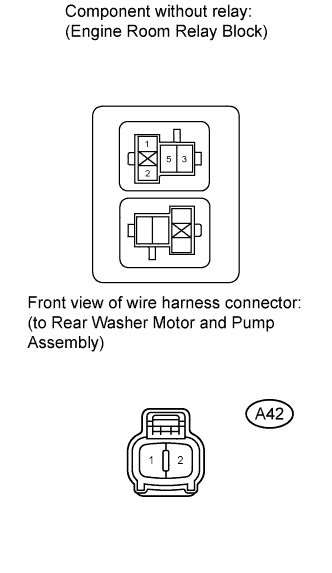 |
Remove the RR WSH relay from the engine room relay block.
Disconnect the A42 rear washer motor and pump assembly connector.
Measure the resistance according to the value(s) in the table below.
| Tester Connection | Condition | Specified Condition |
| Terminals 3 - A42-1 | Always | Below 1 Ω |
| Terminals 3 or A42-1 - Body ground | Always | 10 kΩ or higher |
Reinstall the RR WSH relay.
Reconnect the rear washer motor and pump assembly connector.
|
| ||||
| OK | |
|
| 8.CHECK HARNESS AND CONNECTOR (RR WSH RELAY - MAIN BODY ECU) |
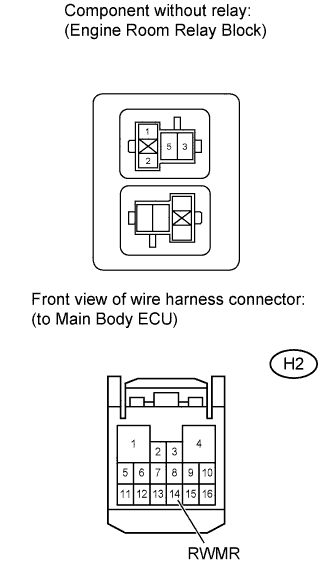 |
Remove the RR WSH relay from the engine room relay block.
Disconnect the H2 main body ECU connector.
Measure the resistance according to the value(s) in the table below.
| Tester Connection | Condition | Specified Condition |
| Terminals 2 - H2-14 (RWMR) | Always | Below 1 Ω |
| Terminals 2 or H2-14 (RWMR) - Body ground | Always | 10 kΩ or higher |
Reinstall the RR WSH relay.
Reconnect the main body ECU connector.
|
| ||||
| OK | |
|
| 9.CHECK HARNESS AND CONNECTOR (REAR WASHER MOTOR - BODY GROUND) |
|
Disconnect the A42 rear washer motor and pump assembly connector.
Measure the resistance according to the value(s) in the table below.
| Tester Connection | Condition | Specified Condition |
| A42-2 - Body ground | Always | Below 1 Ω |
Reconnect the rear washer motor and pump assembly connector.
|
| ||||
| OK | |
|
| 10.CHECK HARNESS AND CONNECTOR (BATTERY - MAIN BODY ECU) |
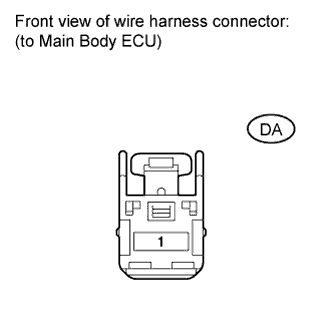 |
Disconnect the DA main body ECU connector.
Measure the voltage according to the value(s) in the table below.
| Tester Connection | Condition | Specified Condition |
| DA-1 - Body ground | Always | 11 to 14 V |
Reconnect the main body ECU connector.
|
| ||||
| OK | |
|
| 11.CHECK HARNESS AND CONNECTOR (MAIN BODY ECU - IGNITION SWITCH, BODY GROUND) |
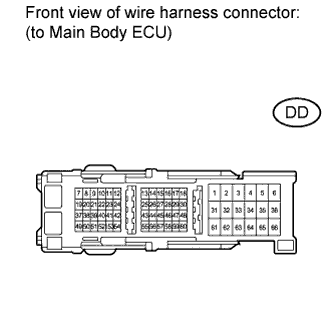 |
Disconnect the DD main body ECU connector.
Measure the voltage according to the value(s) in the table below.
| Tester Connection | Switch Condition | Specified Condition |
| DD-43 - Body ground | Ignition switch off | Below 1 V |
| Ignition switch ON | 11 to 14 V |
Measure the resistance according to the value(s) in the table below.
| Tester Connection | Condition | Specified Condition |
| DD-62 - Body ground | Always | Below 1 Ω |
Reconnect the main body ECU connector.
|
| ||||
| OK | ||
| ||
| ||

