 |
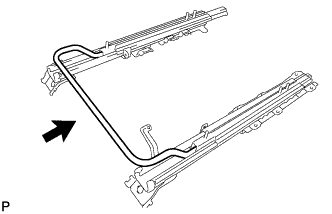
Install the rear seat track adjusting handle.
- HINT:
- Install the adjusting handle straight, and check that it is centered.
REAR NO. 1 SEAT ASSEMBLY > REASSEMBLY |
| 1. INSTALL REAR SEAT TRACK ADJUSTING HANDLE RH |
|
Install the rear seat track adjusting handle.
| 2. INSTALL REAR SEATBACK ADJUSTER ASSEMBLY OUTER RH |
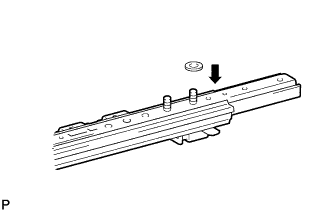 |
Install the washer.
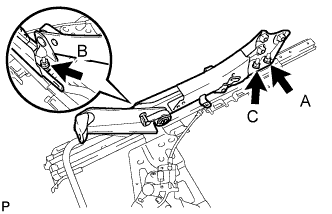 |
Install the rear seatback adjuster assembly with the nuts A, B and C in alphabetical order.
Tighten nut A.
Tighten nut B.
Tighten nut C.
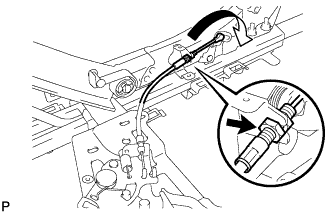 |
Insert and rotate the cable end to connect it.
Connect the rear No. 1 seat lock cable assembly.
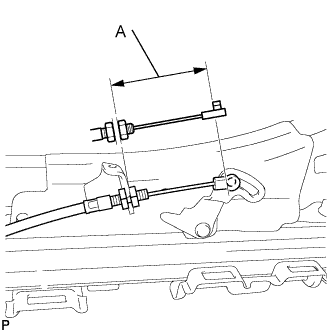 |
Adjust the cable length.
| Area | Measurement |
| A | 51.5 to 53.7 mm (2.0276 to 2.1142 in) |
| 3. INSTALL REAR NO. 1 SEAT ADJUSTER ASSEMBLY INNER RH |
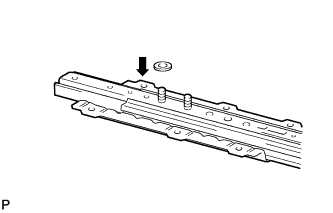 |
Install the washer.
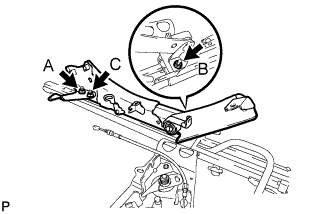 |
Install the rear No. 1 seat adjuster assembly and rear seat cushion support bracket with the nuts A, B and C in alphabetical order.
Tighten nut A.
Tighten nut B.
Tighten nut C.
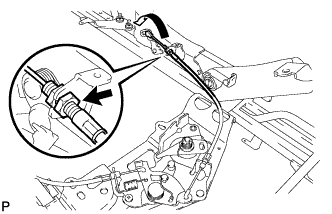 |
Insert and rotate the cable end to connect it.
Connect the rear No. 1 seat lock cable assembly.
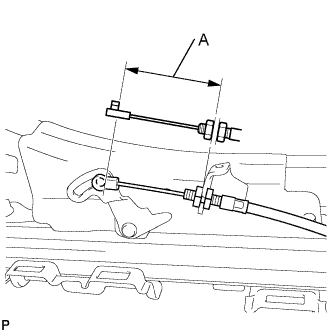 |
Adjust the cable length.
| Area | Measurement |
| A | 51.5 to 53.7 mm (2.0276 to 2.1142 in) |
| 4. INSTALL REAR SEAT CUSHION SPRING NO. 1 |
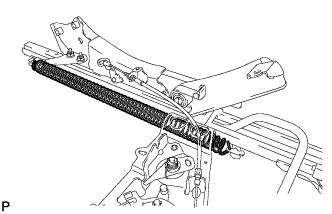 |
Install the rear seat cushion spring.
| 5. INSTALL REAR SEAT RECLINING CONTROL NO. 2 CABLE |
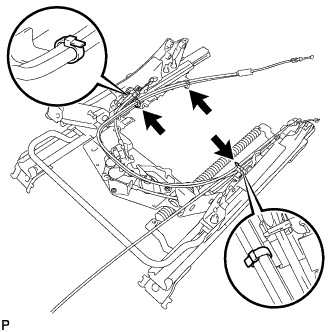 |
Connect the rear seat reclining control No. 2 cable and rear seatback lock control No. 1 cable sub-assembly with new 3 cable ties.
| 6. INSTALL REAR SEATBACK LOCK CONTROL NO. 2 CABLE SUB-ASSEMBLY |
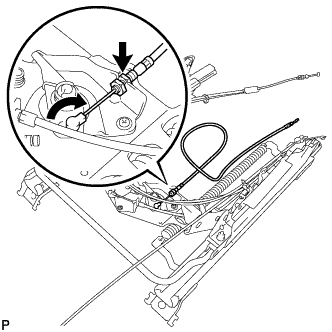 |
Insert and rotate the cable end to connect it.
Connect the rear seatback lock control No. 2 cable sub-assembly and install the cable.
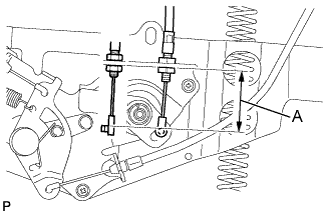 |
Adjust the cable length.
| Area | Measurement |
| A | 39.3 to 46.3 mm (1.5472 to 1.8228 in) |
| 7. INSTALL REAR SEATBACK COVER RH |
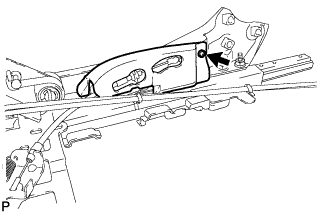 |
Install the rear seatback cover with the screw.
| 8. INSTALL REAR SEATBACK COVER LH |
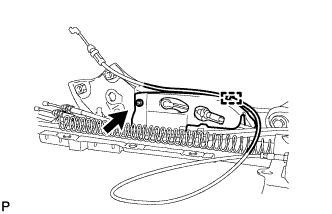 |
Install the rear seatback cover with the screw.
Connect the cable with the cable clamp.
| 9. INSTALL REAR SEAT RECLINING COVER INNER |
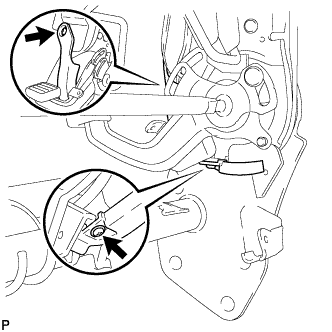 |
Install the rear seat reclining cover with the 2 screws.
| 10. INSTALL REAR SEAT RECLINING COVER INNER LH |
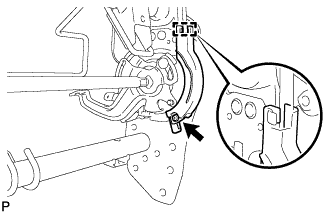 |
Attach the guide to install the rear seat reclining cover.
Install the screw.
| 11. INSTALL REAR BACK LOCK CONTROL LEVER SUB-ASSEMBLY RH |
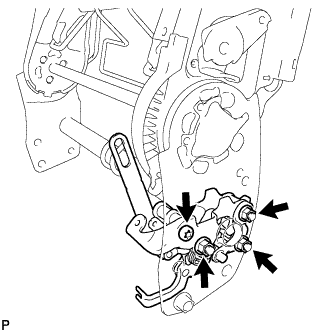 |
Install the rear back lock control lever sub-assembly and rear seat cushion lock striker sub-assembly with the 3 nuts.
Using a T40 "TORX" socket, install the "TORX" bolt.
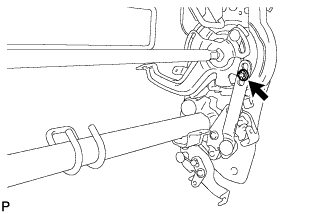 |
Install the washer and new E-ring.
| 12. INSTALL REAR SEAT CUSHION HOLDER BRACKET RH |
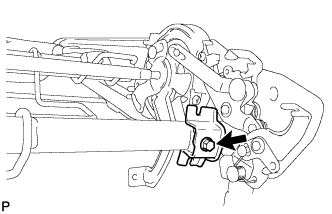 |
Install the rear seat cushion holder bracket with the bolt.
| 13. INSTALL REAR SEATBACK FRAME SUB-ASSEMBLY RH |
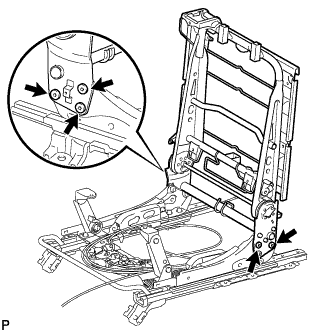 |
Using a T45 "TORX" socket, install the rear seatback frame sub-assembly with the 5 "TORX" bolts.
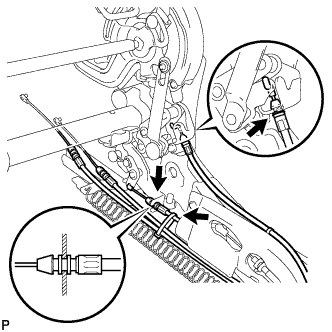 |
Connect the 2 cables.
Bind the 3 cables with a cable tie.
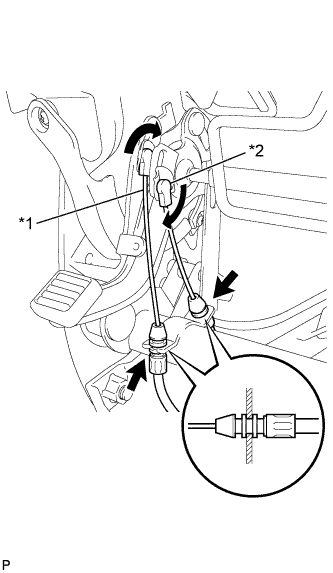 |
Insert and rotate the 2 cable ends to connect them.
| *1 | Rear Seatback Lock Control No. 1 Cable Sub-assembly |
| *2 | Rear Seat Reclining Control No. 2 Cable |
Connect the 2 clamps and install the 2 cables.
| 14. INSTALL REAR SEAT RECLINING COVER INNER RH |
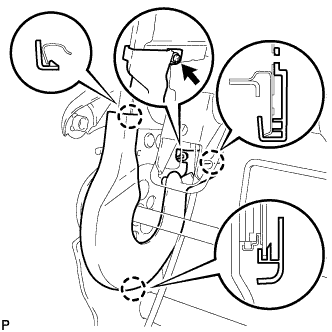 |
Attach the 3 claws to install the rear seat reclining cover.
Install the screw.
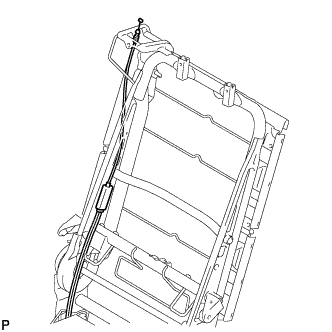 |
Insert the cable through the rear seatback frame sub-assembly.
| 15. INSTALL REAR SEAT RECLINING COVER NO. 1 LH |
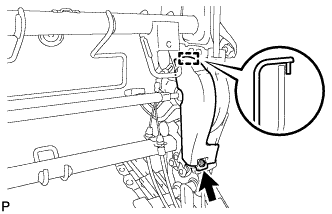 |
Attach the guide to install the rear seat reclining cover.
Install the screw.
| 16. INSTALL SEATBACK HEATER ASSEMBLY (w/ Seat Heater System) |
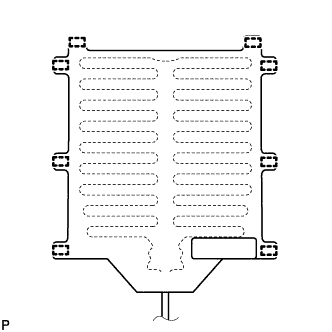 |
Set the seatback heater with the name stamp side facing the seatback cover.
Install the seatback heater with new 8 tack pins.
| 17. INSTALL SEPARATE TYPE REAR SEATBACK COVER |
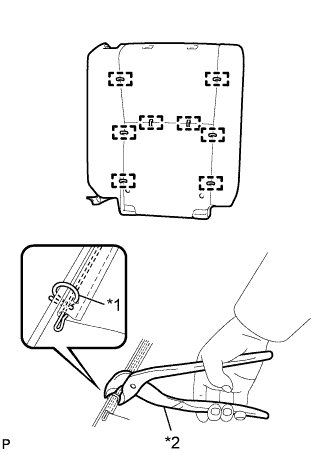 |
Using hog ring pliers, install the seatback cover to the seatback pad with 8 new hog rings.
| *1 | New Hog Ring |
| *2 | Hog Ring Pliers |
| 18. INSTALL SEATBACK COVER WITH PAD |
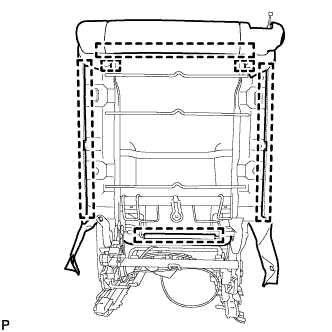 |
Attach the hooks to install the seatback cover with pad.
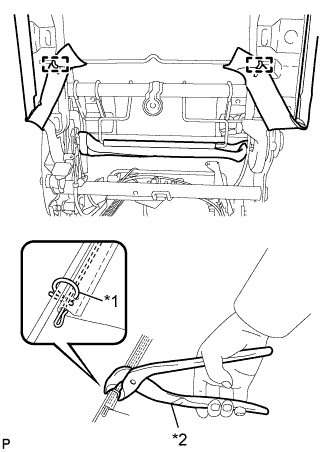 |
Using hog ring pliers, install the seatback cover to the seatback frame with 2 new hog rings.
| *1 | New Hog Ring |
| *2 | Hog Ring Pliers |
| 19. INSTALL NO. 1 SEATBACK COVER SUB-ASSEMBLY RH |
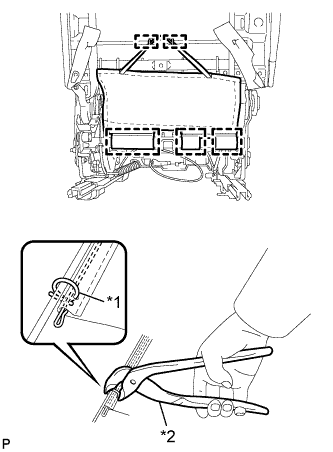 |
Attach the hooks.
| *1 | New Hog Ring |
| *2 | Hog Ring Pliers |
Using hog ring pliers, install the No. 1 seatback cover sub-assembly to the seatback frame with 2 new hog rings.
| 20. INSTALL REAR SEAT HEADREST SUPPORT |
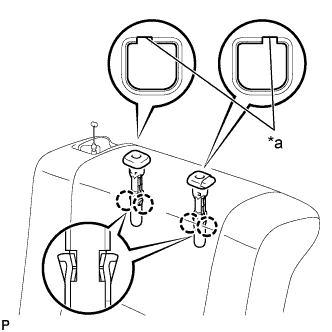 |
Align the protruding portion of the rear seat headrest supports with the installation grooves of the rear seatback frame.
| *a | Protruding |
Attach the 4 claws to install the 2 supports.
| 21. INSTALL REAR SEAT CUSHION UNDER COVER RH |
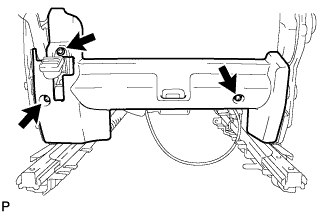 |
Install the rear seat cushion under cover with the 3 screws.
| 22. INSTALL REAR SEAT CUSHION HINGE COVER RH |
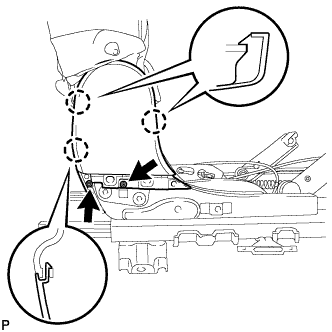 |
Attach the 3 claws to install the rear seat cushion hinge cover.
Install the 2 screws.
| 23. INSTALL REAR SEAT CUSHION HINGE COVER NO. 1 |
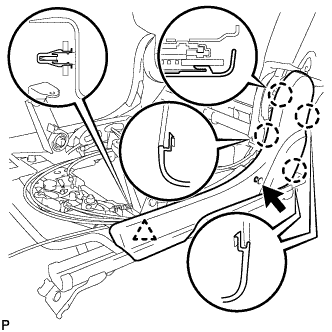 |
Attach the 4 claws and clip to install the rear seat cushion hinge cover.
Install the screw.
| 24. INSTALL REAR SEATBACK BOARD SUB-ASSEMBLY RH |
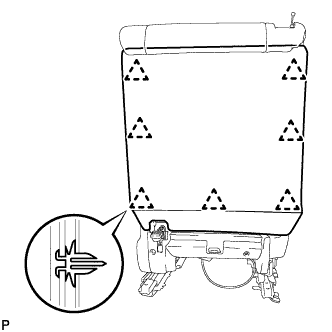 |
Attach the 7 clips to install the rear seatback board sub-assembly.
| 25. INSTALL SEAT ARMREST ASSEMBLY RH (w/ Armrest) |
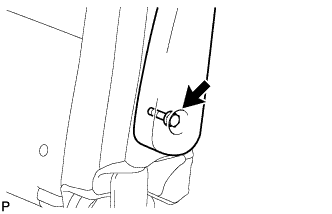 |
Install the seat armrest assembly with the bolt.
| 26. INSTALL REAR NO. 1 SEAT ARMREST CAP (w/ Armrest) |
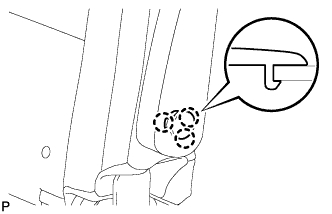 |
Attach the 3 claws to install the rear No. 1 seat armrest cap.
| 27. INSTALL REAR SEAT LOCK CONTROL LEVER SUB-ASSEMBLY RH |
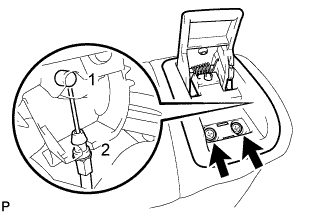 |
Connect the cable in the order shown in the illustration to install the lock control lever sub-assembly.
Install the rear seat lock control lever sub-assembly with the 2 screws.
| 28. INSTALL REAR SEATBACK LOCK STRIKER COVER |
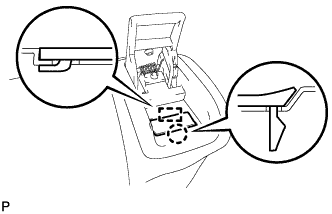 |
Attach the guide and claw to install the rear seatback lock striker cover.
| 29. INSTALL REAR SEAT HEADREST ASSEMBLY |
| 30. INSTALL SEAT HEATER CONTROL SUB-ASSEMBLY RH |
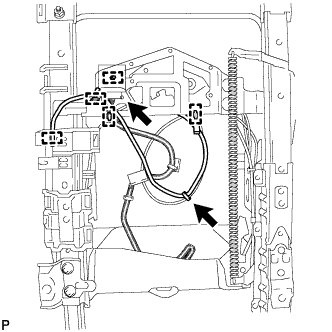 |
Connect the connector.
Attach the 5 harness clamps to install the seat heater control sub-assembly.
Fasten the harness and cable.
| 31. INSTALL NO. 1 SEAT CUSHION COVER RH |
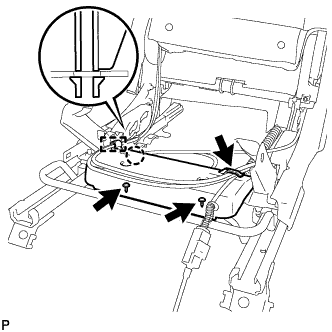 |
Attach the claw to install the No. 1 seat cushion cover.
Install the 2 screws.
Attach the cable clamp and connect the cable to the No. 1 seat cushion cover.
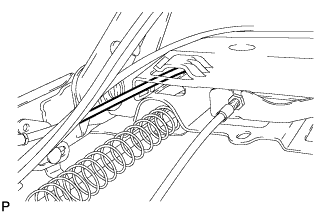 |
When installing the No. 1 seat cushion cover, pass the cable under the cover, as shown in the illustration.
| 32. INSTALL SEAT CUSHION HEATER ASSEMBLY (w/ Seat Heater System) |
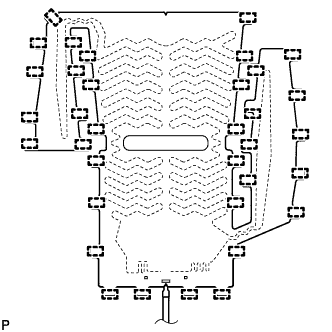 |
Set the seat cushion heater with the name stamp side facing the seat cushion cover.
Install the seat cushion heater with new 31 tack pins.
| 33. INSTALL SEPARATE TYPE REAR SEAT CUSHION COVER |
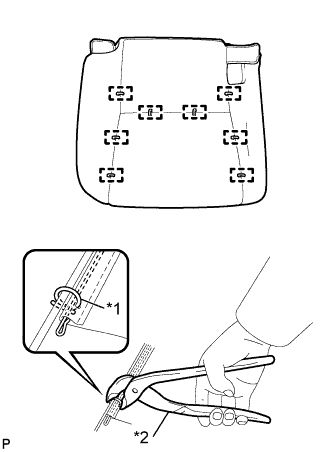 |
Using hog ring pliers, install the seat cushion cover to the seat cushion pad with 8 new hog rings.
| *1 | New Hog Ring |
| *2 | Hog Ring Pliers |
| 34. INSTALL REAR SEAT CUSHION SPRING ASSEMBLY RH (w/ Seat Heater System) |
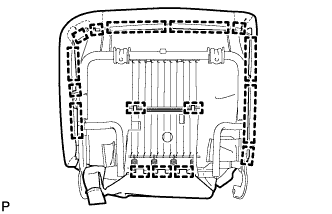 |
Attach the hooks to install the rear seat cushion spring assembly.
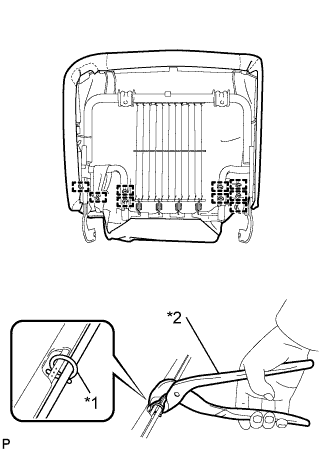 |
Using hog ring pliers, install the seat cushion spring with 9 new hog rings.
| *1 | New Hog Ring |
| *2 | Hog Ring Pliers |
| 35. INSTALL REAR SEAT CUSHION SPRING ASSEMBLY RH (w/o Seat Heater System) |
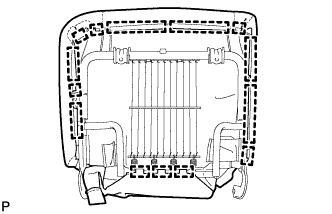 |
Attach the hooks to install the rear seat cushion spring assembly.
|
Using hog ring pliers, install the seat cushion spring with 9 new hog rings.
| *1 | New Hog Ring |
| *2 | Hog Ring Pliers |
| 36. INSTALL REAR NO. 1 SEAT CUSHION ASSEMBLY RH |
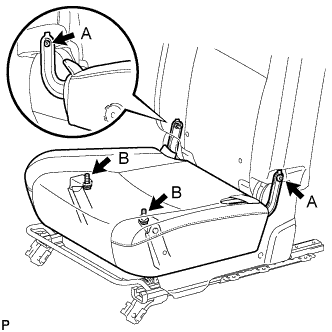 |
Install the 2 bushes to the cushion spring. Then, using a T45 "TORX" socket, install the 2 "TORX" bolts.
Install the 2 bolts.
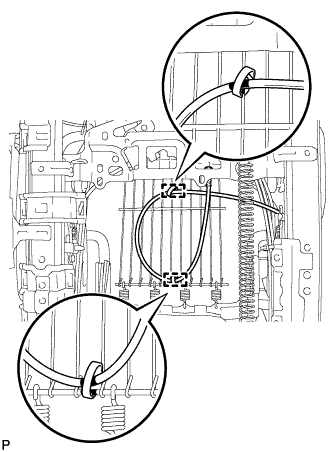 |
Fasten the cable to the seat cushion spring with 2 clamps and connect the cable.
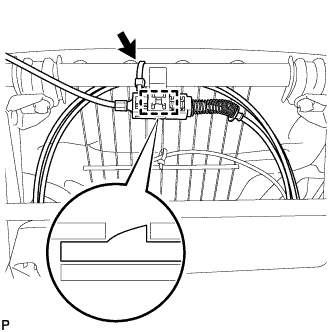 |
Fasten the cable with a cable tie.
Attach the cable clamp and connect the cable to the seat cushion spring.
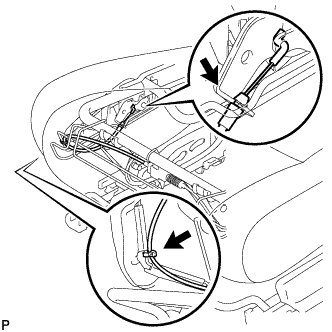 |
Fasten the cable to the seat cushion spring with a cable tie and connect the cable.
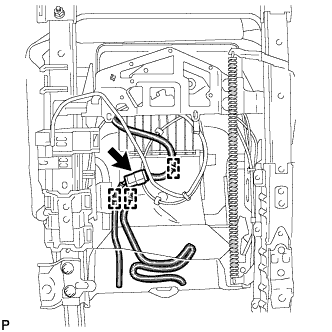 |
Connect the connector and attach the 3 harness clamps.
| 37. INSTALL REAR SEAT INNER BELT ASSEMBLY |
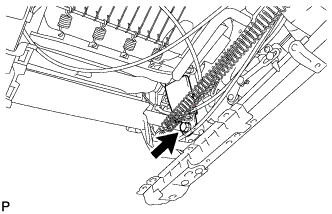 |
Install the rear seat inner belt with the bolt.
| 38. INSTALL REAR SEAT CUSHION HINGE COVER NO. 2 |
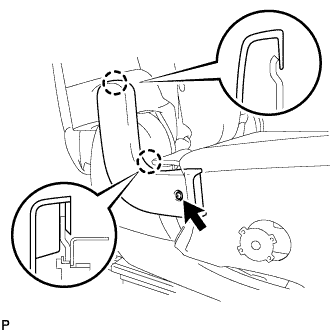 |
Attach the 2 claws to install the rear seat cushion hinge cover.
Install the screw.
| 39. INSTALL REAR SEAT CUSHION HINGE COVER NO. 3 |
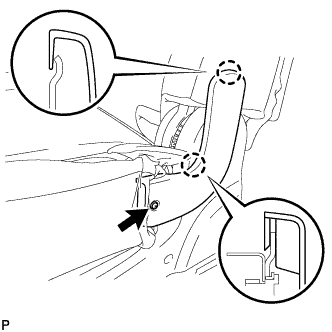 |
Attach the 2 claws to install the rear seat cushion hinge cover.
Install the screw.
| 40. INSTALL REAR SEAT RECLINING RELEASE LEVER |
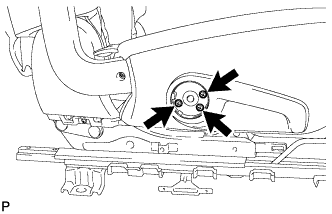 |
Install the rear seat reclining release lever with the 3 screws.
| 41. INSTALL RECLINING ADJUSTER KNOB CAP RH |
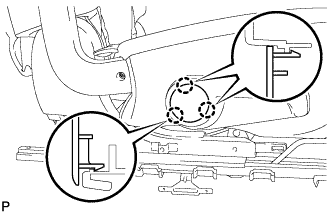 |
Attach the 3 claws to install the reclining adjuster knob cap.
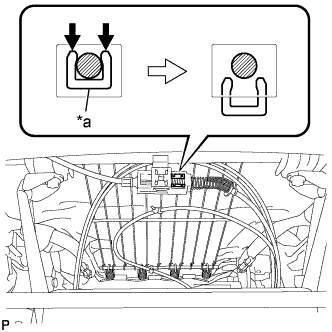 |
Press the pink button on the rear seatback lock control No. 1 cable to release the cable lock, operate the lever a few times to adjust the amount of cable play, and then push in the pink button to lock the cable.
| *a | Pink Button |