 |
Coat the installation part of the stoppers with Primer G.
- NOTICE:
- Allow the primer coating to dry for 3 minutes or more.
- Do not keep any of the opened Primer G for later use.
- Do not apply too much Primer .
WINDSHIELD GLASS > INSTALLATION |
| 1. INSTALL WINDSHIELD GLASS NO.2 STOPPER |
|
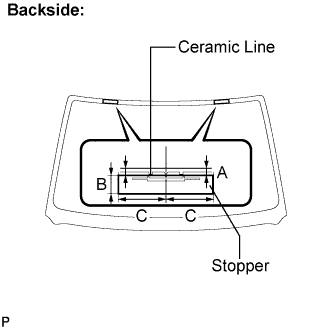
Coat the installation part of the stoppers with Primer G.
Install 2 new stoppers onto the glass, as shown in the illustration.
| Area | Measurement |
| A | 40.0 mm (1.575 in.) |
| B | 7.7 mm (0.303 in.) |
| 2. INSTALL WINDSHIELD GLASS NO.1 STOPPER |
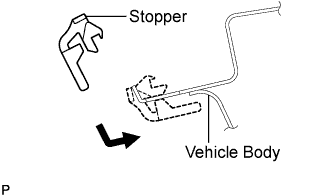 |
Install 2 new stoppers to the vehicle body, as shown in the illustration.
| 3. INSTALL WINDOW GLASS ADHESIVE DAM |
Coat the installation part of the windshield glass adhesive dam with Primer G.
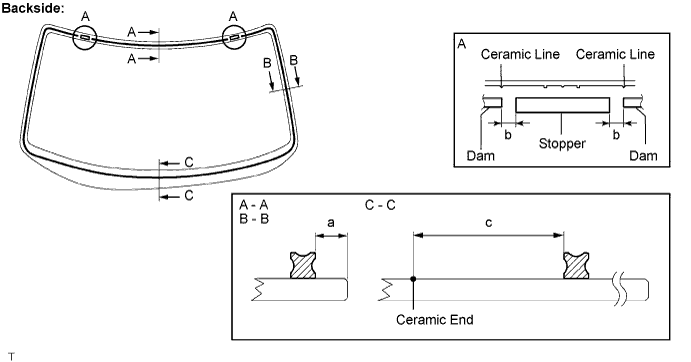
Install a new dam, applying double-sided tape all the way around the glass except where the stoppers are installed, as shown in the illustration.
| Area | Measurement |
| a | 7.0 mm (0.276 in.) |
| b | 6.0 mm (0.236 in.) |
| c | 35.0 mm (1.378 in.) |
| 4. INSTALL WINDSHIELD MOULDING OUTER UPPER |
Using the brush or sponge, coat the edge of the glass and the contact surface with Primer G.
Install the moulding.
| 5. INSTALL WINDSHIELD GLASS |
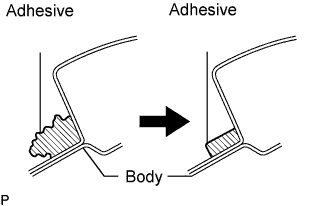 |
Clean and shape the contact surface of the vehicle body.
Using a knife, cut away any rough adhesive on the contact surface of the vehicle body to ensure the appropriate surface shape.
Clean the contact surface of the vehicle body with a piece of shop rag saturated with cleaner.
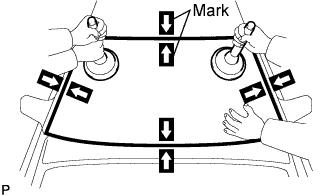 |
Position the glass.
Using a suction cup, place the glass in the correct position.
Check that the whole contact surface of the glass rim is perfectly even.
Place reference marks between the glass and vehicle body.
Remove the glass.
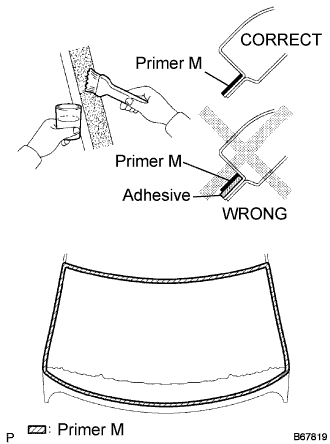 |
Using a brush, coat the exposed part of the vehicle body with Primer M.
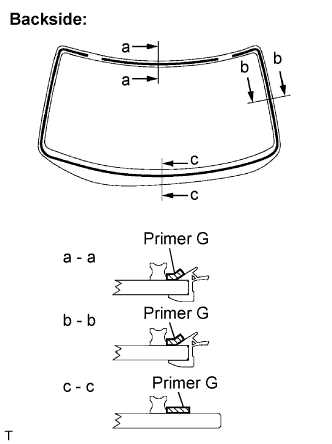 |
Using a brush or sponge, coat the edge of the glass and the contact surface with Primer G.
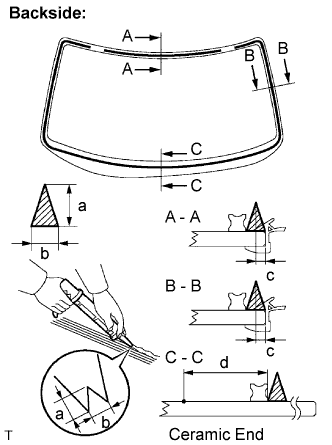 |
Apply adhesive (Adhesive: Part No.08850-00801 or equivalent).
Cut off the tip of the cartridge nozzle, as shown in the illustration.
| Temperature | Usage Timeframe |
| 35°C (95°F) | 15 minutes |
| 20°C (68°F) | 1 hour 40 minutes |
| 5°C (41°F) | 8 hours |
Load the sealer gun with the cartridge.
Coat the glass with adhesive, as shown in the illustration.
| Area | Measurement |
| a | 12.0 mm (0.472 in.) |
| b | 8.0 mm (0.315 in.) |
| c | 3.0 mm (0.118 in.) |
| d | 40.0 mm (1.575 in.) |
|
Install the glass.
Using a suction cup, position the glass so that the reference marks are aligned. Press it in gently along the rim.
Lightly press the front surface of the glass to ensure a close fit.
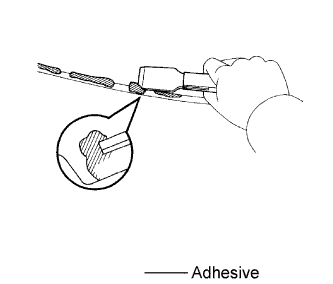 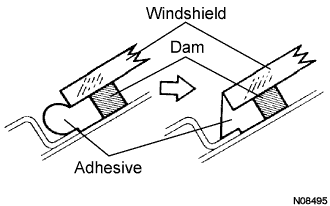 |
Using a scraper, remove any excess or protruding adhesive.
| Temperature | Minimum time prior to driving vehicle |
| 35°C (95°F) | 1 hour 30 minutes |
| 20°C (68°F) | 5 hours |
| 5°C (41°F) | 24 hours |
| 6. REMOVE WINDSHIELD MOULDING OUTSIDE LH |
| 7. INSTALL WINDSHIELD MOULDING OUTSIDE RH |
| 8. CHECK FOR LEAKS AND REPAIR |
Conduct a leak test after the adhesive has completely hardened.
Seal any leaks with auto glass sealer.
| 9. INSTALL COWL TOP VENTILATOR LOUVER SUB-ASSEMBLY |
| 10. INSTALL FRONT WIPER ARM RH |
| 11. INSTALL FRONT WIPER ARM LH |
| 12. REMOVE FRONT WIPER ARM HEAD CAP |
| 13. INSTALL ROOF HEADLINING ASSEMBLY |
| 14. INSTALL INNER REAR VIEW MIRROR ASSEMBLY |
| 15. REMOVE SUN ROOF OPENING TRIM MOULDING (W/ SLIDING ROOF) |
| 16. INSTALL ROOF CONSOLE BOX ASSEMBLY |
| 17. INSTALL VISOR HOLDER |
| 18. INSTALL ASSIST GRIP SUB-ASSEMBLY |
| 19. INSTALL VISOR ASSEMBLY RH |
| 20. INSTALL VISOR ASSEMBLY LH |
| 21. INSTALL FRONT PILLAR GARNISH RH |
| 22. INSTALL FRONT PILLAR GARNISH LH |
| 23. INSTALL FRONT DOOR OPENING TRIM WEATHERSTRIP RH |
| 24. INSTALL FRONT DOOR OPENING TRIM WEATHERSTRIP LH |