 |
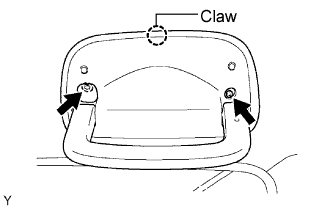
Using a screwdriver, disengage the claw and remove the assist grip cover.
- HINT:
- Tape the screwdriver tip before use.
WINDSHIELD GLASS > REMOVAL |
| 1. REMOVE FRONT DOOR OPENING TRIM WEATHERSTRIP LH |
| 2. REMOVE FRONT DOOR OPENING TRIM WEATHERSTRIP RH |
| 3. REMOVE FRONT PILLAR GARNISH LH |
| 4. REMOVE FRONT PILLAR GARNISH RH |
| 5. REMOVE VISOR ASSEMBLY LH |
| 6. REMOVE VISOR ASSEMBLY RH |
| 7. REMOVE ASSIST GRIP SUB-ASSEMBLY |
|
Using a screwdriver, disengage the claw and remove the assist grip cover.
Remove the torx, screw and assist grip sub-assembly.
| 8. REMOVE VISOR HOLDER |
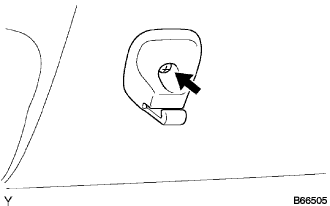 |
Remove the screw and visor holder.
| 9. REMOVE ROOF CONSOLE BOX ASSEMBLY |
| 10. REMOVE SUN ROOF OPENING TRIM MOULDING (W/ SLIDING ROOF) |
| 11. REMOVE INNER REAR VIEW MIRROR ASSEMBLY |
| 12. REMOVE ROOF HEADLINING ASSEMBLY |
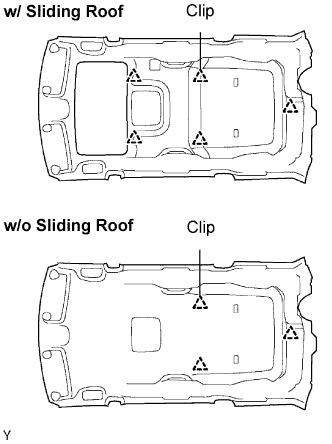 |
w/ sliding roof:
Using a clip remover, disengage the 5 clips and remove the roof headlining assembly.
w/o sliding roof:
Using a clip remover, disengage the 3 clips and remove the roof headlining assembly.
| 13. REMOVE FRONT WIPER ARM HEAD CAP |
| 14. REMOVE FRONT WIPER ARM LH |
Remove the nut and the FR wiper arm LH.
| 15. REMOVE FRONT WIPER ARM RH |
Operate the wiper, and stop the windshield wiper motor assembly to the automatic stop position.
Remove the nut and the FR wiper arm RH.
| 16. REMOVE FRONT FENDER TO COWL SIDE SEAL LH |
| 17. REMOVE FRONT FENDER TO COWL SIDE SEAL RH |
| 18. REMOVE COWL TOP VENTILATOR LOUVER SUB-ASSEMBLY |
| 19. REMOVE WINDSHIELD MOULDING OUTER UPPER |
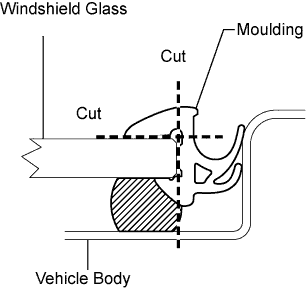 |
Using a knife, cut off the moulding, as shown in the illustration.
Remove the remaining moulding.
w/ Deicer:
Disconnect the connector, as shown in the illustration.
| 20. REMOVE WINDSHIELD GLASS |
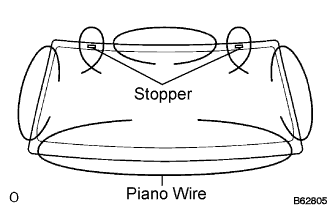 |
Pass a piano wire between the vehicle body and glass from the interior.
Tie both wire ends to wooden blocks or similar objects.
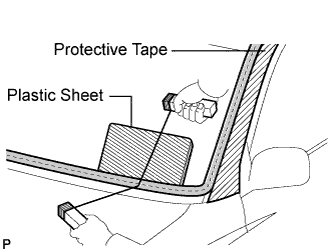 |
Cut off the adhesive by pulling piano wire around the glass.
Disengage the stoppers.
Using a suction cup, remove the glass.
| 21. CLEAN WINDSHIELD GLASS |
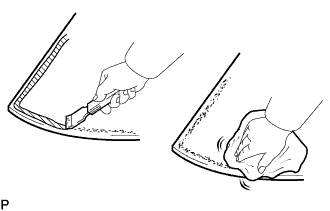 |
Using a scraper, remove the damaged stoppers, dams and adhesive sticking to the glass.
Clean the outer circumference of the glass with white gasoline.