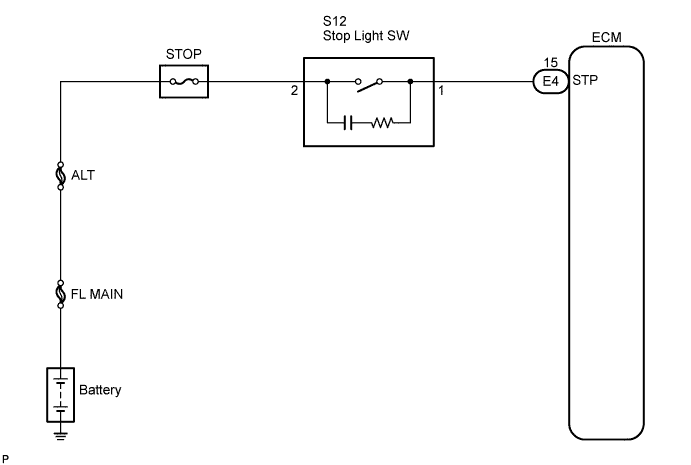
DTC P0724 Brake Switch "B" Circuit High |
| DTC No. | DTC Detection Condition | Trouble Area |
| P0724 | The stop light switch remains ON even when the vehicle is driven in a STOP (less than 3 km/h (2 mph) and GO (30 km/h (19 mph) or more) fashion 5 times. (2-trip detection logic). |
|
| Related DTCs | P0724: Stop light switch/Rationality |
| Required sensors/Components | Stop light switch, Vehicle speed sensor |
| Frequency of operation | Continuous |
| Duration | GO and STOP 5 times |
| MIL operation | 2 driving cycles |
| Sequence of operation | None |
| The monitor will run whenever this DTC is not present. | None |
| Ignition switch | ON |
| Starter | OFF |
| Battery voltage | 8 V or more |
| GO (Vehicle speed is 30 km/h (18.63 mph) or more) | Once |
| STOP (Vehicle speed is less than 3 km/h (1.86 mph)) | Once |
| Brake switch | Remain ON during GO and STOP 5 times |
| 1.READ VALUE USING DATA LIST |
Warm up the engine.
Turn the ignition switch off.
Connect Techstream to the DLC3.
Turn the ignition switch to the ON position.
Turn on the tester.
Select the item "Powertrain / Engine and ECT / Data List".
According to the display on the tester, read the "Data List".
| Tester Display | Measurement Item/Range | Normal Condition | Diagnostic Note |
| Stop Light Switch | Stop light switch Status/ ON or OFF |
| - |
| Result | Proceed to |
| NG | A |
| OK | B |
|
| ||||
| A | |
 |
| 2.INSPECT STOP LIGHT SWITCH ASSEMBLY |
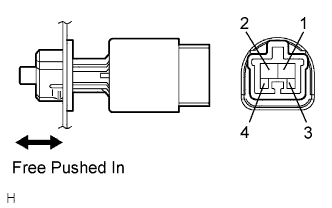 |
Remove the stop light switch assembly.
Measure the resistance according to the value(s) in the table below.
| Switch position | Tester Connection | Specified Condition |
| Switch pin free | 1 - 2 | Below 1 Ω |
| Switch pin pushed in | ↑ | 10 kΩ or higher |
| Switch pin free | 3 - 4 | 10 kΩ or higher |
| Switch pin pushed in | ↑ | Below 1 Ω |
|
| ||||
| OK | |
|
| 3.CHECK HARNESS AND CONNECTOR (STOP LIGHT SWITCH ASSEMBLY - ECM) |
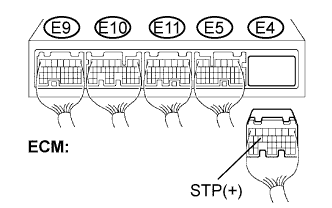 |
Install the stop light switch assembly.
Measure the voltage according to the value(s) in the table below when the brake pedal is depressed and released.
| Condition | Tester Connection | Specified Condition |
| Brake pedal is depressed | E4-15 (STP) - Body ground | 11 to 14 V |
| Brake pedal is released | Below 1 V |
|
| ||||
| OK | ||
 | ||
| ||

