 |
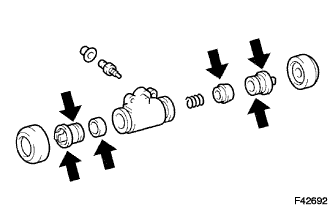
Apply lithium soap base glycol grease to the 2 new wheel cylinder cups and the 2 pistons.
REAR DRUM BRAKE > REASSEMBLY |
| 1. INSTALL REAR WHEEL CYLINDER CUP KIT |
Temporarily tighten the bleeder plug to the wheel cylinder, and install the bleeder plug cap.
|
Apply lithium soap base glycol grease to the 2 new wheel cylinder cups and the 2 pistons.
Install the 2 wheel cylinder cups to each piston.
Install the compression spring and 2 pistons to the rear wheel brake cylinder.
Install the 2 new cylinder dust boots to the rear wheel brake cylinder.
| 2. INSTALL LH, FRONT OR UPPER REAR WHEEL BRAKE CYLINDER ASSEMBLY |
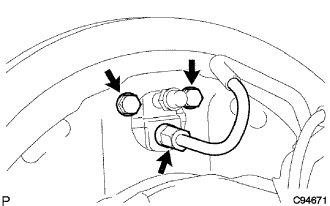 |
Install the rear wheel brake cylinder assembly with the 2 bolts.
Using SST, connect the brake tube.
| 3. APPLY HIGH TEMPERATURE GREASE |
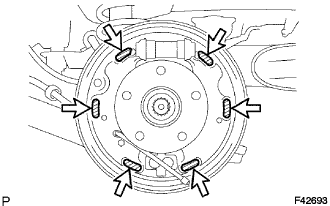 |
Apply high temperature grease to the shoe attached surface of backing plate.
| 4. INSTALL REAR BRAKE SHOE |
Apply high temperature grease to the adjusting bolt.
Install the rear brake strut set with the shoe return spring.
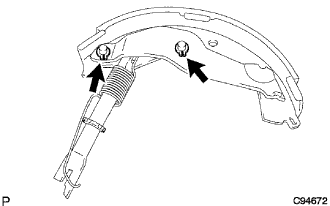 |
Using a pliers, install the rear brake strut set, parking brake reaction lever and parking brake shoe lever LH with the 2 new C-washers.
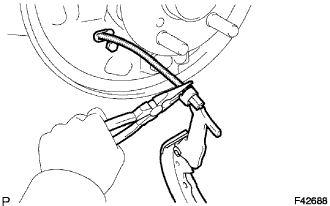 |
Using a needle-nose pliers, connect the parking brake cable No. 3 to the parking brake shoe lever LH.
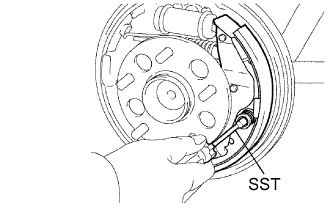 |
Using SST, install the rear brake shoe, pin, shoe hold down spring and shoe hold down spring cup.
| 5. INSTALL FRONT BRAKE SHOE |
Install the rear brake automatic adjust lever LH, automatic adjust lever spring and parking brake shoe strut LWR to the front brake shoe.
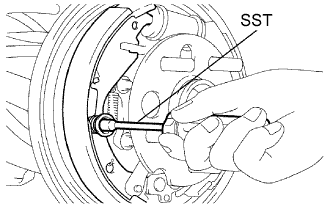 |
Using SST, install the front brake shoe, pin, shoe hold down spring and shoe hold down spring cup.
 |
Install the tension spring to the front brake shoe and rear brake shoe.
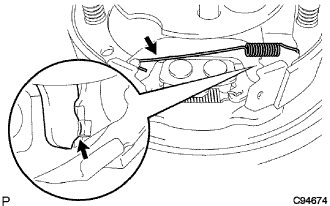 |
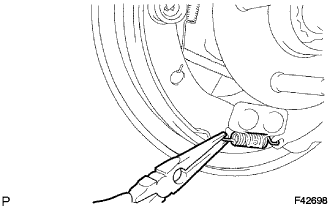
Using a needle-nose pliers, install the return spring.
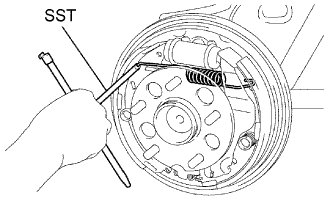 |
Using SST, install the shoe return spring to the front brake shoe.
| 6. CHECK REAR DRUM BRAKE INSTALLATION |
Check that each part is installed properly.
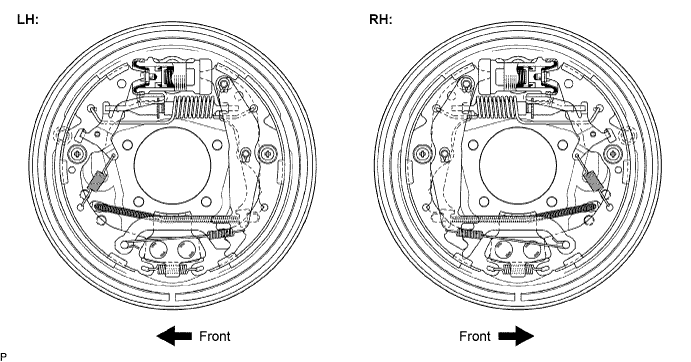
Measure the brake drum inside diameter and the diameter of the brake shoes. Check that difference between the diameter is the correct shoe clearance.
| 7. INSTALL REAR BRAKE DRUM SUB-ASSEMBLY |
| 8. ADJUST REAR DRUM BRAKE SHOE CLEARANCE |
Temporarily install the hub nuts.
Remove the hole plug, and turn the adjuster and expand the shoe until the drum locks.
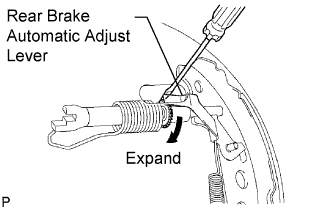 |
Using a screwdriver, back off the adjuster 15 notches.
Install the hole plug.
| 9. FILL RESERVOIR WITH BRAKE FLUID |
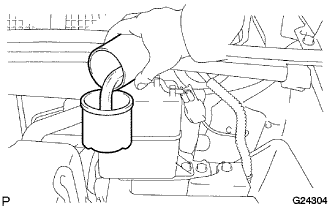 |
| 10. BLEED BRAKE MASTER CYLINDER |
Run the engine at idle.
Connect the vinyl tube to the brake caliper bleeder plug.
Open the brake caliper bleeder plug or wheel cylinder bleeder plug.
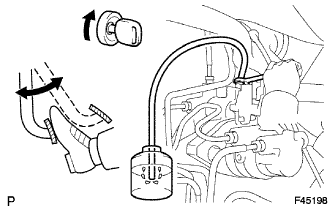 |
Depress the brake pedal several times, then loosen the master cylinder (3rd chamber) bleeder plug with the pedal held down (*3).
At the point when the fluid stops coming out, tighten the master cylinder (3rd chamber) bleeder plug, then release the brake pedal (*4).
Repeat (*3) and (*4) several times until the air in the master cylinder is bled out.
Tighten the master cylinder (3rd chamber) bleeder plug .
Tighten the brake caliper bleeder plug or wheel cylinder bleeder plug.
| 11. BLEED BRAKE LINE |
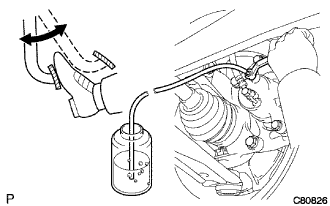 |
Connect the vinyl tube to the bleeder plug.
Depress the brake pedal several times, then loosen the bleeder plug with the pedal depressed (*5).
At the point when fluid stops coming out, tighten the bleeder plug, then release the brake pedal (*6).
Repeat (*5) and (*6) several times until all the air in the fluid is completely bled out.
Tighten the bleeder plug completely.
Repeat the above procedure to bleed the air out of the brake line for each wheel.
| 12. BLEED BRAKE ACTUATOR (w/ VSC) |
Depress the brake pedal more than 20 times with the ignition switch off.
Connect the Techstream to the DLC3, then turn the ignition switch to the ON position.
Turn the Techstream on and select "AIR BLEEDING" on the screen.
Perform air bleeding according to "Step 1: Increase" on the Techstream display.
Connect a vinyl tube to either one of the bleeder plugs.
Depress the brake pedal several times, then loosen the bleeder plug connected to the vinyl tube with the pedal depressed (*7).
When fluid stops coming out, tighten the bleeder plug, then release the brake pedal (*8).
Repeat (*7) and (*8) until all the air in the fluid is completely bled out.
Tighten the bleeder plug completely.
Repeat the above procedures for the rest of the wheels to bleed the air from the brake line.
Bleed the air from the suction line according to "Step 2: Inhalation" on the Techstream display.
Connect a vinyl tube to the bleeder plug at the right front wheel or the right rear wheel and loosen the bleeder plug.
Operate the brake actuator assembly to perform air bleeding using the Techstream (*9).
Check that the operation has stopped by referring to the Techstream display and tighten the bleeder plug (*10).
Repeat (*9) and (*10) until all the air in the fluid is completely bled out.
Tighten the bleeder plug completely.
For the rest of the wheels, perform air bleeding in the same way as stated in the above procedure.
Bleed the air from the pressure reduction line according to "Step 3: Decrease" on the Techstream display.
Connect a vinyl tube to either one of the bleeder plugs.
Loosen the bleeder plug (*11).
Using the Techstream, operate the brake actuator assembly, completely depress the brake pedal, and hold it.
Tighten the bleeder plug, then release the brake pedal (*12).
Repeat (*11) to (*12) until all the air in the fluid is completely bled out.
Tighten the bleeder plug completely.
Repeat the above procedures for the rest of the brakes to bleed the air from the brake line.
Bleed the air from the brake line again according to "Step 4: Increase" on the Techstream display.
Connect a vinyl tube to either one of the bleeder plugs.
Depress the brake pedal several times, then loosen the bleeder plug connected to the vinyl tube with the pedal depressed (*13).
When fluid stops coming out, tighten the bleeder plug, then release the brake pedal (*14).
Repeat (*13) and (*14) until all the air in the fluid is completely bled out.
Tighten the bleeder plug completely.
Repeat the above procedures for each brake to bleed the air from the brake line.
Finish "AIR BLEEDING" on the Techstream and turn off the Techstream.
Disconnect the Techstream from the DLC3.
Turn the ignition switch to the OFF position.
| 13. CHECK FLUID LEVEL IN RESERVOIR |
Check the fluid level and add fluid, if necessary.
| 14. INSPECT FOR BRAKE FLUID LEAK |
| 15. INSTALL REAR WHEEL |
| 16. INSPECT PARKING BRAKE PEDAL TRAVEL |
| 17. ADJUST PARKING BRAKE PEDAL TRAVEL |