 |
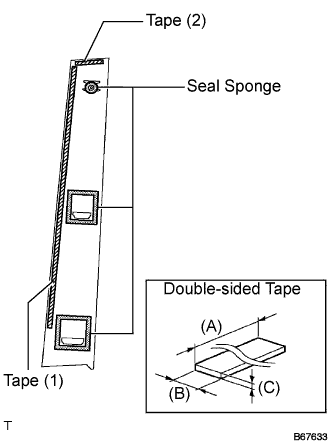
Apply new double-sided tape to the front door window frame moulding, as shown in the illustration.
| Length (A) | Tape (1) 470.0 mm (18.504 in.) Tape (2) 43.0 mm (1.693 in.) |
| Width (B) | 5.0 mm (0.197 in.) |
| Thickness (C) | 0.6 mm (0.024 in.) |
SLIDE DOOR (w/o Power Slide Door) > DISASSEMBLY |
| 1. REMOVE REAR DOOR WINDOW FRAME MOULDING REAR LH |
Remove the tape from the front door window frame moulding.
Clean the contact surface of the vehicle body with white gasoline.
Clean the outer circumference of the front door window frame moulding with white gasoline.
|
Apply new double-sided tape to the front door window frame moulding, as shown in the illustration.
| Length (A) | Tape (1) 470.0 mm (18.504 in.) Tape (2) 43.0 mm (1.693 in.) |
| Width (B) | 5.0 mm (0.197 in.) |
| Thickness (C) | 0.6 mm (0.024 in.) |
Using a heat light, heat the vehicle body and front door window frame moulding.
| Body | 40 to 60 °C (104 to 140 °F) |
| Moulding | 20 to 30 °C (68 to 86 °F) |
Remove the peeling paper from the face of the front door window frame moulding face.
Engage the 2 claws and install the front door window frame moulding with the screw.
| 2. REMOVE REAR DOOR WINDOW FRAME MOULDING SUB-ASSEMBLY LH |
Install the front door grass weatherstrip.
| 3. REMOVE SLIDE DOOR WINDOW GARNISH LH |
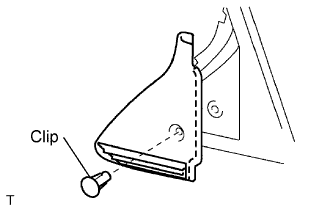 |
Fully open the slide door window.
Remove the glass run.
Using a screwdriver, disengage the clip and remove the garnish.
Using a screwdriver, disengage the 2 claws and remove the weatherstrip inner from the garnish.
| 4. REMOVE REAR SIDE TRIM BOARD COVER LH |
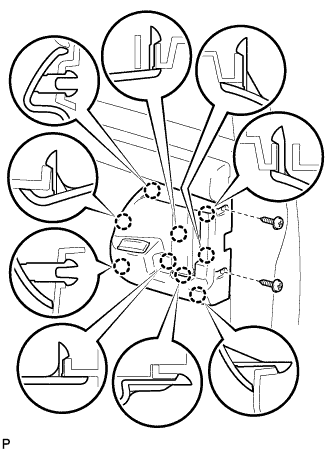 |
Remove the 2 screws.
Using a screwdriver, disengage the 9 claws and remove the rear side trim board cover LH.
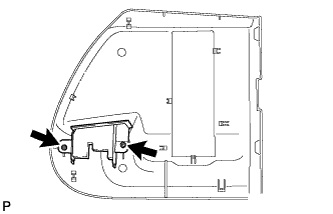 |
Remove the 2 screws and rear door trim bracket LH.
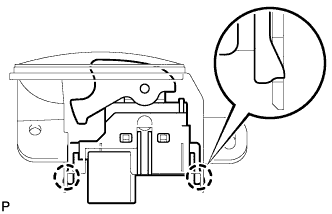 |
Using a screwdriver, disengage the 2 claws and remove the rear power window regulator switch assembly.
| 5. REMOVE REAR DOOR TRIM BOARD SUB-ASSEMBLY LH |
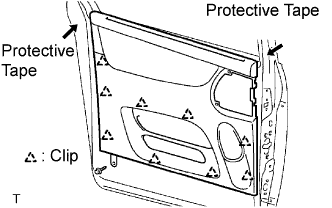 |
Remove the screw.
Using a screwdriver, disengage the 9 clips and remove the trim board.
Using a clip remover, remove the 6 clips and weatherstrip No. 2.
Using a screwdriver, disengage the 11 claws and remove the weatherstrip inner from trim board.
 |
w/ Sunshade:
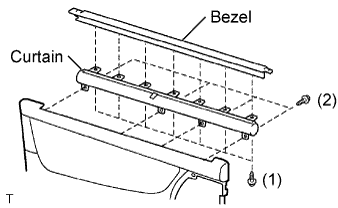
Remove the sunshade.
Remove the 7 screws and sunshade bezel.
Remove the 4 screws and curtain.
| 6. REMOVE SLIDE DOOR WINDOW ASSEMBLY LH |
 |
w/ Sunshade:
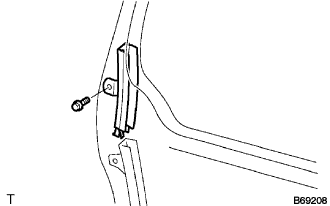
Remove the sunshade hook.
Remove the bolt and window frame.
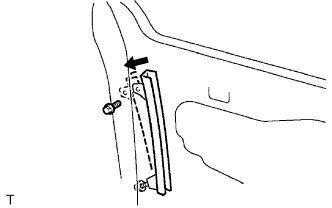 |
Remove the bolt.
Loosen the nut.
Push the window frame rear lower in the direction indicated by the arrow mark in the illustration.
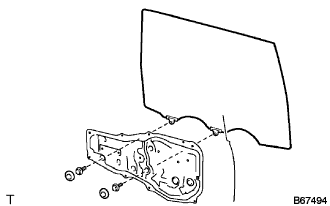 |
Remove the 2 hole plugs.
Move the window until the bolts appear in the service holes.
Remove the 2 bolts and window.
| 7. REMOVE REAR DOOR GLASS WEATHERSTRIP ASSEMBLY OUTER LH |
| 8. REMOVE SLIDE DOOR ATTACHMENT CONTROL LH |
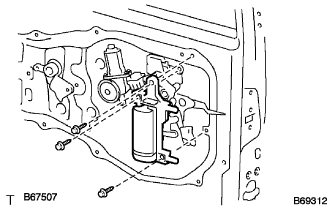 |
Remove the 2 screws, bolt and inside handle.
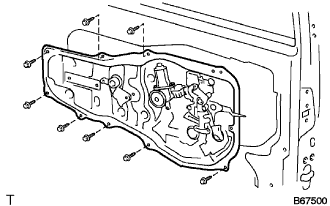 |
Disconnect the connectors from the lock actuator and power window regulator motor.
Disengage the control cables.
Remove the 8 bolts and attachment control.
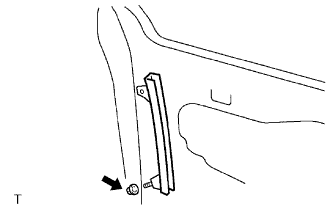 |
Remove the nut and the window frame rear lower.
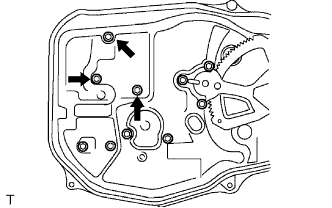 |
Remove the control rod.
Remove the 3 bolts and lock remote control.
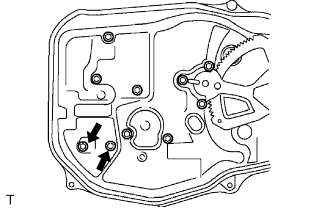 |
Remove the 2 screws and lock actuator.
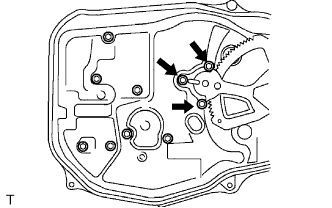 |
Remove the 3 screws and power window regulator motor.
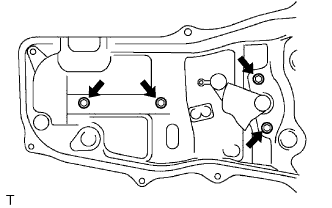 |
Remove the half stop control lever and door lock control bellcrank.
Remove the 4 bolts and window regulator.
| 9. REMOVE REAR DOOR STIFFENER CUSHION LH |
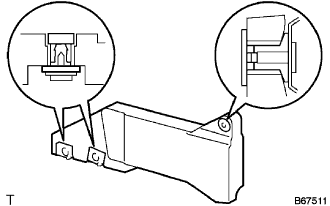 |
Remove 2 hole plugs.
Remove the 2 screws, clip and stiffener cushion.
Remove the 2 grommets and 2 clips.
| 10. REMOVE REAR DOOR OUTSIDE HANDLE COVER LH |
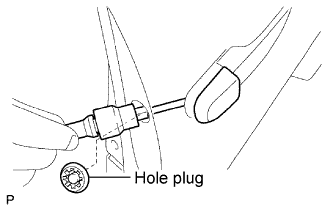 |
Remove the hole plug.
Using a torx socket wrench (T30), loosen the screw and remove the outside handle cover with the lock key cylinder installed.
| 11. REMOVE REAR DOOR OUTSIDE HANDLE ASSEMBLY LH |
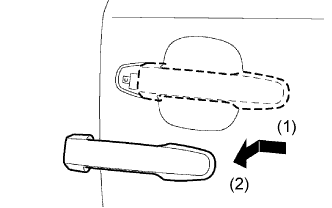 |
Pushing and pulling the outside handle in the direction indicated by the arrow mark in the illustration, remove the outside handle.
Remove the outside handle pads front and rear.
| 12. REMOVE REAR DOOR OUTSIDE HANDLE FRAME SUB-ASSEMBLY LH |
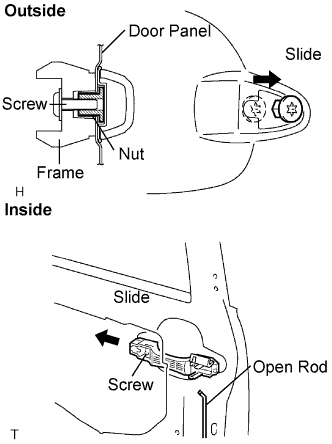 |
Remove the open rod to the outside handle frame.
Using a torx socket wrench (T30), loosen the screw.
Slide the outside handle frame in the direction indicated by the arrow mark in the illustration and remove it.
| 13. REMOVE SLIDE DOOR LOCK ASSEMBLY FRONT LH |
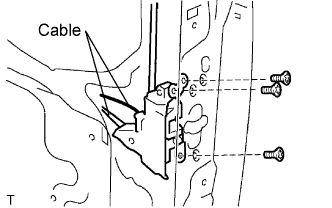 |
Remove the 2 cables.
Using a torx socket wrench (T30), remove the 3 screws and lock.
| 14. REMOVE REAR DOOR LOCK ASSEMBLY LH |
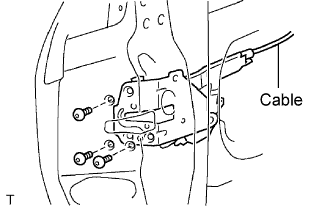 |
Remove the cable.
Using the torx socket wrench (T30), remove the 3 screws and lock.
| 15. REMOVE REAR DOOR WIRE SUB-ASSEMBLY LH |
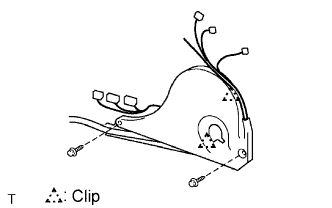 |
Remove the 2 screws.
Using a screwdriver, remove the 2 clips and door wire.