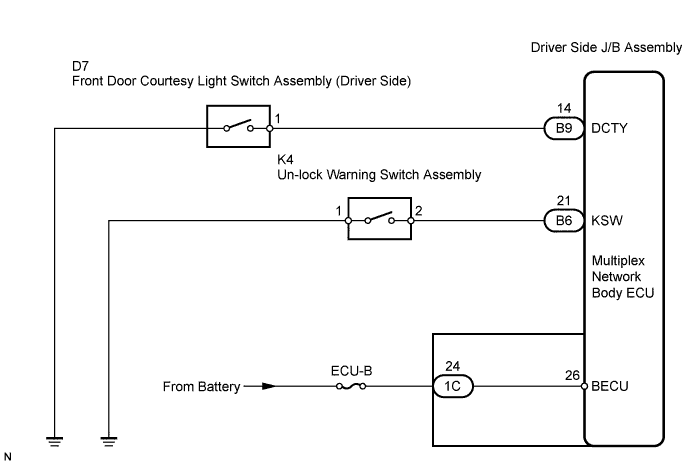
POWER DOOR LOCK CONTROL SYSTEM > Key Lock-in Prevention Function does not Work Properly (Manual Operation and Operation Interlocked with Key are Active) |
| 1.INSPECT FUSE (ECU-B) |
Remove ECU-B fuse from engine room junction block.
Measure the resistance.
|
| ||||
| OK | |
 |
| 2.READ VALUE USING DATA LIST |
Using Techstream, check that the un-lock warning switch signal is output when the switch is operated.
| Tester Display | Measurement Item/Range | Normal Condition | Diagnostic Note |
| Key Unlock Warning SW | Un-lock warning switch signal/ON or OFF | ON: Key is in ignition ley cylinder OFF: No key is in ignition key cylinder | - |
|
| ||||
| NG | |
|
| 3.INSPECT UN-LOCK WARNING SWITCH ASSEMBLY |
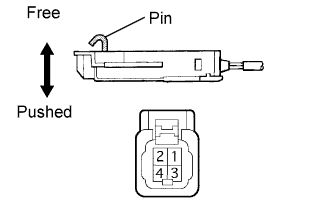 |
Remove the un-lock warning switch.
Measure the resistance according to the value(s) in the table below.
| Terminal No. | Condition | Specified Condition |
| 1 - 2 | Free (Key removed) | 10 kΩ or higher |
| Pushed (Key set) | Below 1 Ω |
|
| ||||
| OK | |
|
| 4.CHECK HARNESS AND CONNECTOR (UN-LOCK WARNING SWITCH ASSEMBLY - DRIVER SIDE J/B) |
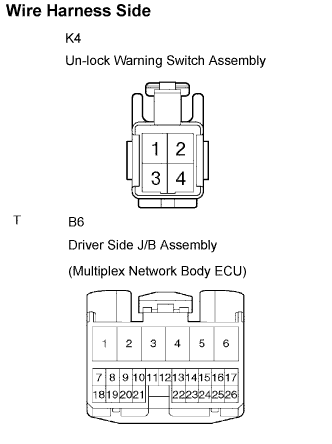 |
Disconnect the K4 switch and B6 body ECU connectors.
Measure the resistance according to the value(s) in the table below.
| Symbol (Terminal No.) | Specified Condition |
| K4-2 - KSW (B6-21) | Below 1 Ω |
| K4-1 - Body ground | Below 1 Ω |
|
| ||||
| OK | ||
 | ||
| ||
| 5.READ VALUE USING DATA LIST |
Using Techstream, check that the driver side door courtesy light switch signal s output when the switch is operated.
| Tester Display | Measurement Item/Range | Normal Condition | Diagnostic Note |
| D Door Courtesy SW | Driver side door courtesy light switch signal/ON or OFF | ON: Driver side door is open OFF: Driver side door is closed | - |
|
| ||||
| NG | |
|
| 6.INSPECT FRONT DOOR COURTESY LIGHT SWITCH ASSEMBLY (DRIVER SIDE) |
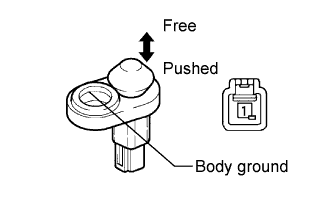 |
Remove the courtesy light switch.
Measure the resistance according to the value(s) in the table below.
| Terminal No. | Condition | Specified Condition |
| 1 - Body ground | Free | Below 1 Ω |
| Pushed | 10 kΩ or higher |
|
| ||||
| OK | |
|
| 7.CHECK HARNESS AND CONNECTOR (FRONT DOOR COURTESY LIGHT SWITCH - DRIVER SIDE J/B) |
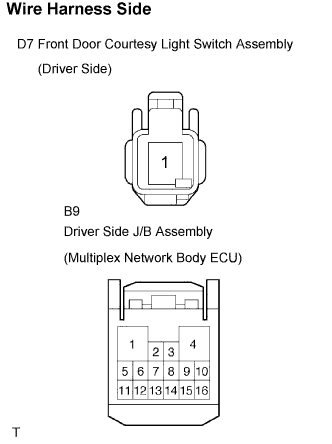 |
Disconnect the D7 switch and B9 body ECU connectors.
Measure the resistance according to the value(s) in the table below.
| Symbol (Terminal No.) | Specified Condition |
| D7-1 - DCTY (B9-14) | Below 1 Ω |
|
| ||||
| OK | ||
| ||
| ||

