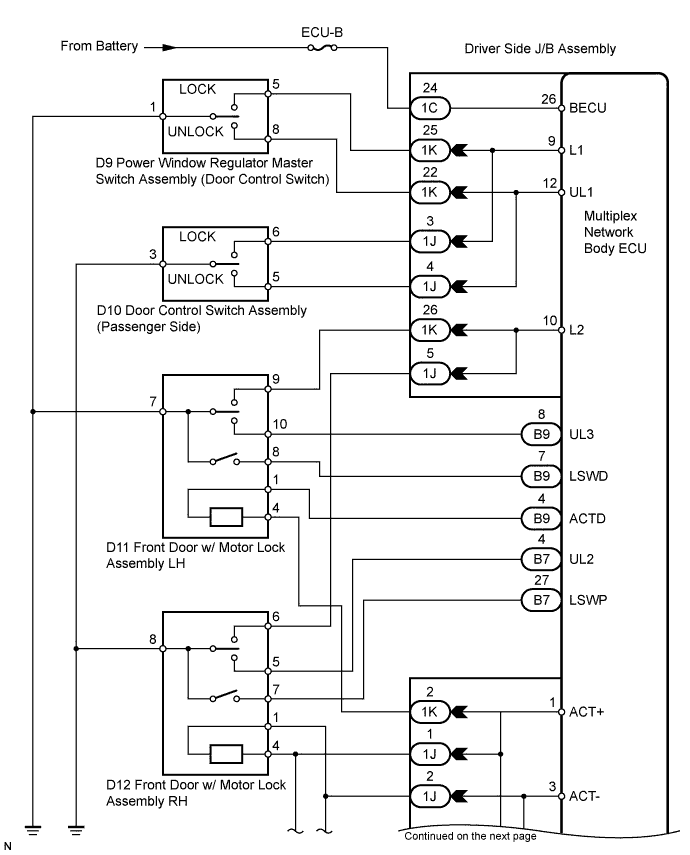
POWER DOOR LOCK CONTROL SYSTEM > All Doors cannot be Locked / Unlocked at Once |
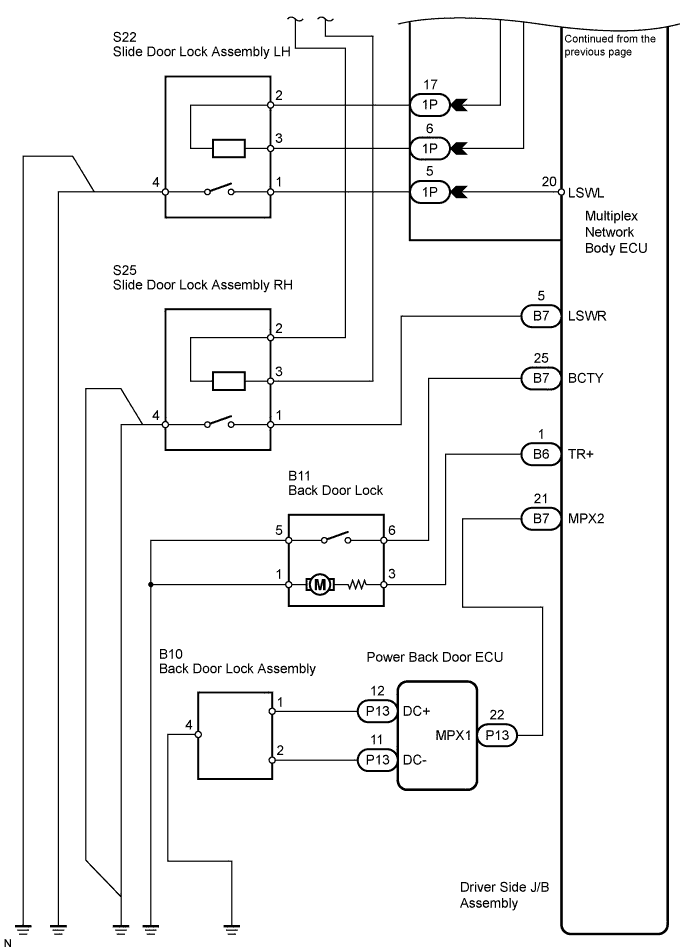
| 1.INSPECT FUSE (ECU-B) |
Remove ECU-B fuse from engine room junction block.
Measure the resistance.
|
| ||||
| OK | |
 |
| 2.PERFORM ACTIVE TEST USING TECHSTREAM |
Select the Active Test and then check that the power door lock operates.
| Tester Display | Test Part | Control Range | Diagnostic Note |
| Door Lock | Operate the door lock motor for all doors | LOCK/UNLOCK | - |
|
| ||||
| NG | |
|
| 3.CHECK OPERATION (MASTER SWITCH OR KEY CYLINDER) |
When manual door lock/unlock operation via the master switch can not be performed, proceed to A.
When manual door lock/unlock operation via the door control switch (passenger side) can not be performed, proceed to B.
When manual door lock/unlock operation interlocked with the driver side door lock key cylinder can not be performed, proceed to C.
When manual door lock/unlock operation interlocked with the passenger side door lock key cylinder can not be performed, proceed to D.
|
| ||||
|
| ||||
|
| ||||
| A | |
|
| 4.INSPECT POWER WINDOW REGULATOR SWITCH ASSEMBLY (DOOR CONTROL SWITCH) |
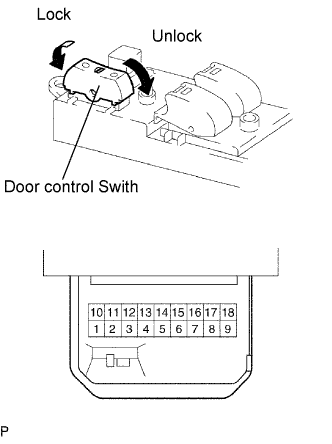 |
Remove the master switch.
Measure the resistance according to the value(s) in the table below.
| Terminal No. | Switch Position | Specified Condition |
| 1 - 5 | Lock | Below 1 Ω |
| 1 - 5, 1 - 8 | OFF | 10 kΩ or higher |
| 1 - 8 | Unlock | Below 1 Ω |
|
| ||||
| OK | |
|
| 5.CHECK HARNESS AND CONNECTOR (POWER WINDOW REGULATOR MASTER SWITCH - DRIVER SIDE J/B) |
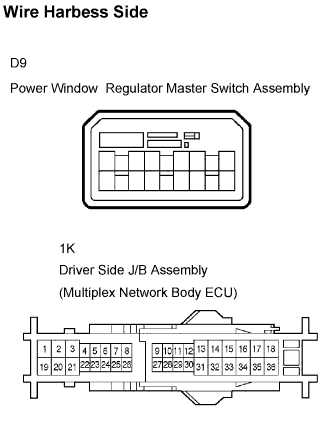 |
Disconnect the D9 switch and 1K J/B connectors.
Measure the resistance according to the value(s) in the table below.
| Symbol (Terminal No.) | Specified Condition |
| L (D9-5) - L1 (1K-25) | Below 1 Ω |
| UL (D9-8) - UL1 (1K-22) | Below 1 Ω |
| E (D9-1) - Body ground | Below 1 Ω |
|
| ||||
| NG | ||
 | ||
| ||
| 6.INSPECT DOOR CONTROL SWITCH ASSEMBLY |
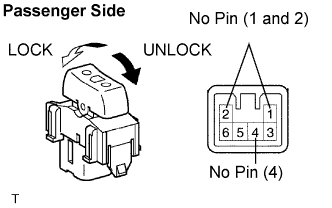 |
Passenger side:
Inspect the resistance of the switch.
| Terminal No. | Switch Position | Specified Condition |
| 3 - 6 | Lock | Below 1 Ω |
| 3 - 5, 3 - 6 | OFF | 10 kΩ or higher |
| 3 - 5 | Unlock | Below 1 Ω |
|
| ||||
| OK | |
|
| 7.CHECK HARNESS AND CONNECTOR (DOOR CONTROL SWITCH (PASSENGER SIDE) - DRIVER SIDE J/B) |
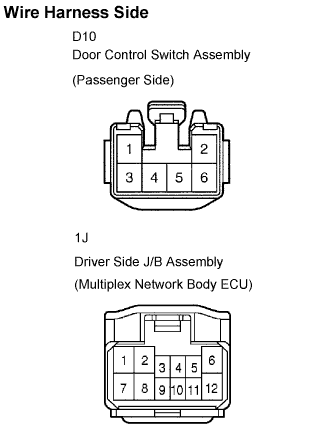 |
Disconnect the D10 switch and 1J J/B connectors.
Measure the resistance according to the value(s) in the table below.
| Symbol (Terminal No.) | Specified Condition |
| L (D10-6) - L1 (1J-3) | Below 1 Ω |
| UL (D10-5) - UL1 (1J-4) | Below 1 Ω |
| E (D10-3) - Body ground | Below 1 Ω |
|
| ||||
| NG | ||
| ||
| ||
| 8.INSPECT FRONT DOOR W/ MOTOR LOCK ASSEMBLY LH |
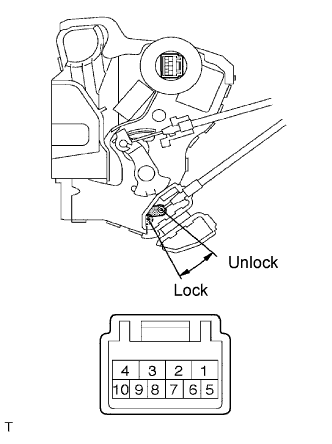 |
Apply battery voltage and inspect operation of the door lock motor.
| Measurement Condition | Specified Condition |
| Battery positive (+) → Terminal 4 Battery negative (-) → Terminal 1 | Lock |
| Battery positive (+) → Terminal 1 Battery negative (-) → Terminal 4 | Unlock |
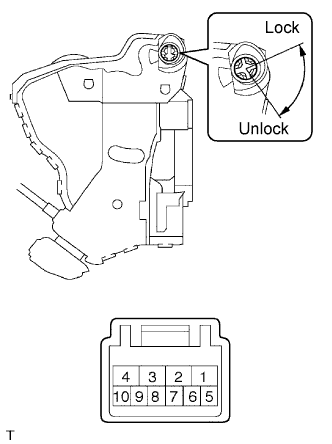 |
Inspect the resistance of the door lock and unlock switch.
| Terminal No. | Door Lock Position | Specified Condition |
| 7 - 9 | Lock | Below 1 Ω |
| 7 - 9, 7 - 10 | OFF | 10 kΩ or higher |
| 7 - 10 | Unlock | Below 1 Ω |
Inspect the resistance of the position switch.
| Terminal No. | Door Lock Position | Specified Condition |
| 7 - 8 | Lock | 10 kΩ or higher |
| Unlock | Below 1 Ω |
|
| ||||
| OK | |
|
| 9.CHECK HARNESS AND CONNECTOR (FRONT DOOR W/ MOTOR LOCK ASSEMBLY - DRIVER SIDE J/B) |
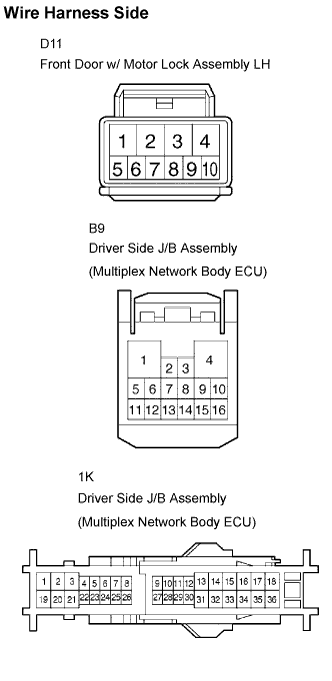 |
Disconnect the D11 door lock, B9 and 1K body ECU connectors.
Measure the resistance according to the value(s) in the table below.
| Symbol (Terminal No.) | Specified Condition |
| UL (D11-1) - ACTD (B9-4) | Below 1 Ω |
| L (D11-4) - ACT+ (1K-2) | Below 1 Ω |
| E (D11-7) - Body ground | Below 1 Ω |
|
| ||||
| OK | ||
| ||
| ||
| 10.INSPECT FRONT DOOR W/MOTOR LOCK ASSEMBLY RH |
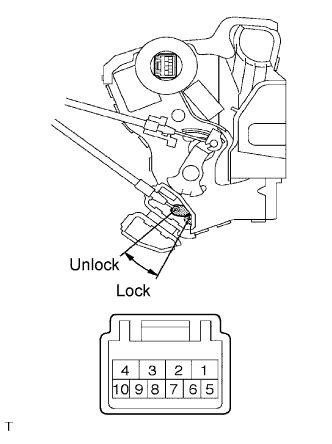 |
Apply battery voltage and inspect operation of the door lock motor.
| Measurement Condition | Specified Condition |
| Battery positive (+) → Terminal 4 Battery negative (-) → Terminal 1 | Lock |
| Battery positive (+) → Terminal 1 Battery negative (-) → Terminal 4 | Unlock |
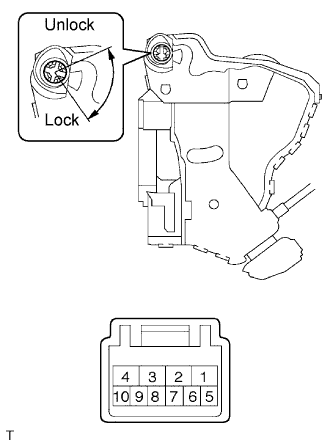 |
Inspect the resistance of the door lock and unlock switch.
| Terminal No. | Door Lock Position | Specified Condition |
| 8 - 5 | Lock | Below 1 Ω |
| 8 - 5, 8 - 6 | OFF | 10 kΩ or higher |
| 8 - 6 | Unlock | Below 1 Ω |
Inspect the resistance of the position switch.
| Terminal No. | Door Lock Position | Specified Condition |
| 7 - 8 | Lock | 10 kΩ or higher |
| Unlock | Below 1 Ω |
|
| ||||
| OK | |
|
| 11.CHECK HARNESS AND CONNECTOR (FRONT DOOR W/ MOTOR LOCK ASSEMBLY RH - DRIVER SIDE J/B) |
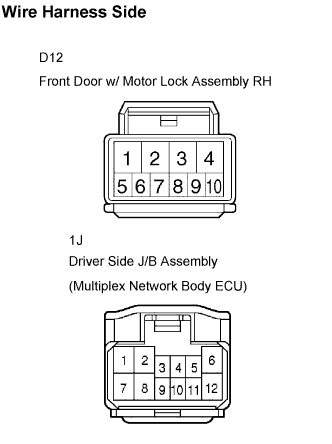 |
Disconnect the D12 door lock and 1J body ECU connectors.
Measure the resistance according to the value(s) in the table below.
| Symbol (Terminal No.) | Specified Condition |
| UL (D12-1) - ACT- (1J-2) | Below 1 Ω |
| L (D12-4) - ACT+ (1J-1) | Below 1 Ω |
| E (D12-8) - Body ground | Below 1 Ω |
|
| ||||
| OK | ||
| ||
| ||

