POWER DOOR LOCK CONTROL SYSTEM > Only Back Door cannot be Opened |
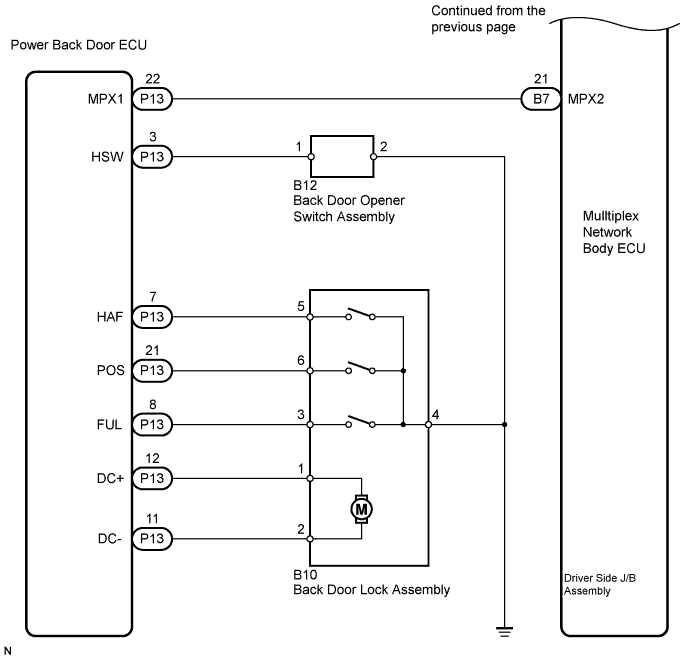
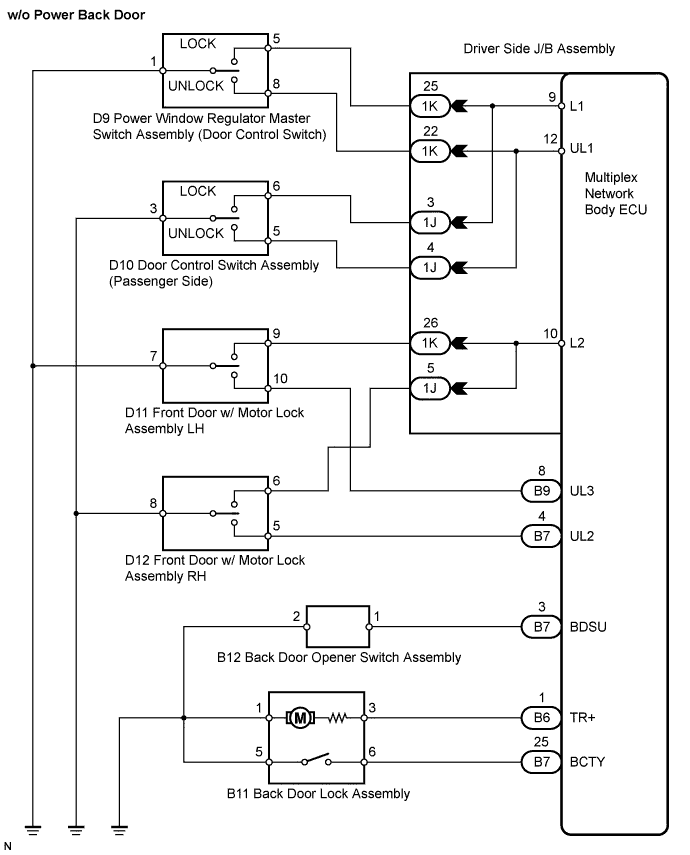
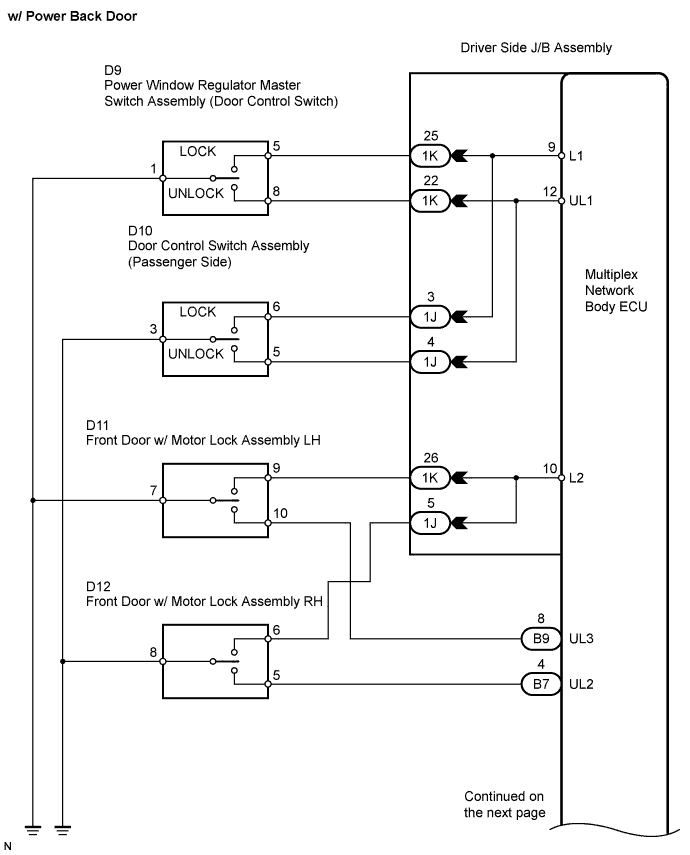
| 1.CHECK POWER BACK DOOR |
Choose the system to be inspected.
| System | Go to step |
| with power back door system | A |
| without power back door system | B |
|
| ||||
| A | |
 |
| 2.CHECK DTC |
Use Techstream to check for normal function of the multiplex communication system.
(ECU unconnected, communication line malfunctioning) Without DTC B1214, B1215 or B1287 outputs, proceed to A.
(ECU unconnected, communication line malfunctioning) With DTC B1214, B1215 or B1287 outputs, proceed to B
|
| ||||
| A | |
|
| 3.PERFORM ACTIVE TEST USING TECHSTREAM |
Select the Active Test and then check that the power door lock operates.
| Tester Display | Test Part | Control Range | Diagnostic Note |
| Door Lock | Operate the door lock motor for all doors | LOCK/UNLOCK | - |
|
| ||||
| NG | |
|
| 4.INSPECT BACK DOOR LOCK ASSEMBLY |
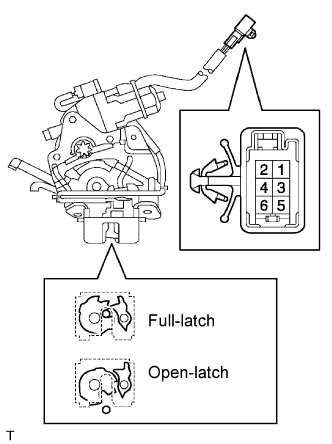 |
Check operation of the door lock.
Using a screwdriver, push the latch in order to put the back door lock in the locked condition (full-latch position).
Connect the battery positive (+) lead to terminal 1 and the battery negative (-) lead to terminal 2.
Then, check operation of the latch.
Inspect motor operation when battery voltage is applied to the normals.
| Measurement Condition | Specified Condition |
| Battery positive (+) → Terminal 2 Battery negative (-) → Terminal 1 | Clockwise (Motor in normal rotation) |
| Battery positive (+) → Terminal 1 Battery negative (-) → Terminal 2 | Counterclockwise (Motor in reverse rotation) |
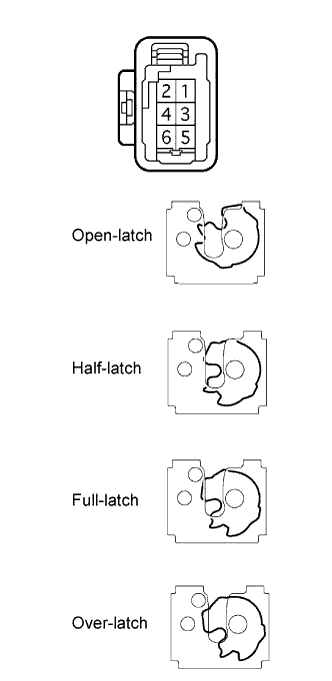 |
Check the back door courtesy light switch resistance.
Check the resistance between the terminals of the courtesy switch.
| Terminal No. | Door Lock Latch Position | Specified Condition |
| 3 - 4 | Open-latch position, Half- latch position | Below 1 Ω |
| Full-latch position, Over- latch position | 10 kΩ or higher |
Check the back door latch switch resistance.
Check the resistance between the terminals of the courtesy switch.
| Terminal No. | Door Lock Latch Position | Specified Condition |
| 4 - 5 | Open-latch position, Over-latch position | Below 1 Ω |
| Half-latch position, Full- latch position | 10 kΩ or higher |
Check the position switch resistance.
Connect the battery positive (+) lead to connector terminal 1 and the negative (-) lead to connector terminal 2.
Check the resistance between the terminals of the courtesy switch.
| Terminal No. | Door Lock Latch Position | Specified Condition |
| 4 - 6 | Any position other than motor stop position (Motor in operation) | 10 kΩ or higher |
| Motor stop position (Gear in original position) | Below 1 Ω |
|
| ||||
| OK | |
|
| 5.CHECK HARNESS AND CONNECTOR (BACK DOOR LOCK ASSEMBLY - POWER BACK DOOR ECU) |
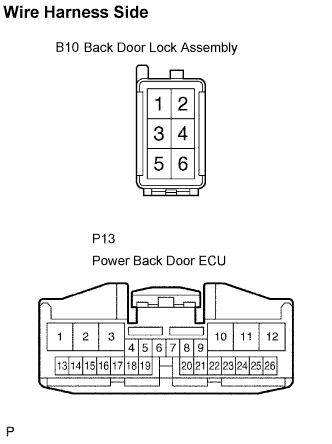 |
Disconnect the B10 lock and P13 ECU connectors.
Measure the resistance according to the value(s) in the table below.
| Symbol (Terminal No.) | Specified Condition |
| (B10-5) - HAF (P13-7) | Below 1 Ω |
| (B10-6) - POS (P13-21) | Below 1 Ω |
| (B10-3) - FUL (P13-8) | Below 1 Ω |
| (B10-1) - DC+ (P13-12) | Below 1 Ω |
| (B10-2) - DC- (P13-11) | Below 1 Ω |
|
| ||||
| OK | |
|
| 6.READ VALUE USING TECHSTREAM |
Using Techstream, check the Data List for proper functioning of the back door opener switch.
| Tester Display | Measurement Item/Range | Normal Condition | Diagnostic Note |
| Back Door Open SW | Back door opener switch signal/ON or OFF | ON: Back door opener switch is pushed OFF: Back door opener switch is not pushed | - |
|
| ||||
| NG | |
|
| 7.INSPECT BACK DOOR OPENER SWITCH ASSEMBLY |
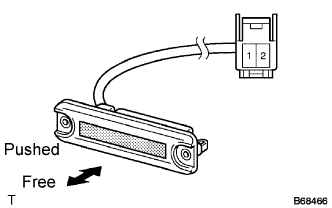 |
Remove the back door opener switch.
Measure the resistance according to the value(s) in the table below.
| Terminal No. | Condition | Specified Condition |
| 1 - 2 | Free | 10 kΩ or higher |
| Pushed | Below 1 Ω |
|
| ||||
| OK | |
|
| 8.CHECK HARNESS AND CONNECTOR (BACK DOOR OPENER SWITCH - POWER BACK DOOR ECU - BODY GROUND) |
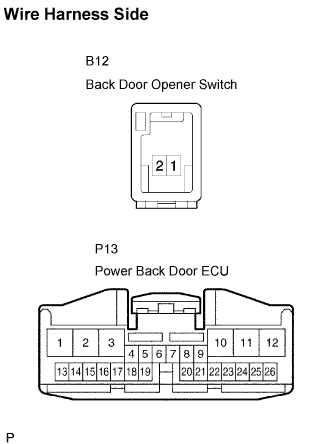 |
Disconnect the B12 switch and P13 ECU connectors.
Measure the resistance according to the value(s) in the table below.
| Symbol (Terminal No.) | Specified Condition |
| (B12-1) - HSW (P13-3) | Below 1 Ω |
| (B12-2) - Body ground | Below 1 Ω |
|
| ||||
| OK | ||
 | ||
| ||
| 9.PERFORM ACTIVE TEST USING TECHSTREAM |
Select the Active Test and then check that the power door lock operates.
| Tester Display | Test Part | Control Range | Diagnostic Note |
| Door Lock | Operate the door lock motor for all doors | LOCK/UNLOCK | - |
|
| ||||
| NG | |
|
| 10.INSPECT BACK DOOR LOCK ASSEMBLY |
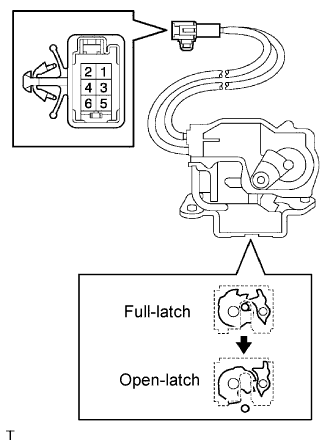 |
Check operation of the door lock.
Using a screwdriver, push the latch in order to put the back door lock in the locked condition (full-latch position).
Connect the battery positive (+) lead to terminal 3 and the battery negative (-) lead to terminal 1.
Then, check operation of the latch.
Inspect the resistance of the courtesy switch.
| Terminal No. | Door Lock Latch Position | Specified Condition |
| 5-6 | Open-latch position | Below 1 Ω |
| 5-6 | Full-latch position | 10 kΩ or higher |
|
| ||||
| OK | |
|
| 11.CHECK HARNESS AND CONNECTOR (BACK DOOR LOCK ASSEMBLY - DRIVER SIDE J/B) |
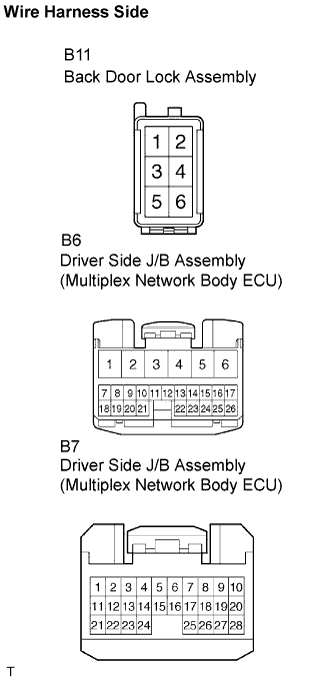 |
Disconnect the B11 lock, B6 and P7 ECU connectors.
Measure the resistance according to the value(s) in the table below.
| Symbol (Terminal No.) | Specified Condition |
| (B11-3) - TR+ (B6-1) | Below 1 Ω |
| (B11-6) - BCTY(B7-25) | Below 1 Ω |
| (B11-1) - Body ground | Below 1 Ω |
| (B11-5) - Body ground | Below 1 Ω |
|
| ||||
| OK | |
|
| 12.READ VALUE USING TECHSTREAM |
Using Techstream, check the Data List for proper functioning of the back door opener switch.
| Tester Display | Measurement Item/Range | Normal Condition | Diagnostic Note |
| Back Door Open SW | Back door opener switch signal/ON or OFF | ON: Back door opener switch is pushed OFF: Back door opener switch is not pushed | - |
|
| ||||
| NG | |
|
| 13.INSPECT BACK DOOR OPENER SWITCH ASSEMBLY |
|
Remove the back door opener switch.
Measure the resistance according to the value(s) in the table below.
| Terminal No. | Condition | Specified Condition |
| 1 - 2 | Free | 10 kΩ or higher |
| Pushed | Below 1 Ω |
|
| ||||
| OK | |
|
| 14.CHECK HARNESS AND CONNECTOR (BACK DOOR OPENER SWITCH - DRIVER SIDE J/B) |
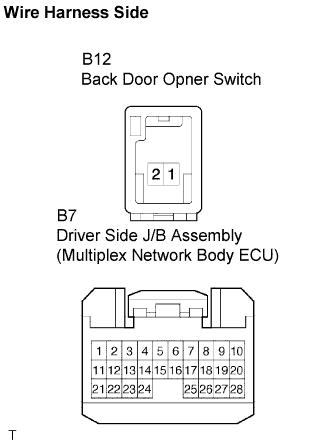 |
Disconnect the B12 switch and P7 ECU connectors.
Measure the resistance according to the value(s) in the table below.
| Symbol (Terminal No.) | Specified Condition |
| (B12-1) - BDSU (B7-3) | Below 1 Ω |
| (B12-2) - Body ground | Below 1 Ω |
|
| ||||
| OK | ||
| ||
| ||

