Home › BODY ELECTRICAL › DOOR LOCK › BACK DOOR LOCK

BACK DOOR LOCK > INSPECTION

for Preparation Click here


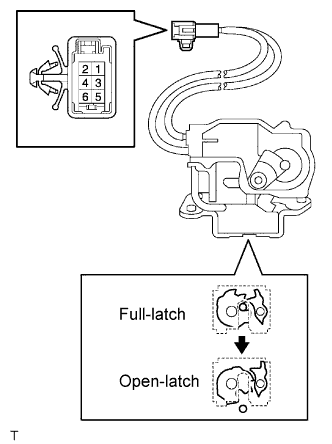
1. INSPECT BACK DOOR LOCK ASSEMBLY (W/O CLOSER)


    B068458E01
  1. Check operation of the door lock.

    1. Using a screwdriver, push the latch in order to put the back door lock in the locked condition (full-latch position).

    2. Connect the battery positive (+) lead to terminal 3 and the battery negative (-) lead to terminal 1. Then, check operation of the latch.

      Standard:
      The latch turns to the open-latch position
      If operation is not as specified, replace the door lock assembly.

  1. Check the back door courtesy switch resistance.

    1. Check the resistance between the terminals of the courtesy switch.

      Standard resistance:
      Door Lock Latch Position
      Terminal No.
      Specified Condition
      Open-latch position
      5 - 6
      Below 1 Ω
      Full-latch position
      5 - 6
      10 kΩ or higher

      If the result is not as specified, replace the door lock assembly.


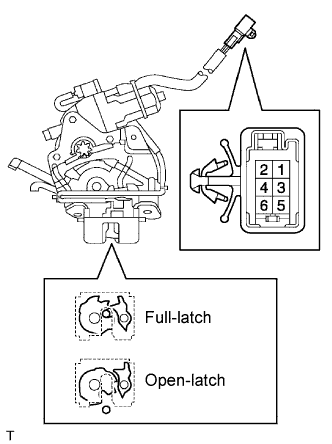
2. INSPECT BACK DOOR LOCK ASSEMBLY (W/ CLOSER)


    B067754E03
  1. Check operation of the door lock.

    1. Using a screwdriver, push the latch in order to put the back door lock in the locked condition (full-latch position).

    2. Connect the battery positive (+) lead to terminal 1 and the battery negative (-) lead to terminal 2.
      Then, check operation of the latch.

      Standard:
      The latch turns to the open-latch position
    3. Inspect motor operation when battery voltage is applied to the terminals.

      Standard:
      Measurement Condition
      Specified Condition
      Battery positive (+) → Terminal 2
      Battery negative (-) → Terminal 1
      Clockwise (Motor in normal rotation)
      Battery positive (+) → Terminal 1
      Battery negative (-) → Terminal 2
      Counterclockwise (Motor in reverse rotation)

      HINT:
      If operation is not as specified, replace the door lock assembly.


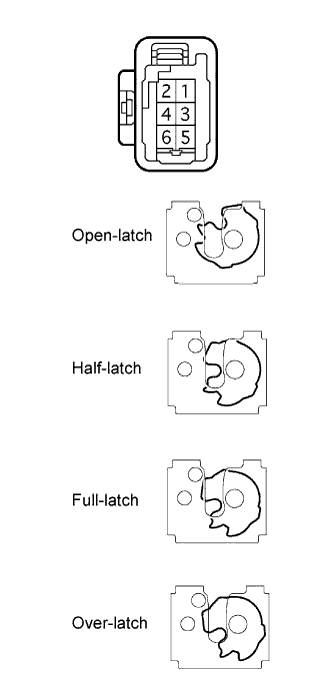
    B062719E04
  1. Measure the resistance according to the value(s) in the table below.

    Standard resistance (Courtesy switch):
    Tester Connection
    Door Lock Latch Position
    Specified Condition
    3 - 4
    Open-latch
    Below 1 Ω
    3 - 4
    Half-latch
    Below 1 Ω
    3 - 4
    Full-latch
    10 kΩ or higher
    3 - 4
    Over-latch
    10 kΩ or higher

    HINT:
    If the result is not as specified, replace the door lock assembly.

  1. Measure the resistance according to the value(s) in the table below.

    Standard resistance (Back door latch switch):
    Tester Connection
    Door Lock Latch Position
    Specified Condition
    4 - 5
    Open-latch
    Below 1 Ω
    4 - 5
    Half-latch
    Below 1 Ω
    4 - 5
    Full-latch
    10 kΩ or higher
    4 - 5
    Over-latch
    10 kΩ or higher

    HINT:
    If the result is not as specified, replace the door lock assembly.

  1. Measure the resistance according to the value(s) in the table below.

    Standard resistance (Position switch):
    Tester Connection
    Door Lock Latch Position
    Specified Condition
    4 - 6
    Any position other than motor stop position
    (Motor in operation)
    Below 1 Ω
    4 - 6
    Motor stop position
    (Gear in original position)
    10 kΩ or higher

    HINT:
    If the result is not as specified, replace the door lock assembly.

  1. Measure the resistance according to the value(s) in the table below.

    1. Full-latch:
      Connect the battery positive (+) lead to connector terminal 7 and the negative (-) lead to connector terminal 5.

      Standard resistance:
      Tester Connection
      Driven Gear Position
      Specified Condition
      8 - 9
      Release
      Below 1 Ω

      HINT:
      If the result is not as specified, replace the door lock assembly.