Home › BODY › MIRROR › POWER MIRROR CONTROL SYSTEM (w/ Memory)

POWER MIRROR CONTROL SYSTEM (w/ Memory) > Door Mirror Foot Light Circuit

for Preparation Click here


DESCRIPTION

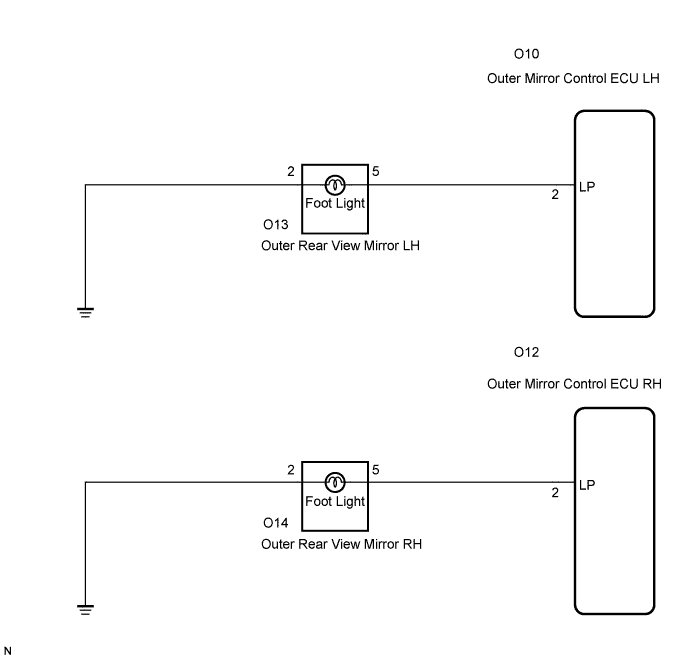
  1. When the outer mirror control ECU receives the signal(s) from the body ECU through BEAN communication, it illuminates the foot light. The foot light is installed on the bottom of the outer rear view mirror and comes on or does off according to the following conditions.
  2. The light comes on when:
    1. Doors are unlocked by wireless operation.
    2. The driver's door is manually unlocked with the shift lever is in the P position or the ignition off. (Both driver's and passenger's side come on.)
  3. The light goes off when:
    1. Doors are locked by wireless operation.
    2. Doors are locked by the mechanical key.
    3. The setting time has elapsed after the light come on.
    4. The setting time has elapsed after the driver's or passenger's door is closed while the light is on.
    5. The ignition is off and the shift lever is in any position other than P.
    6. Doors are locked or unlocked by interlock operation or manual switch.

WIRING DIAGRAM


B112567E01


INSPECTION PROCEDURE

1.PERFORM ACTIVE TEST USING TECHSTREAM
  1. Connect Techstream to the DLC3.

  1. Ignition switch on.

  1. Enter the following menus: DIAGNOSIS / ENHANCED OBD II / ACTIVE TEST.

  1. Select the ACTIVE TEST, use Techstream to issue a control command, and then check that the outer rear view mirrors.

    Mirror L/Mirror R:

    Tester Display
    Test Part
    Control Range
    Diagnostic Note
    FOOT LIGHT
    Foot light illumination operation
    ON/OFF
    -
    OK:
    Outer mirror foot light is light up.


OK
PROCEED TO NEXT CIRCUIT INSPECTION SHOWN IN PROBLEM SYMPTOMS TABLE
NG


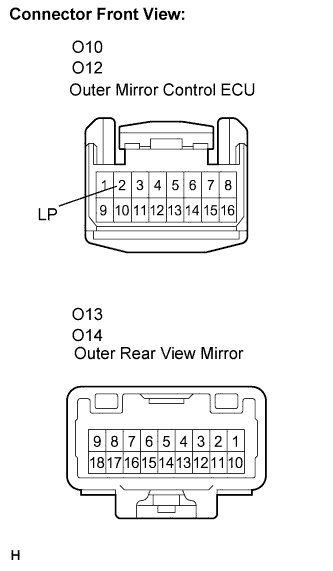
2.CHECK HARNESS AND CONNECTOR (OUTER MIRROR CONTROL ECU - OUTER REAR VIEW MIRROR)


    B112554E01
  1. Disconnect the O10 or O12 ECU connector.

  1. Disconnect the O13 or O14 mirror connector.

  1. Measure the resistance according to the value(s) in the table below.

    Resistance:
    Terminals No. (Symbols)
    Condition
    Specified Condition
    O10-2 (LP) - O13-5 (*1)
    Always
    Below 1 Ω
    O12-2 (LP) - O14-5 (*2)
    Always
    Below 1 Ω
    O10-2 (LP) - Body ground (*1)
    Always
    10 kΩ or higher
    O12-2 (LP) - Body ground (*2)
    Always
    10 kΩ or higher

    *1: LH side
    *2: RH side


NG
REPAIR OR REPLACE HARNESS OR CONNECTOR
OK


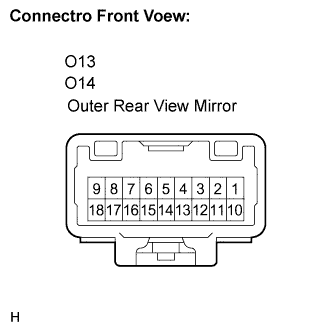
3.CHECK HARNESS AND CONNECTOR (OUTER REAR VIEW MIRROR - BODY GROUND)


    B112555E01
  1. Measure the resistance according to the value(s) in the table below.

Resistance:
Terminals No.
Condition
Specified Condition
O13-2 - Body ground(*1)
Always
Below 1 Ω
O14-2 - Body ground (*2)
Always
Below 1 Ω

*1: LH side
*2: RH side


NG
REPAIR OR REPLACE HARNESS OR CONNECTOR
OK

PROCEED TO NEXT CIRCUIT INSPECTION SHOWN IN PROBLEM SYMPTOMS TABLE