REAR SEAT OUTER BELT ASSEMBLY > INSTALLATION |
| 1. INSTALL NO. 2 REAR SEAT OUTER BELT ASSEMBLY |
![]() |
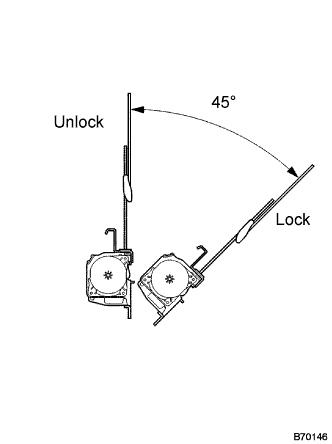
Check the degree of tilt when the No. 2 rear seat outer belt assembly begins to lock the ELR.
Check that the belt does not lock within 15° of tilt in all directions but that the belt locks with over 45° of tilt, when gently moving the retractor.
If operation is not as specified, replace the No. 2 rear seat outer belt assembly.
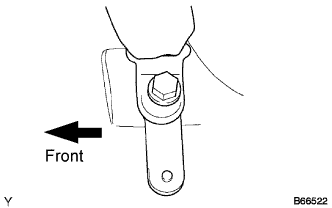
Install the No. 2 rear seat outer belt assembly with the bolt on the retractor side.
Install the No. 2 rear seat outer belt assembly on the shoulder anchor side with the bolt.
| 2. INSTALL 3 POINT TYPE REAR SEAT BELT ASSEMBLY (for 8-Passenger) |
![]() |
Check the degree of tilt when the 3 point type rear seat belt assembly begins to lock the ELR.
Check that the 3 point type rear seat belt assembly does not lock within 15° of tilt in all directions but that the 3 point type rear seat belt assembly locks with over 45° of tilt, when gently moving the retractor.
If operation is not as specified, replace the 3 point type rear seat belt assembly.
Install the 3 point type rear seat belt assembly on the retractor side with the bolt.
![]() |
Install the 3 point type rear seat belt assembly on the floor anchor side with the bolt.
Check the ELR lock.
Check that the 3 point type rear seat belt assembly locks when pulling out the belt quickly when the 3 point type rear seat belt assembly is installed.
If operation is not as specified, replace the belt 3 point type rear seat belt assembly.
Check the fastening function of the child restraint system.
Check that the belt cannot be pulled out any more but can be rewound after the belt is fully pulled out.
Check that the belt can be pulled out and rewound after the belt is fully rewound.
If operation is not as specified, replace the 3 point type rear seat belt assembly.
| 3. INSTALL NO. 1 REAR SEAT OUTER BELT ASSEMBLY (for 7-Passenger) |
![]() |
Check the degree of tilt when the No. 1 rear seat outer belt assembly begins to lock the ELR.
Check that the belt does not lock within 15° of tilt in all directions but that the belt locks with over 45° of tilt, when gently moving the retractor.
If operation is not as specified, replace the No. 1 rear seat outer belt assembly.
Install the No. 1 rear seat outer belt assembly with the bolt and 3 nuts.
Install the rear seat shoulder belt cover
Install the rear seatback board RH
Install the No. 1 rear seat outer belt assembly with the bolt.
Check the ELR lock.
Check that the belt locks when pulling out the belt quickly when the belt is installed.
If operation is not as specified, replace the No. 1 rear seat outer belt assembly assembly.
Check the fastening function of the child restraint system.
Check that the belt cannot be pulled out any more but can be rewound after the belt is fully pulled out.
Check that the belt can be pulled out and rewound after the belt is fully rewound.
If operation is not as specified, replace the No. 1 rear seat outer belt assembly.
| 4. INSTALL REAR WINDOW SIDE GARNISH ASSEMBLY |
| 5. INSTALL FRONT QUARTER TRIM PANEL ASSEMBLY |
![]() |
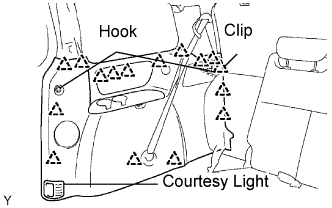
Engage the 16 clips to install the front quarter trim panel assembly.
Connect the courtesy light connectors.
Install the courtesy light.
Install the 2 package holder net hooks.
Install the No. 2 rear seat outer belt assembly on the floor anchor side with the bolt.
Install the floor anchor cover.
Check the ELR lock.
| 6. INSTALL BACK DOOR SCUFF PLATE |
| 7. INSTALL BACK DOOR WEATHERSTRIP |
| 8. INSTALL REAR DOOR WEATHERSTRIP |
| 9. INSTALL REAR DOOR SCUFF PLATE |