Home › ENGINE › 2GR-FE COOLING › RADIATOR

RADIATOR > INSTALLATION

for Preparation Click here


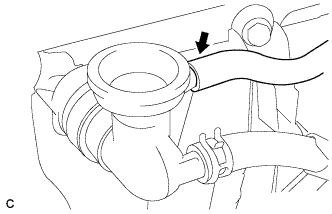
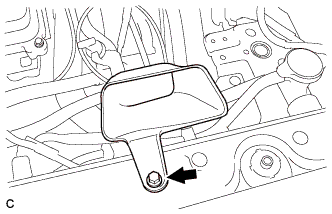
1. CONNECT INLET SUB-ASSEMBLY


    A161476
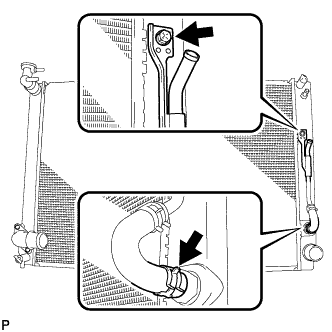
  1. Connect the inlet hose to the radiator.

  1. Install the inlet sub-assembly to the radiator with the bolt.

    Torque:
    7.1 N*m{ 72 kgf*cm , 63 in.*lbf }


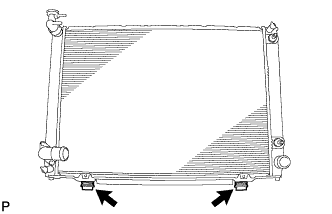
2. INSTALL NO. 2 RADIATOR SUPPORT


    A161475
  1. Install the No. 2 radiator support to the radiator with the 2 bolts.

    Torque:
    12.7 N*m{ 130 kgf*cm , 112 in.*lbf }


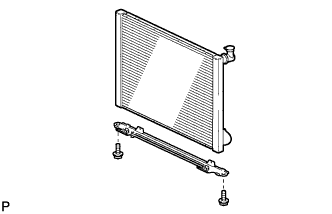
3. INSTALL RADIATOR SUPPORT LOWER


    A162806
  1. Install the 2 radiator support lowers to the radiator.


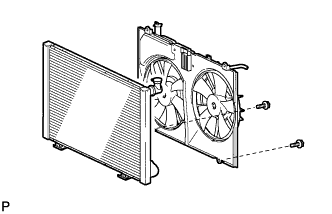
4. INSTALL FAN SHROUD WITH FAN MOTOR


    A161474
  1. Install the fan shroud with fan motor to the radiator with the 2 bolts.

    Torque:
    6 N*m{ 61 kgf*cm , 4 ft.*lbf }


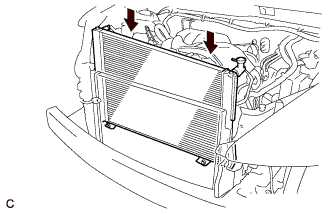
5. INSTALL RADIATOR ASSEMBLY WITH FAN SHROUD AND FAN MOTOR


    A162800
  1. Install the radiator assembly with fan shroud and fan motor.


    A161470
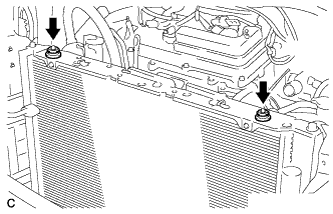
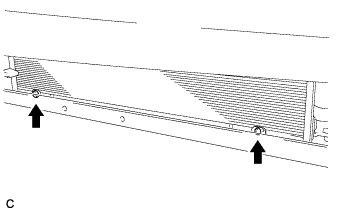
  1. Install the condenser assembly to the radiator assembly with fan shroud and fan motor with the 2 bolts.

    Torque:
    3.9 N*m{ 40 kgf*cm , 35 in.*lbf }


6. INSTALL NO. 1 RADIATOR SUPPORT


    A162801E01
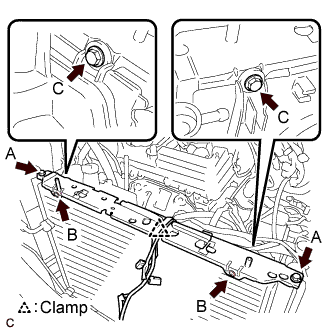
  1. Install the No. 1 radiator support to the radiator assembly with the 6 bolts.

    Torque:
    Bolt A:
    13 N*m{ 130 kgf*cm , 9 ft.*lbf }
    Bolt B:
    3.9 N*m{ 40 kgf*cm , 35 in.*lbf }
    Bolt C:
    6 N*m{ 61 kgf*cm , 4 ft.*lbf }

  1. Attach the clamp.


7. INSTALL RADIATOR SUPPORT CUSHION


    A162805
  1. Install the 2 radiator support cushions to the No. 1 radiator support.


8. INSTALL PRESSURE FEED TUBE ASSEMBLY


    A161466
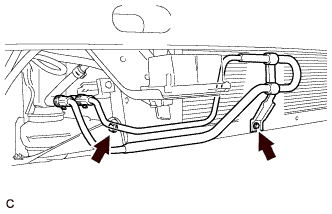
  1. Install the 2 bolts.

    Torque:
    7.8 N*m{ 80 kgf*cm , 69 in.*lbf }


9. INSTALL HEADLIGHT BRACKET RH


    A161465
  1. Install the headlight bracket RH with the 3 nuts.


10. INSTALL RADIATOR SIDE DEFLECTOR RH


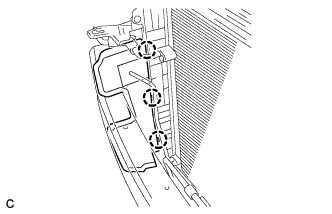
    A161464
  1. Engage the 3 claws to install the radiator side deflector RH.


11. INSTALL HEADLIGHT ASSEMBLY RH
  1. The installation procedure of the RH side is the same as the LH side.

    HINT:
    Click here


12. CONNECT NO. 2 OIL COOLER OUTLET TUBE SUB-ASSEMBLY


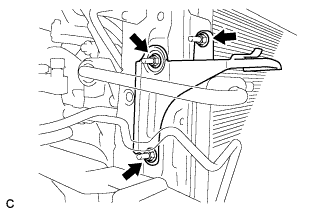
  1. Install the No. 2 oil cooler outlet tube sub-assembly with the 2 bolts.
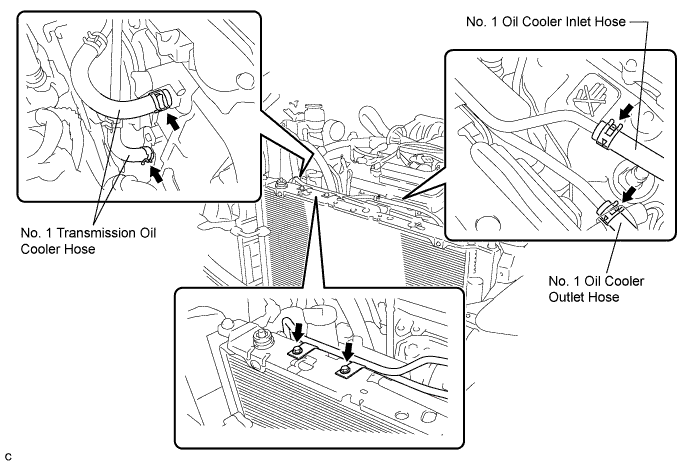
    Torque:
    6 N*m{ 61 kgf*cm , 4 ft.*lbf }


    A161467E02

  1. Connect the No. 1 transmission oil cooler hoses to the radiator.

  1. Connect the No. 1 oil cooler inlet and No. 1 oil cooler outlet hoses to the No. 2 oil cooler outlet tube sub-assembly.


13. INSTALL RADIATOR UPPER SUPPORT SUB-ASSEMBLY


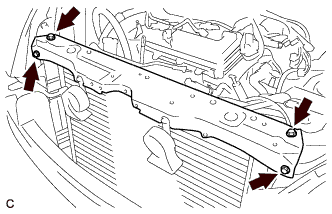
    A161463
  1. Install the radiator upper support sub-assembly with the 4 bolts.

    Torque:
    5.0 N*m{ 51 kgf*cm , 44 in.*lbf }


14. CONNECT COOLING FAN ECU CONNECTOR


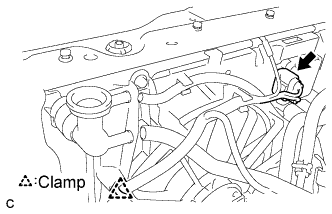
    A161472E01
  1. Connect the connector.

  1. Attach the clamp.


15. INSTALL HOOD LOCK SUPPORT SUB-ASSEMBLY


    A161460
  1. Install the hood lock support sub-assembly with the 2 bolts.
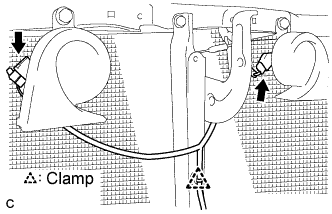


    A161458
  1. Attach the clamp.

  1. Connect the low pitched horn and high pitched horn connectors.
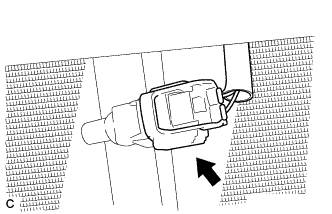


    A161459
  1. Connect the ambient temperature sensor connector.


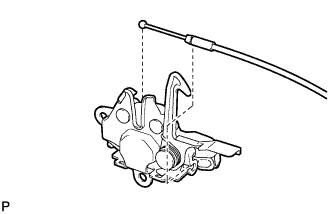
16. INSTALL HOOD LOCK ASSEMBLY


    A162807
  1. Connect the cable to the hood lock assembly.
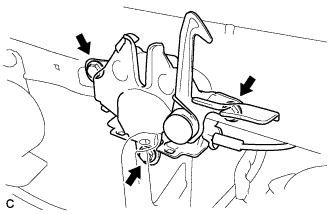


    A161457
  1. Install the hood lock assembly with the 3 bolts.

    Torque:
    8 N*m{ 82 kgf*cm , 6 ft.*lbf }

  1. With Hood Courtesy Switch:

    1. Connect the connector.


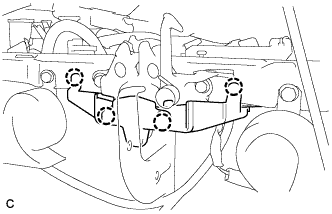
17. INSTALL HOOD LOCK RELEASE LEVER PROTECTOR


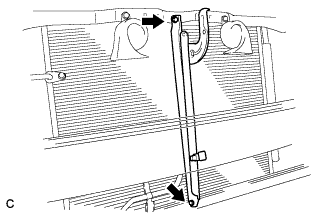
    A161456
  1. Engage the 4 claws to install the hood lock release lever protector.


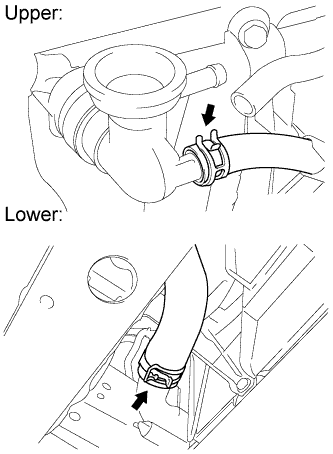
18. CONNECT NO. 2 RADIATOR HOSE


    A161461
  1. Connect the No. 2 radiator hose to the radiator.


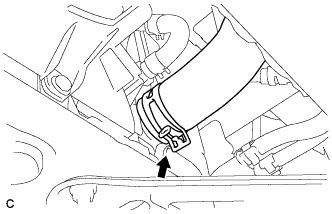
19. CONNECT NO. 1 RADIATOR HOSE


    A162804E01
  1. Connect the No. 1 radiator hose to the radiator.


20. CONNECT RADIATOR RESERVE TANK HOSE OR PIPE


    A161455
  1. Connect the radiator reserve tank hose or pipe to the radiator.


21. INSTALL NO. 1 AIR CLEANER INLET


    A155040
  1. Install the No. 1 air cleaner inlet with the bolt.

    Torque:
    7.0 N*m{ 71 kgf*cm , 62 in.*lbf }


22. INSTALL FRONT BUMPER ENERGY ABSORBER


23. INSTALL FRONT BUMPER ASSEMBLY


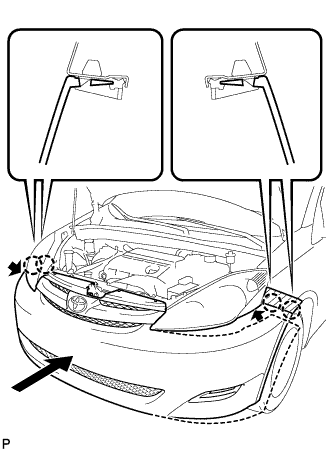
    B125282
  1. Push the front bumper onto the front of the vehicle and engage the claws on the left and right sides of the front bumper to install it as shown in the illustration.
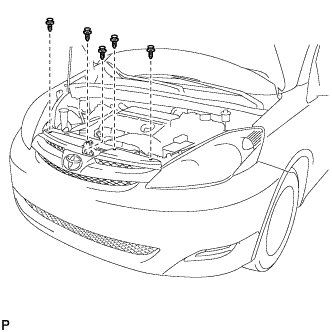
    HINT:
    1. Apply protective tape to the bottom part of the front fender to prevent it from being damaged.
    2. Connect the connectors if necessary.


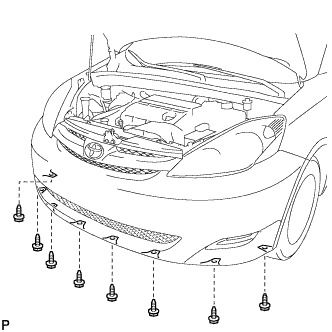
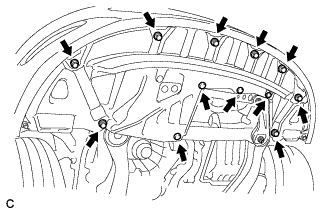
    B125280
  1. Install the 5 clips.


    B125279
  1. Connect the engine under cover to the front bumper assembly with the 8 screws.
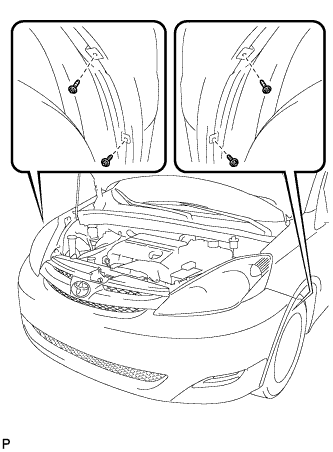
    Torque:
    7.0 N*m{ 71 kgf*cm , 62.0 in.*lbf }


    B125278
  1. Connect the fender liner to the front bumper assembly with the 4 screws.


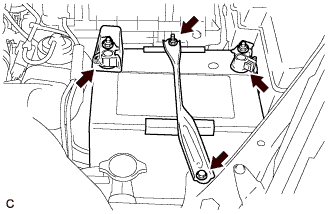
24. INSTALL BATTERY


    A155033
  1. Install the battery and battery tray.

  1. Install the battery clamp with the bolt and nut.

    Torque:
    Bolt:
    9.0 N*m{ 92 kgf*cm , 80 in.*lbf }
    Nut:
    3.5 N*m{ 36 kgf*cm , 31 in.*lbf }

  1. Connect the positive battery terminal.

  1. Connect the negative battery terminal.


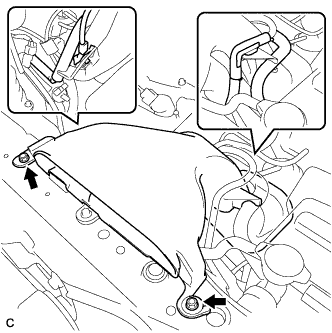
25. INSTALL NO. 2 AIR CLEANER INLET


    A133004
  1. Install the No. 2 air cleaner inlet with the 2 clamps and 2 bolts.

    Torque:
    7.0 N*m{ 71 kgf*cm , 62 in.*lbf }


26. ADD ENGINE COOLANT
  1. Tighten the radiator drain cock plug by hand.

  1. Tighten the 2 cylinder block drain cock plugs.

    Torque:
    13 N*m{ 130 kgf*cm , 9 ft.*lbf } for cylinder block drain cock plugs

  1. Remove the air drain cock plug from the water inlet housing.
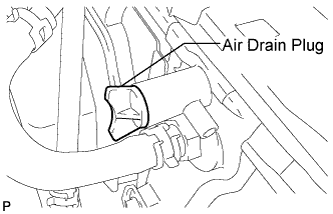


    A162799E01
  1. Loosen the air drain plug at the top of the radiator 3 or 4 turns.

  1. Add TOYOTA Super Long Life Coolant (SLLC) to the radiator inlet opening until coolant overflows from the engine air drain cock hole. Then install the air drain cock plug to the water inlet housing.

    Torque:
    13 N*m{ 130 kgf*cm , 9 ft.*lbf } for air drain cock plug

  1. Continue to add TOYOTA Super Long Life Coolant (SLLC) to the radiator inlet opening until coolant overflows from the radiator air drain hole. Then close the air drain plug at the top of the radiator.

    HINT:
    If the coolant level at the radiator inlet opening drops after squeezing the No. 1 and No. 2 radiator hoses, add coolant.

  1. Slowly fill the radiator with TOYOTA Super Long Life Coolant (SLLC).

    Standard capacity:
    11.3 liters (12.0 US qts, 10.0 Imp. qts)

    HINT:
    1. TOYOTA vehicles are filled with TOYOTA SLLC at the factory. In order to avoid damage to the engine cooling system and other technical problems, only use TOYOTA SLLC or similar high quality ethylene glycol based non-silicate, non-amine, non-nitrite, non-borate coolant with long-life hybrid organic acid technology (coolant with long-life hybrid organic acid technology consists of a combination of low phosphates and organic acids).
    2. Contact your TOYOTA dealer for further details.

    NOTICE:
    Never use water as a substitute for engine coolant.

  1. Slowly pour coolant into the radiator reservoir tank until it reaches the FULL line.

  1. Squeeze the No. 1 and No. 2 radiator hoses several times by hand, and then check the level of the coolant.
    If the coolant level is low, add coolant.

  1. Bleed air from the cooling system.

    1. Warm up the engine until the thermostat opens. While the thermostat is open, circulate the coolant for several minutes.

      HINT:
      The thermostat open timing can be confirmed by squeezing the inlet radiator hose by hand, and checking when the engine coolant starts to flow inside the hose.

    2. Maintain the engine speed at 2500 to 3000 rpm.

    3. Squeeze the inlet and outlet radiator hoses several times by hand to bleed air.

      CAUTION:
      When squeezing the radiator hoses:
      1. Wear protective gloves.
      2. Be careful as the radiator hoses are hot.
      3. Keep your hands away from the radiator fan.

      NOTICE:
      1. Make sure that the radiator reservoir still has some coolant in it.
      2. If the coolant temperature gauge indicates an excessive temperature, turn off the engine and let it cool.
      3. If there is not enough coolant, the engine may overheat or be seriously damaged.
      4. If the radiator reservoir does not have enough coolant, perform the following: 1) stop the engine, 2) wait until the coolant has cooled down, and 3) add coolant until the coolant is filled to the FULL line.

  1. Stop the engine and wait until the engine coolant cools down.

  1. Add engine coolant to the FULL line on the radiator reservoir.


27. INSPECT FOR COOLANT LEAK

CAUTION:
Do not remove the radiator cap while the engine and radiator are still hot. Pressurized, hot engine coolant and steam may be released and cause serious burns.

NOTICE:
Before performing each inspection, turn the A/C switch OFF.


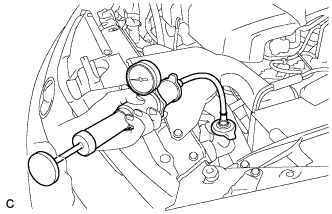
    A161453
  1. Fill the radiator with coolant and attach a radiator cap tester.

  1. Warm up the engine.

  1. Using a radiator cap tester, increase the pressure inside the radiator to 118 kPa (1.2 kgf/cm2, 17 psi), and check that the pressure does not drop.
    If the pressure drops, check the hoses, radiator and water pump for leaks. If no external leaks are found, check the heater core, cylinder block and cylinder head.


28. ADD AUTOMATIC TRANSAXLE FLUID


29. CHECK AUTOMATIC TRANSAXLE FLUID

HINT:
Drive the vehicle so that the engine and transaxle are at normal operating temperature.

Fluid temperature:
70 to 80°C (158 to 176°F)

  1. Park the vehicle on a level surface and set the parking brake.
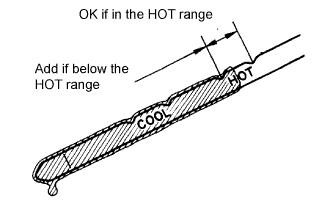


    D025120E05
  1. With the engine idling and the brake pedal depressed, move the shift lever to all positions from P to L and return to the P position.

  1. Take out the dipstick and wipe it clean.

  1. Put the dipstick back all the way.

  1. Take out the dipstick again and check that the fluid level is within the HOT range.
    If the fluid level is below the HOT range, add new fluid and recheck the fluid level.
    If the fluid level exceeds the HOT range, drain the fluid once, add the proper amount of new fluid and recheck the fluid level.
    If there are leaks, it is necessary to repair or replace O-rings, FIPGs, oil seals, plugs and/or other parts.


30. INSTALL NO. 1 ENGINE UNDER COVER


    A162362
  1. Install the No. 1 engine under cover sub-assembly with the 8 bolts and 4 clips.


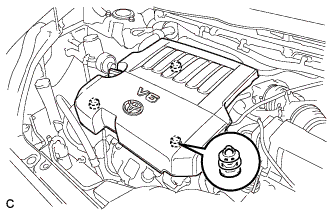
31. INSTALL V-BANK COVER SUB-ASSEMBLY


    A162365
  1. Fit the 3 retainers and install the V-bank cover.


32. VEHICLE PREPARATION FOR HEADLIGHT AIM ADJUSTMENT
  1. Prepare the vehicle:

    1. Ensure there is no damage or deformation to the body around the headlights.
    2. Fill the fuel tank.
    3. Make sure that the oil is filled to the specified level.
    4. Make sure that the coolant is filled to the specified level.
    5. Inflate the tires to the appropriate pressure.
    6. Place the spare tire, tools, and jack in their original positions.
    7. Unload the trunk.
    8. Sit a person of average weight (68 kg, 150 lb) in the driver's seat.


33. PREPARATION FOR HEADLIGHT AIMING (Using a tester)
  1. Prepare the vehicle for headlight aim check.

  1. Adjust in accordance with headlight tester instructions.


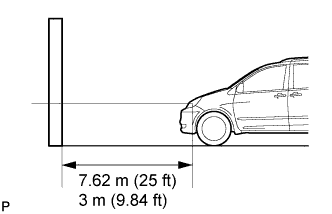
34. PREPARATION FOR HEADLIGHT AIMING (Using a screen)


    E119927E01
  1. Prepare the vehicle according to the following conditions:

    1. Place the vehicle in a location that is dark enough to clearly observe the cutoff line. The cutoff line is a distinct line, below which light from the headlights can be observed and above which it cannot.
    2. Place the vehicle at a 90° angle to the wall.
    3. Create a 7.62 m (25 ft) distance between the vehicle (headlight bulb center) and the wall.
    4. Place the vehicle on a level surface.
    5. Bounce the vehicle up and down to settle the suspension.

      NOTICE:
      A distance of 7.62 m (25 ft) between the vehicle (headlight bulb center) and the wall is necessary for proper aim adjustment. If unavailable, secure a distance of exactly 3 m (9.84 ft) for check and adjustment. (The target zone will change with the distance so follow the instructions in the illustration.)

  1. Prepare a piece of thick white paper (approximately 2 m (6.6 ft) (height) x 4 m (13.1 ft) (width)) to use as a screen.

  1. Draw a vertical line down the center of screen (V line).


  1. Set the screen as shown in the illustration.
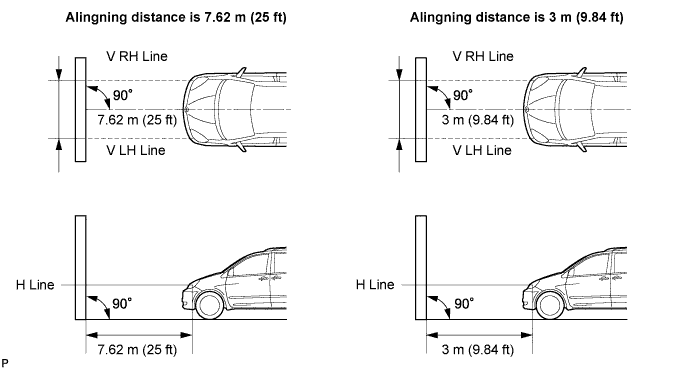

    E119928E01

    HINT:
    1. Stand the screen perpendicular to the ground.
    2. Align the V line on the screen with the center of the vehicle.


    I033423E06
  1. Draw base lines (H line, V LH, V RH lines) on the screen as shown in the illustration.
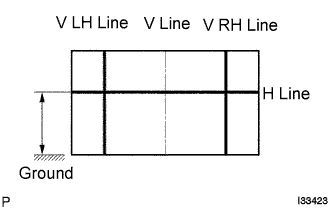
    HINT:
    1. The base lines differ for "low-beam inspection" and "high-beam inspection."
    2. Mark the headlight bulb center marks on the screen. If the center mark cannot be observed on the headlight, use the center of the headlight bulb or the manufacturer's name marked on the headlight as the center mark.


    1. H Line (Headlight height):
      Draw a horizontal line across the screen so that it passes through the center marks. The H line should be at the same height as the headlight bulb center marks of the low-beam headlights.

    2. V LH Line, V RH Line (Center mark position of left- hand (LH) and right-hand (RH) headlights):
      Draw two vertical lines so that they intersect the H line at each center mark (aligned with the center of the low-beam headlight bulbs).


35. HEADLIGHT AIMING INSPECTION
  1. Cover or disconnect the connector of the headlight on the opposite side to prevent light from the headlight not being inspected from affecting headlight aiming inspection.

    NOTICE:
    Do not keep the headlight covered for more than 3 minutes. The headlight lens is made of synthetic resin, and may easily melt or be damaged due to heat.

    HINT:
    When checking the aim of the high-beam, cover the low-beam or disconnect the connector.

  1. Start the engine.

    NOTICE:
    Engine rpm must be 1,500 or more.

  1. With headlight leveling switch:

    1. Set the headlight leveling switch to 0 (zero).


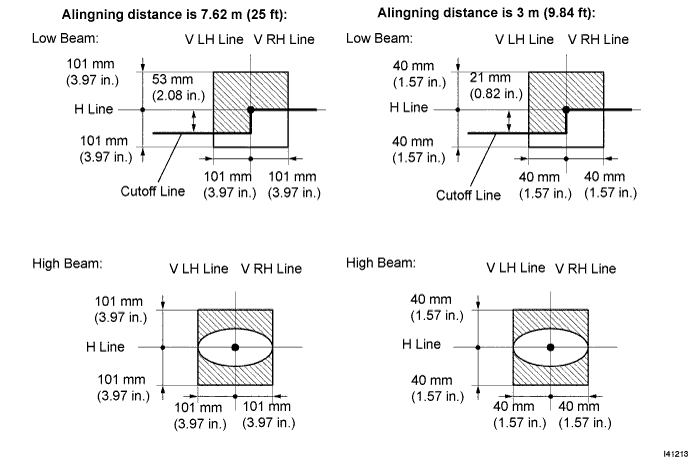
  1. Turn on the headlight and make sure that the cutoff line falls within the specified area, as shown in the illustration.

    I041213E03

    HINT:
    1. Since the low-beam light and the high-beam light are a unit, if the aim on one is correct, the other should also be correct. However, check both beams just to make sure.
    2. Alignment distance is 7.62 m (25 ft):
      The cutoff line is 101 mm (3.97 in.) above and below the H line as well as left and right of the V line with low-beam (SAE J599).
    3. Alignment distance is 3 m (9.84 ft):
      The cutoff line is 40 mm (1.57 in.) above and below the H line as well as left and right of the V line with low-beam (SAE J599).
    4. Alignment distance is 7.62 m (25 ft):
      The cutoff line is 101 mm (3.97 in.) above and below the H line as well as left and right of the V line with high-beam (SAE J599).
    5. Alignment distance is 3 m (9.84 ft):
      The cutoff line is 40 mm (1.57 in.) above and below the H line as well as left and right of the V line with high-beam (SAE J599).
    6. Alignment distance is 7.62 m (25 ft):
      The cutoff line is 53 mm (2.08 in.) below the H line with low-beam.
    7. Alignment distance is 3 m (9.84 ft):
      The cutoff line is 21 mm (0.82 in.) below the H line with low-beam.


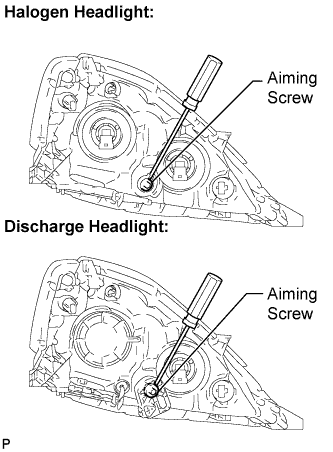
36. HEADLIGHT AIMING ADJUSTMENT


    E119929E01
  1. Adjust the aim vertically:
    Adjust the headlight aim into the specified range by turning aiming screw A with a screwdriver.

    NOTICE:
    The final turn of the aiming screw should be made in the clockwise direction. If the screw is tightened excessively, loosen it and then retighten it, so that the final turn of the screw is in the clockwise direction.

    HINT:
    1. Perform low-beam aim adjustment.
    2. The headlight aim moves up when turning the aiming screw clockwise, and moves down when turning the aiming screw counterclockwise.


37. VEHICLE PREPARATION FOR FOG LIGHT AIM ADJUSTMENT (w/ Fog Light)
  1. Prepare the vehicle:

    1. Ensure there is no damage or deformation to the body around the fog lights.
    2. Fill the fuel tank.
    3. Make sure that the oil is filled to the specified level.
    4. Make sure that the coolant is filled to the specified level.
    5. Inflate the tires to the appropriate pressure.
    6. Place the spare tire, tools, and jack in their original positions.
    7. Unload the trunk.
    8. Sit a person of average weight (68 kg, 150 lb) in the driver's seat.


38. PREPARATION FOR FOG LIGHT AIMING (Using a screen) (w/ Fog Light)


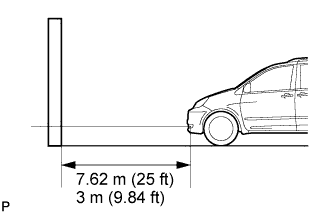
    E119934E01
  1. Prepare the vehicle according to the following conditions:

    1. Place the vehicle in a location that is dark enough to clearly observe the cutoff line. The cutoff line is a distinct line, below which light from the fog lights can be observed and above which it cannot.
    2. Place the vehicle at a 90° angle to the wall.
    3. Create a 7.62 m (25 ft) distance between the vehicle (fog light bulb center) and the wall.
    4. Place the vehicle on a level surface.
    5. Bounce the vehicle up and down to settle the suspension.

      NOTICE:
      A distance of 7.62 m (25 ft) between the vehicle (fog light bulb center) and the wall is necessary for proper aim adjustment. If unavailable, secure a distance of exactly 3 m (9.84 ft) for check and adjustment. (The target zone will change with the distance, so follow the instructions in the illustration.)

  1. Prepare a piece of thick white paper (approximately 2 m (6.6 ft) (height) x 4 m (13.1 ft) (width)) to use as a screen.

  1. Draw a vertical line down the center of screen (V line).


  1. Set the screen as shown in the illustration.
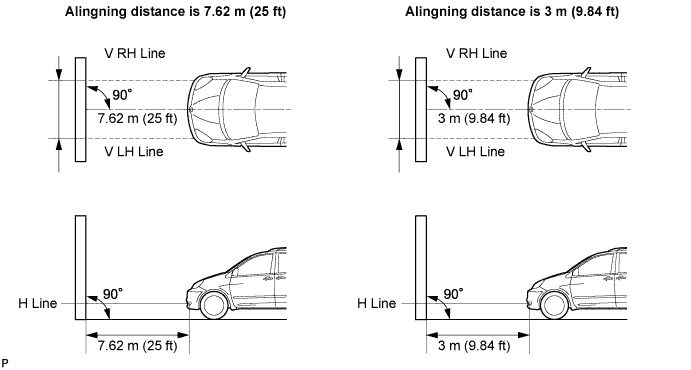

    E119935E01

    HINT:
    1. Stand the screen perpendicular to the ground.
    2. Align the V line on the screen with the center of the vehicle.


    I033423E06
  1. Draw base lines (H line, V LH, V RH lines) on the screen as shown in the illustration.

    HINT:
    Mark the fog light bulb center marks on the screen. If the center mark cannot be observed on the fog light, use the center of the fog light bulb or the manufacturer's name marked on the fog light as the center mark.


    1. H Line (Fog light height):
      Draw a horizontal line across the screen so that it passes through the center marks. The H line should be at the same height as the fog light bulb center marks of the low-beam fog lights.

    2. V LH Line, V RH Line (Center mark position of left-hand (LH) and right-hand (RH) fog lights):
      Draw two vertical lines so that they intersect the H line at each center mark.


39. FOG LIGHT AIMING INSPECTION (w/ Fog Light)
  1. Cover or disconnect the connector of the fog light on the opposite side to prevent light from the fog light not being inspected from affecting fog light aiming inspection.

  1. Start the engine.

    NOTICE:
    Engine rpm must be 1,500 or more.


  1. Turn on the fog light and make sure that the cutoff line falls within the specified area, as shown in the illustration.
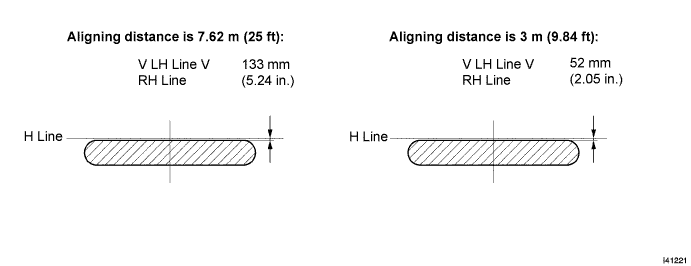

    I041221E08


40. FOG LIGHT AIMING ADJUSTMENT (w/ Fog Light)


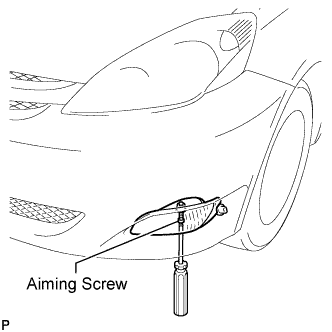
    E119936E01
  1. Adjust the fog light aim into the specified range by turning aiming screw with a screwdriver.

    NOTICE:
    The final turn of the aiming screw should be made in the clockwise direction. If the screw is tightened excessively, loosen it and then retighten it, so that the final turn of the screw is in the clockwise direction.