BODY PANEL FENDER APRON BRACE ASSEMBLY REPLACEMENT
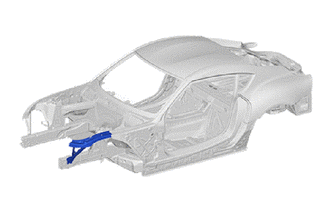
REMOVE THE ADHESIVE
Detach any mechanical connecting elements where required.
Heat the adhesive flange with a hot air blower.
- NOTICE:
-
Do not exceed the maximum object temperature of 250°C.
Use pliers or a chisel to peel off the component.
- NOTICE:
-
Do not damage adjacent components.
Remove adhesive residue from the adhesive flange.
REMOVAL
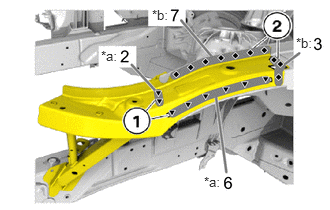
| *a | Self-tapping Screw |
| *b | Rivet |
Remove the self-tapping screws and adhesive connections in the areas (1). (See the introduction)
Remove the rivets and adhesive connections in the areas (2).
- NOTICE:
-
Do not damage the spring strut dome (aluminium).
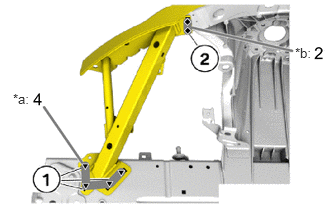
| *a | Self-tapping Screw |
| *b | Rivet |
Remove the self-tapping screws and adhesive connections in the areas (1). (See the introduction)
Remove the rivets and adhesive connections in the areas (2).
- NOTICE:
-
Do not damage the spring strut dome (aluminium).
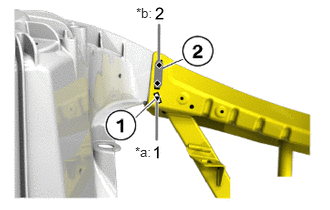
| *a | Self-tapping Screw |
| *b | Rivet |
Remove the self-tapping screw and adhesive connections in the areas (1). (See the introduction)
Remove the rivets and adhesive connections in the areas (2).
- NOTICE:
-
Do not damage the spring strut dome (aluminium).
PREPARE NEW PART
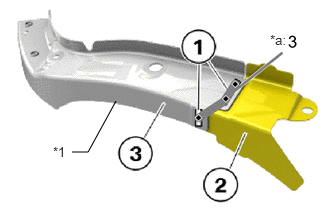
| *1 | RADIATOR SUPPORT UPPER |
| *a | Rivet |
Remove the rivets and adhesive connections in the areas (1).
Disconnect (2) from (3).
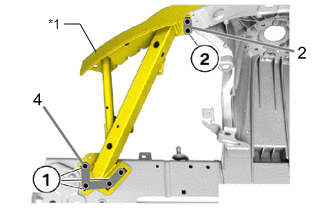
| *1 | FENDER SIDE APRON SUB-ASSY |
Adjust and fix the fender side apron sub-assy.
Transfer hole pattern in the areas (1) from the front side member to the fender side apron sub-assy. (See the introduction)
Transfer hole pattern in the area (2) from the spring support to the fender side apron sub-assy. (See the introduction)
Drill out holes in areas (1) and (2) with 6.8 mm (0.27 in.) diameter.
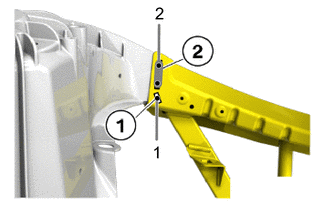
Transfer hole pattern in the areas (1) and (2) from the spring support to the fender side apron sub-assy. (See the introduction)
Drill out holes in areas (1) and (2) with 6.8 mm (0.27 in.) diameter.
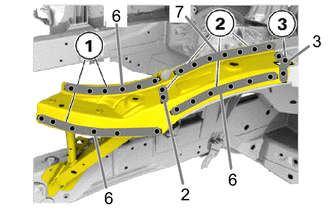
Adjust and fix the radiator support upper.
Transfer holes for blind rivet connections in areas (1) and (2). (See the introduction)
Drill holes in areas (1) with 4.2 mm (0.17 in.) diameter.
Drill holes in areas (2) with 6.8 mm (0.27 in.) diameter.
Drill out holes in areas (3) with 6.8 mm (0.27 in.) diameter.
PREPARE THE ALUMINIUM SURFACE (NEW PART) FOR STRUCTURAL BONDING
Do not sand the bonding surfaces.
Remove coarse contamination from the bonding surfaces using solvent cleaner R2.
- Expendable materials:
Cleaner R2 500ml 08879-WA010
Clean the bonding surfaces using solvent cleaner R1.
- Expendable materials:
Cleaner R1 100ml, Bottle 08833-WA050
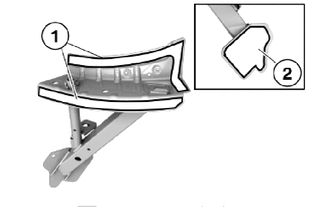
Prepare fender side apron sub-assy in areas (1) and (2) for bonding the new aluminium part.
- Expendable materials:
Cleaner R2 500ml 08879-WA010 Cleaner R1 100ml, Bottle 08833-WA050
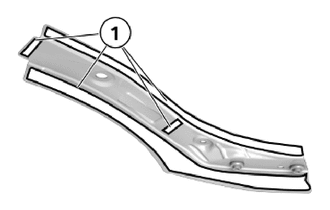
Prepare radiator support upper in areas (1) for bonding the new aluminium part.
- Expendable materials:
Cleaner R2 500ml 08879-WA010 Cleaner R1 100ml, Bottle 08833-WA050
PREPARE THE ALUMINIUM SURFACE (USED PART) FOR STRUCTURAL BONDING
Remove coarse contamination from the bonding surfaces using solvent cleaner R2.
- Expendable materials:
Cleaner R2 500ml 08879-WA010
Clean the bonding surfaces using solvent cleaner R1.
- Expendable materials:
Cleaner R1 100ml, Bottle 08833-WA050
Remove oxide layers or paint from bonding surfaces using a stainless steel wire brush or sandpaper with 120 grain.
- HINT:
-
Grind the bonding surface down to the bare metal.
Clean the bonding surfaces using solvent cleaner R1.
- Expendable materials:
Cleaner R1 100ml, Bottle 08833-WA050
Allow cleaned surfaces to dry for approximately 5 min.
- HINT:
-
The bonding surfaces must be completely dry.
Flame spray the bonding surfaces with primer P2.
- HINT:
- ·
Go over the bonding surfaces slowly with the flame.
·Flaming with the blue part of the flame must be avoided.
·Condensation water appears on the area that is still uncoated. The condensation water in the line of the flame must evaporate completely.
- Expendable materials:
Primer P2 50ml, Gas cartridge 08833-WA240
Immediately following flame spraying, coat the bonding surfaces that are still warm (approximately 50°C) with primer P1. Apply the primer P1 with a brush, cotton ball or similar item.
- Expendable materials:
Primer P1 50ml, Bottle 08833-WA030
Allow the bonding surfaces to dry for approximately 5 min.
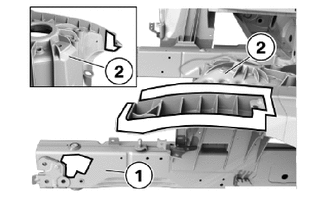
Prepare engine support (1) in the marked area for bonding the used aluminium part.
Prepare wheel arch (2) in the marked area for bonding the used aluminium part.
- Expendable materials:
Cleaner R2 500ml 08879-WA010 Cleaner R1 100ml, Bottle 08833-WA050 Primer P1 50ml, Bottle 08833-WA030 Primer P2 50ml, Gas cartridge 08833-WA240
INSTALLATION
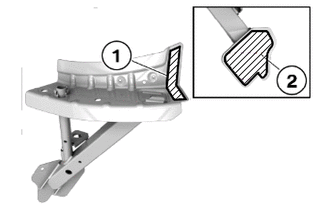

|
Adhesive |
Apply adhesive to the area indicated by (1) and (2) in the illustration.
- Adhesive:
K1 Bodywork Adhesive 195ml 08833-WA210
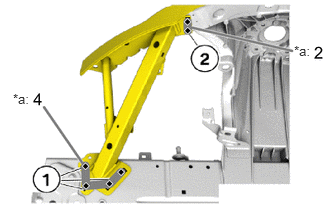
| *a | BLIND RIVET N1 HEMLOCK 813 |
Install the fender side apron sub-assy in the areas (1) and (2) with the blind rivets N1.
- Expendable materials:
BLIND RIVET N1 HEMLOCK 813 φ 6.5 mm ; clamping range 2.8-4.8 mm 90118WA664
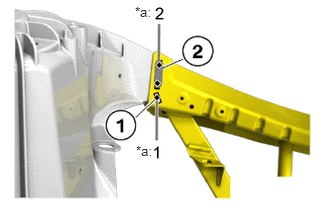
| *a | BLIND RIVET N1 HEMLOCK 813 |
Install the fender side apron sub-assy in the areas (1) and (2) with the blind rivets N1.
- Expendable materials:
BLIND RIVET N1 HEMLOCK 813 φ 6.5 mm ; clamping range 2.8-4.8 mm 90118WA664
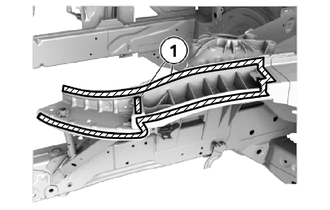
|
|
Adhesive |
Apply adhesive to the area indicated by (1) in the illustration.
- Adhesive:
K1 Bodywork Adhesive 195ml 08833-WA210
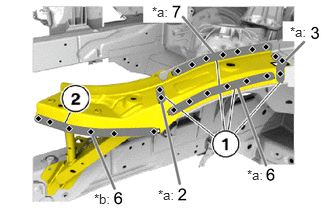
| *a | BLIND RIVET N1 HEMLOCK 813 |
| *b | BLIND RIVET N6 |
Install the radiator support upper in the areas (1) with blind rivets N1.
- Expendable materials:
BLIND RIVET N1 HEMLOCK 813 φ 6.5 mm ; clamping range 2.8-4.8 mm 90118WA664
Install the radiator support upper in the area (2) with blind rivets N6.
- Expendable materials:
BLIND RIVET N6 φ4mm, clamping range 3-5 mm 83192158655
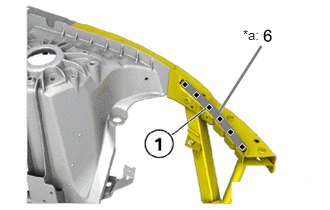
| *a | BLIND RIVET N6 |
Install the radiator support upper in the area (1) with blind rivets N6.
- Expendable materials:
BLIND RIVET N6 φ4mm, clamping range 3-5 mm 83192158655
INSTALL THE EMC SCREW (EMC = ELECTROMAGNETIC COMPATIBILITY)
After adhesive has fully hardened: Drill hole with diameter of 4.2 mm (0.17 in.).
- HINT:
-
The EMC screw can only be screwed in and sealed with sealant once the adhesive has fully hardened.
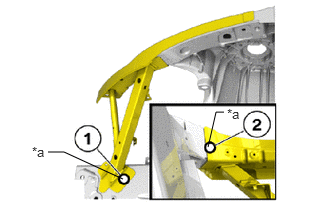
| *a | EMC SCREW |
Install the EMC screws in the area (1) and (2).
- Expendable materials:
EMC SCREW SF Plus, M5x15 90118WA666
Apply seam seal to the area (1) and (2).
- Expendable materials:
Seam Seal 310ml 08826-WA220
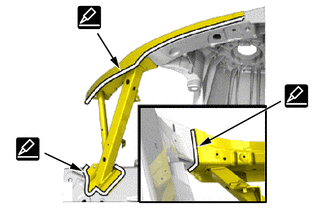
Apply seam seal to the rivets.
- Expendable materials:
Seam Seal 310ml 08826-WA220
After welding, apply body sealer and undercoating to the corresponding parts. (See the painting/coating)
After applying the top coat, apply anti-rust agent to the internal panel portion of the closed section structural weld points.