WIPER / WASHER FRONT WIPER MOTOR INSTALLATION
CAUTION / NOTICE / HINT
- HINT:
- ·
Use the same procedure for RHD and LHD vehicles.
·The procedure listed below is for LHD vehicles.
PROCEDURE

 85010
1.INSTALL FRONT WIPER MOTOR AND LINK ASSEMBLY
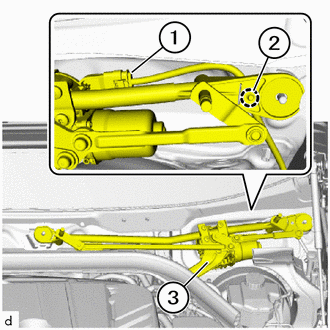
Connect the connector (1).
Engage the guide (3) and clamp (2).
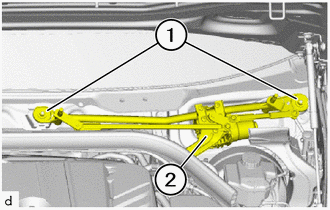
Install the front wiper motor and link assembly (2).
Install a new nuts (1).
- Torque:
- 11.8 N*m (120 kgf*cm, 9 ft.*lbf)
53681
2.INSTALL UPPER FRONT SUSPENSION CENTER BRACE
55781E
3.INSTALL COWL TOP VENTILATOR LOUVER SUB-ASSEMBLY
- NOTICE:
- ·
Damage caused by water ingress into the vehicle.
Water ingress into the vehicle may result in damage to components, malfunctions and corrosion.
-Ensure correct installation of the components.
-Only use undamaged components.
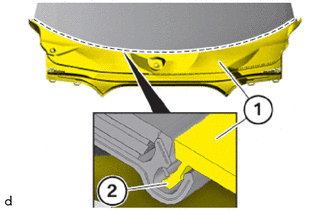
Push the cowl top ventilator louver sub-assembly (1) into the claw (2) beginning on the side.
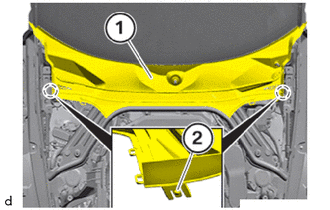
Engage the cowl top ventilator louver sub-assembly (1) in the claws (2).
55734A
4.INSTALL WATER GUARD PLATE RH
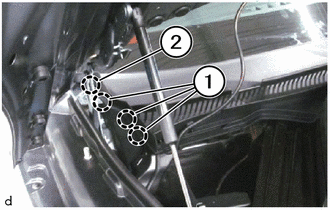
Engage the guide (2) and claws (1) to install the water guard plate RH.
53867
5.INSTALL FRONT FENDER TO COWL SIDE SEAL LH
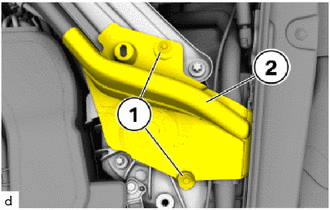
Install front fender to cowl side seal LH (2).
Install clips (1).
53866
6.INSTALL FRONT FENDER TO COWL SIDE SEAL RH
- HINT:
-
Description is for left component only. Procedure on the right side is identical.
55878B
7.INSTALL COWL VENT COVER LH
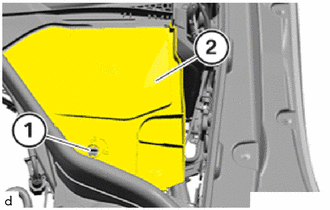
Install the cowl vent cover LH (2).
Engage the lock (1).
55877B
8.INSTALL COWL VENT COVER RH
for Type A:
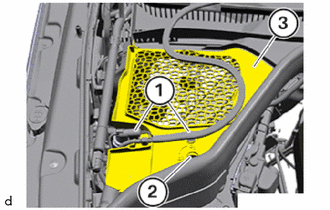
Install the cowl vent cover RH (3).
Engage the lock (2).
Connect the connector and the washer nozzle and hose assembly (1) to the cowl vent cover RH (3).
for Type B:
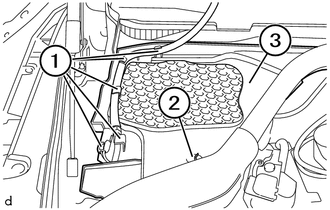
Install the cowl vent cover RH (3).
Engage the lock (2).
Connect the connector and the washer nozzle and hose assembly (1) to the cowl vent cover RH (3).
9.INSPECT FRONT WIPER ARM AND BLADE ASSEMBLY
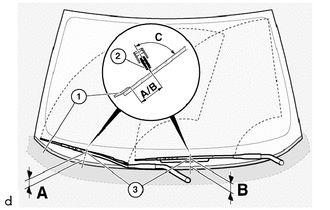
Connect the front wiper arm and blade assembly (3).
Correctly position the front wiper arm and blade assembly (2) in relation to the windshield glass edge (1).
- Distance from windshield glass edge to wiper blade:
Area Dimension A 65.0 mm (2.56 in.) B 58.0 mm (2.28 in.)
10.INSTALL FRONT WIPER ARM AND BLADE ASSEMBLY LH
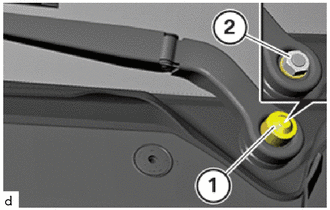
Using a socket wrench 16 mm, tighten nut (2).
- Torque:
- 35.0 N*m (357 kgf*cm, 26 ft.*lbf)
Install the front wiper arm head cap (1).
11.INSTALL FRONT WIPER ARM AND BLADE ASSEMBLY RH
- HINT:
-
Description is for left component only. Procedure on the right side is identical.