B58 INTAKE / EXHAUST EXHAUST PIPE INSTALLATION
PROCEDURE

 1.INSTALL EXHAUST PIPE ASSEMBLY
- CAUTION:
- ·
Hot surfaces.
Risk of burning!
-Perform all work only on components that have cooled down.
·Component with heavy weight.
Danger of injury!
-Note component's center of gravity.
-Support component using a jack.
-Secure component against falling off the jack.
·Heavy component.
Heavy components can lead to injury or damage.
-Remove and install heavy components with the aid of another person/other persons.
for V-band Clamp:
Guide in the exhaust pipe assembly with the assistance of a second person and connect it to the catalytic converter.
Replace nut.
Tighten nut.
- Torque:
- 19 N*m (194 kgf*cm, 14 ft.*lbf)
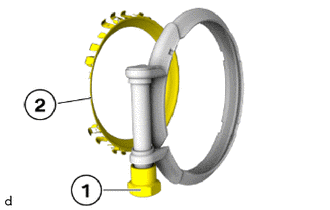
Unscrew the nut (1) and remove the sealing ring (2).
Replace the exhaust pipe clamp.
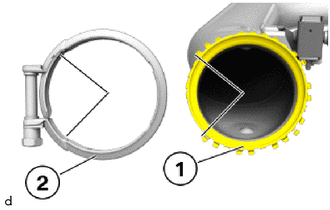
Mount the sealing ring (1) on the exhaust pipe assembly.
- NOTICE:
-
Make sure that the sealing ring (1) is correctly positioned for the exhaust pipe clamp (2).
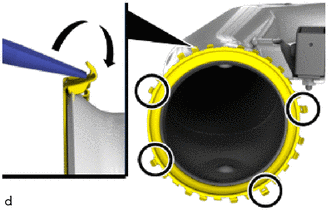
Bend all sheet metal tabs over with a suitable tool, except those in the marked areas.
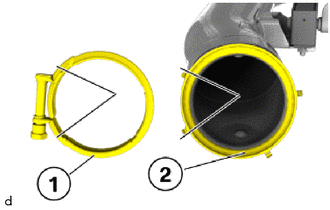
Mount the exhaust pipe clamp (1) on the sealing ring (2).
- NOTICE:
- ·
Make sure that the exhaust pipe clamp (1) is positioned correctly on the sealing ring (2).
·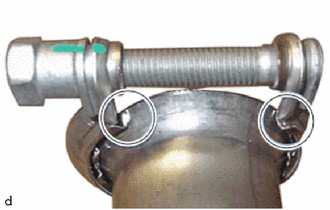
Make sure that the exhaust pipe clamp (1) rests against the sheet metal tabs after mounting (marks).
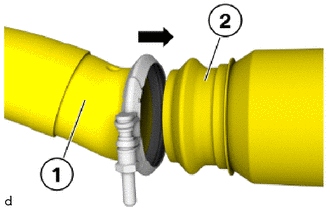
Connect the exhaust pipe assembly (1) with the exhaust manifold converter sub-assembly (2) and position correctly.
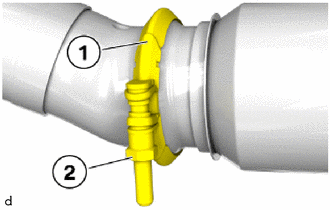
Using a 16 mm deep socket wrench, tighten down screw (2).
- NOTICE:
-
Make sure that exhaust pipe clamp(1) is fitted correctly.
- Torque:
- 25 N*m (255 kgf*cm, 18 ft.*lbf)
for Ribbon Clamp:
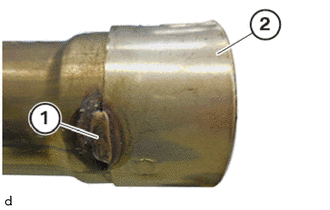
Open the weld seam (1) with a hacksaw.
Remove the exhaust pipe clamp (2).
Replace the exhaust pipe clamp.
Guide in the exhaust pipe assembly with the assistance of a second person and connect it to the exhaust manifold converter sub-assembly.
Tighten the exhaust pipe clamp.
- Torque:
- 26 N*m (265 kgf*cm, 19 ft.*lbf)
Replace nut.
Tighten nut.
- Torque:
- 19 N*m (194 kgf*cm, 14 ft.*lbf)
Replace nut.
Tighten nut.
- Torque:
- 19 N*m (194 kgf*cm, 14 ft.*lbf)
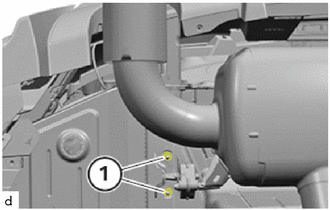
Replace nuts.
Tighten nuts.
- Torque:
- 19 N*m (194 kgf*cm, 14 ft.*lbf)
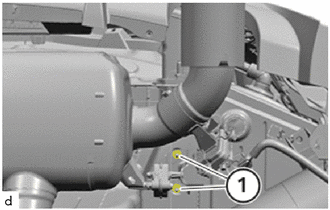
Replace nuts.
Tighten nuts.
- Torque:
- 19 N*m (194 kgf*cm, 14 ft.*lbf)
Connect connectors and lock.
58724G
2.INSTALL REAR UNDERBODY PROTECTOR LH
Install the rear underbody protector LH.
Tighten the screws.
- Torque:
- 3.0 N*m (31 kgf*cm, 27 in.*lbf)
58723F
3.INSTALL REAR UNDERBODY PROTECTOR RH
- HINT:
-
Use the same procedure as for the LH side.
58252
4.INSTALL REAR FLOOR PANEL BRACE
- CAUTION:
-
Driving without the rear floor panel brace is not permitted.
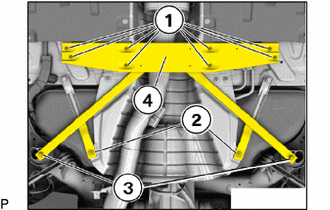
Position the rear floor panel brace (4) and tighten the E14 bolts (3) on the rear lower suspension member stopper.
- Torque:
- 56 N*m (571 kgf*cm, 41 ft.*lbf)
Tighten the bolts (1).
- Torque:
- 28 N*m (286 kgf*cm, 21 ft.*lbf)
Tighten the T20 bolts (2).
- Torque:
- 2.6 N*m (27 kgf*cm, 23 in.*lbf)
57628E
5.INSTALL REAR FLOOR SIDE MEMBER COVER LH
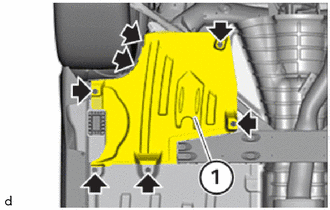
Insert the rear floor side member cover LH.
Tighten the nuts and screws.
- Torque:
- Screw : 3.0 N*m (31 kgf*cm, 27 in.*lbf)
- Nut : 2.6 N*m (27 kgf*cm, 23 in.*lbf)
57627G
6.INSTALL REAR FLOOR SIDE MEMBER COVER RH
- HINT:
-
Use the same procedure as for the LH side.
7.INSPECT FOR EXHAUST GAS LEAK
If gas is leaking, tighten the areas necessary to stop the leak. Replace damaged parts as necessary.