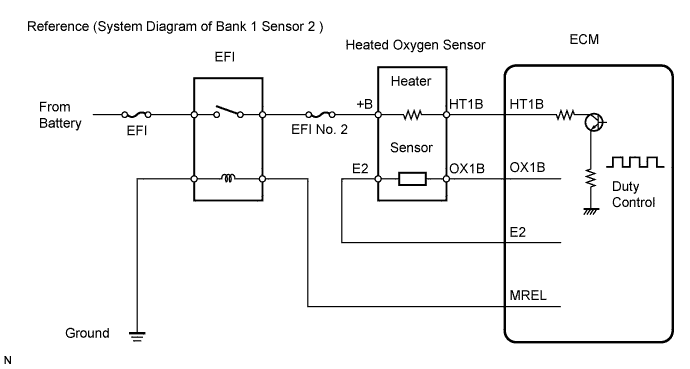
DTC P0037 Oxygen Sensor Heater Control Circuit Low (Bank 1 Sensor 2) |
DTC P0038 Oxygen Sensor Heater Control Circuit High (Bank 1 Sensor 2) |
| DTC No. | DTC Detection Conditions | Trouble Areas |
| P0037 | Heated Oxygen (HO2) sensor heater current less than 0.3 A (1 trip detection logic) |
|
| P0038 | Heated Oxygen (HO2) sensor heater current more than 2 A (1 trip detection logic) |
|
| Related DTCs | P0037: Heated oxygen sensor heater range check (Low current) P0038: Heated oxygen sensor heater range check (High current) |
| Required Sensors/Components (Main) | Heated oxygen sensor heater |
| Required Sensors/Components (Related) | Vehicle speed sensor |
| Frequency of Operation | Continuous |
| Duration | P0037: 0.5 seconds P0038: 0.3 seconds |
| MIL Operation | Immediate |
| Sequence of Operation | None |
| Monitor runs whenever following DTCs not present | None |
| Battery voltage | 10.5 V or more |
| All heaters turned OFF and intrusive heating operated when following conditions met: | (a) and (b) |
| (a) Heater | ON |
| (b) Heater current | Less than 0.3 A |
| Monitor runs whenever following DTCs not present | None |
| Battery voltage | 10.5 V or more |
| Engine | Running |
| Starter | OFF |
| Intrusive operating | Not operating |
| Monitor runs whenever following DTCs not present | None |
| Battery voltage | 10.5 V or more |
| All heaters turned OFF and intrusive heating operated when following conditions met: | (a) and (b) |
| (a) Heater | ON |
| (b) Heater current | More than 2 A |
| Heated oxygen sensor heater current during intrusive heating | Less than 0.3 A |
| Heated oxygen sensor heater current | More than 2 A |
| Heated oxygen sensor heater current during intrusive heating | 2 A or more |
| Heated Oxygen (HO2) sensor heater current | 0.4 to 1 A (when engine idles, HO2 sensor warmed up and battery voltage 11 to 14 V) |
| 1.INSPECT HEATED OXYGEN SENSOR (HEATER RESISTANCE) |
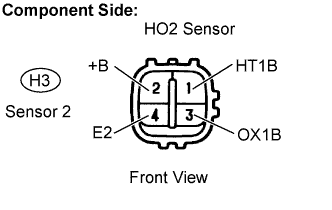 |
Disconnect the H3 Heated Oxygen (HO2) sensor connector.
Measure the resistance between the terminals of the HO2 sensor connector.
| Tester Connections | Specified Conditions |
| HT1B (1) - +B (2) | 11 to 16 Ωat 20°C (68°F) |
| HT1B (1) - E2 (4) | 10 kΩ or higher |
Reconnect the HO2 sensor connector.
|
| ||||
| OK | |
 |
| 2.INSPECT EFI RELAY |
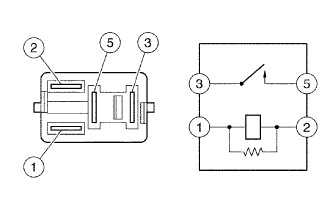 |
Remove the EFI relay from the engine room R/B.
Check the EFI relay resistance.
| Tester Connections | Specified Conditions |
| 3 - 5 | 10 kΩ or higher |
| 3 - 5 | Below 1 Ω (when battery voltage applied to terminals 1 and 2) |
Reinstall the EFI relay.
|
| ||||
| OK | |
|
| 3.INSPECT ECM (HT1B VOLTAGE) |
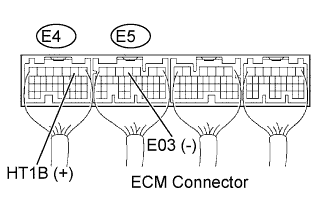 |
Turn the ignition switch to ON.
Measure the voltage between the terminals of the ECM connectors.
| Tester Connections | Specified Conditions |
| HT1B (E4-2) - E03 (E5-4) | 9 to 14 V |
|
| ||||
| NG | |
|
| 4.CHECK HARNESS AND CONNECTOR (HEATED OXYGEN SENSOR - ECM, HEATED OXYGEN SENSOR - EFI RELAY) |
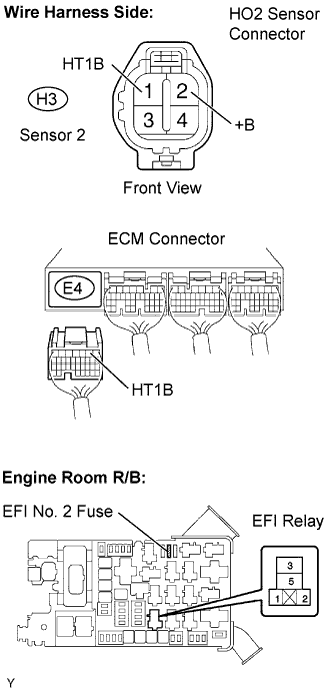 |
Check the harness and connectors between the ECM and HO2 sensor.
Disconnect the H3 HO2 sensor connector.
Disconnect the E4 ECM connector.
Check the resistance.
| Tester Connections | Specified Conditions |
| HT1B (H3-1) - HT1B (E4-2) | Below 1 Ω |
| Tester Connections | Specified Conditions |
| HT1B (H3-1) or HT1B (E4-2) - Body ground | 10 kΩ or higher |
Reconnect the HO2 sensor connector.
Reconnect the ECM connector.
Check the harness and connector between the HO2 sensor and EFI relay.
Inspect the EFI No. 2 fuse.
Disconnect the H3 HO2 sensor connector.
Remove the EFI relay from the engine room R/B.
Check the resistance.
| Tester Connections | Specified Conditions |
| +B (H3-2) - EFI relay (3) | Below 1 Ω |
| Tester Connections | Specified Conditions |
| +B (H3 - 2) or EFI relay (3) - Body ground | 10 kΩ or higher |
Reconnect the HO2 sensor connector.
Reinstall the EFI relay.
|
| ||||
| OK | ||
 | ||
| ||
