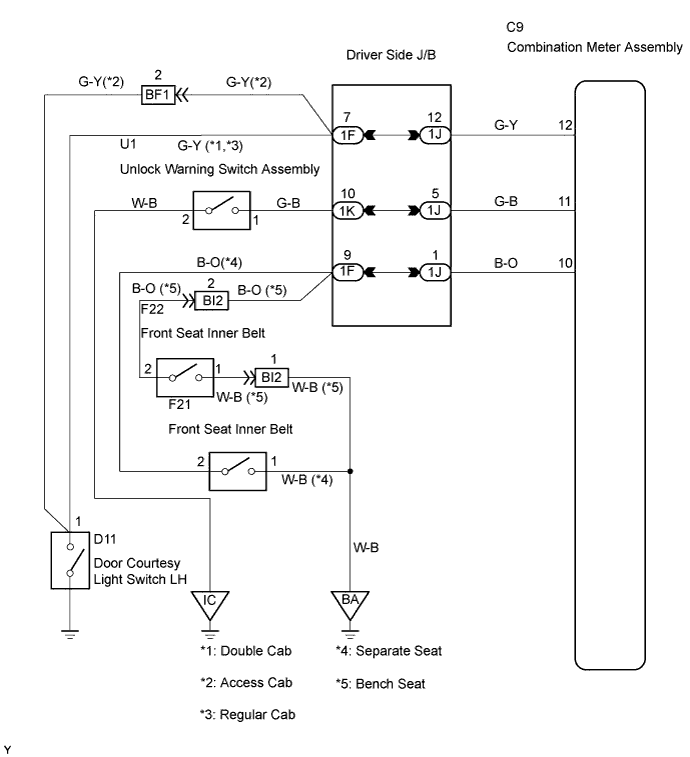
METER / GAUGE SYSTEM > Warning Buzzer does not Sound |
| 1.CHECK BUZZER |
Operate the buzzers and check that the buzzers for seat belt warning, key reminder warning and light reminder warning sound normally.
| No warning buzzers sound. | A |
| Seat belt warning does not sound. (Bench seat) | B |
| Seat belt warning does not sound. (Separate seat) | C |
| Key reminder warning does not sound. | D |
|
| ||||
|
| ||||
|
| ||||
| B | |
 |
| 2.INSPECT FRONT SEAT INNER BELT ASSEMBLY (DRIVER SIDE) |
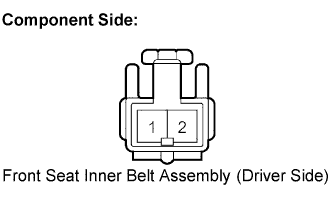 |
Disconnect the F22 front seat inner belt assembly (driver side) connector.
Measure the resistance.
| Tester Connection | Condition | Specified Condition |
| 1 - 2 | Seat belt fastened | 10 kΩ or higher |
| 1 - 2 | Seat belt unfastened | Below 1 Ω |
Reconnect the front seat inner belt assembly (driver side) connector.
|
| ||||
| OK | |
|
| 3.CHECK HARNESS AND CONNECTOR (FRONT SEAT INNER BELT (DRIVER SIDE) - COMBINATION METER) |
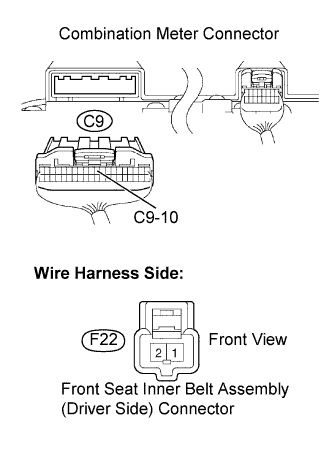 |
Disconnect the C9 combination meter connector.
Disconnect the F22 front seat inner belt assembly (driver side) connector.
Measure the resistance.
| Tester Connection | Specified Condition |
| C9-10 - F22-2 | Below 1 Ω |
| C9-10 or F22-2 - Body ground | 10 kΩ or higher |
Reconnect the front seat inner belt assembly (driver side) connector.
Reconnect the combination meter connector.
|
| ||||
| OK | ||
 | ||
| ||
| 4.INSPECT FRONT SEAT INNER BELT ASSEMBLY (DRIVER SIDE) |
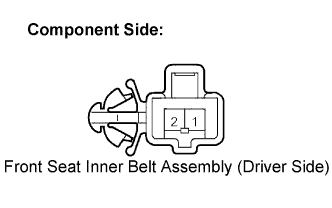 |
Disconnect the F21 front seat inner belt assembly (driver side) connector.
Measure the resistance.
| Tester Connection | Condition | Specified Condition |
| 1 - 2 | Seat belt fastened | 10 kΩ or higher |
| 1 - 2 | Seat belt unfastened | Below 1 Ω |
Reconnect the front seat inner belt assembly (driver side) connector.
|
| ||||
| OK | |
|
| 5.CHECK HARNESS AND CONNECTOR (FRONT SEAT INNER BELT (DRIVER SIDE) - COMBINATION METER) |
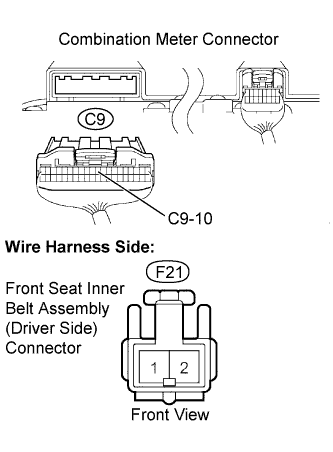 |
Disconnect the C9 combination meter connector.
Disconnect the F21 front seat inner belt assembly (driver side) connector.
Measure the resistance.
| Tester Connection | Specified Condition |
| C9-10 - F21-2 | Below 1 Ω |
| C9-10 or F21-2 - Body ground | 10 kΩ or higher |
Reconnect the front seat inner belt assembly (driver side) connector.
Reconnect the combination meter connector.
|
| ||||
| OK | ||
| ||
| ||
| 6.INSPECT COMBINATION METER ASSEMBLY |
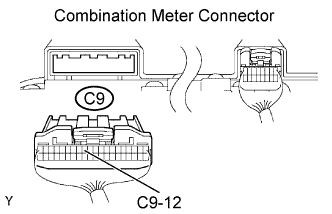 |
Disconnect the C9 combination meter connector.
Measure the resistance.
| Tester Connection | Condition | Specified Condition |
| C9-12 - Body ground | Driver side door closed | 10 kΩ or higher |
| C9-12 - Body ground | Driver side door open | Below 1 Ω |
Reconnect the combination meter connector.
|
| ||||
| NG | |
|
| 7.INSPECT UNLOCK WARNING SWITCH ASSEMBLY |
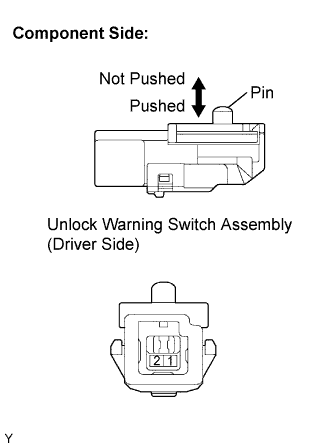 |
Remove the U1 unlock warning switch assembly.
Measure the resistance.
| Tester Connection | Switch Condition | Specified Condition |
| 1 - 2 | Not pushed | 10 kΩ or higher |
| 1 - 2 | Pushed | Below 1 Ω |
Reinstall the unlock warning switch assembly.
|
| ||||
| OK | |
|
| 8.CHECK HARNESS AND CONNECTOR (SWITCH (DRIVER SIDE) - J/B (BODY ECU) AND BODY GROUND) |
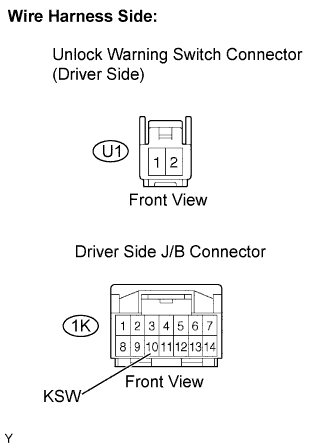 |
Disconnect the U1 unlock warning switch assembly connector.
Disconnect the 1K driver side J/B connector.
Measure the resistance.
| Tester Connection | Specified Condition |
| (U1-1) - KSW (1K-10) | Below 1 Ω |
| (U1-2) - Body ground | Below 1 Ω |
Reconnect the unlock warning switch assembly connector.
Reconnect the driver side J/B connector.
|
| ||||
| OK | |
|
| 9.INSPECT FRONT DOOR COURTESY LIGHT SWITCH ASSEMBLY (DRIVER SIDE) |
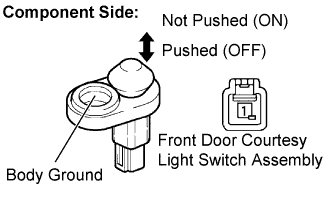 |
Remove the front door courtesy light switch assembly.
Measure the resistance.
| Tester Connection | Condition | Specified Condition |
| 1 - Body ground | Not pushed (ON) | Below 1 Ω |
| 1 - Body ground | Pushed (OFF) | 10 kΩ or higher |
Reinstall the front door courtesy light switch assembly.
|
| ||||
| OK | |
|
| 10.CHECK HARNESS AND CONNECTOR (FRONT DOOR COURTESY LIGHT SWITCH LH - BODY ECU) |
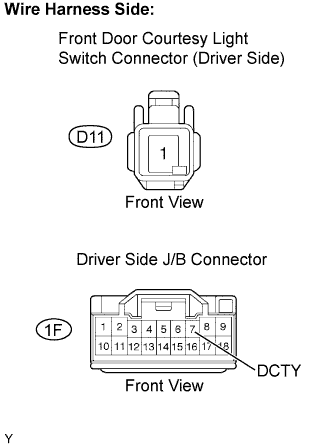 |
Disconnect the D11 front door courtesy light switch assembly connector.
Disconnect the 1F driver side J/B connector.
Measure the resistance.
| Tester Connection | Specified Condition |
| (D11-1) - DCTY (1F-7) | Below 1 Ω |
Reconnect the front door courtesy light switch assembly connector.
Reconnect the driver side J/B connector.
|
| ||||
| OK | ||
| ||
| ||

