 |
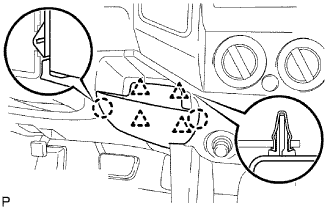
Disengage the 4 clips and 2 claws, and remove the instrument panel under tray.
CIGARETTE LIGHTER > REMOVAL |
| 1. DISCONNECT CABLE FROM NEGATIVE BATTERY TERMINAL |
| 2. REMOVE INSTRUMENT PANEL UNDER TRAY (for Pedal Type Parking Brake) |
|
Disengage the 4 clips and 2 claws, and remove the instrument panel under tray.
| 3. REMOVE INSTRUMENT PANEL HOLE COVER (for Lever Type Parking Brake) |
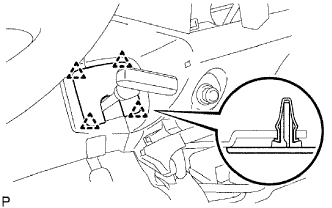 |
Disengage the 4 clips and remove the instrument panel hole cover.
| 4. REMOVE CONSOLE UPPER REAR PANEL SUB-ASSEMBLY (for Automatic Transmission on Separate Seat Type) |
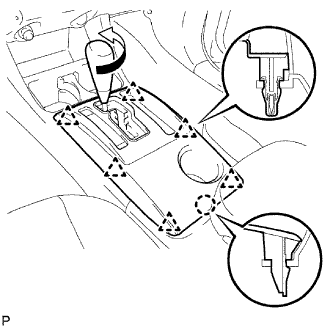 |
Remove the shift knob.
Disengage the 6 clips and claw, and remove the console upper rear panel sub-assembly.
| 5. REMOVE CONSOLE UPPER REAR PANEL SUB-ASSEMBLY (for Manual Transmission on Separate Seat Type) |
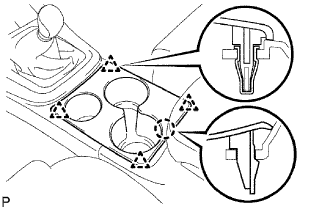 |
Disengage the 4 clips and claw, and remove the console upper rear panel sub-assembly.
| 6. REMOVE REAR CONSOLE BOX ASSEMBLY (for Separate Seat Type) |
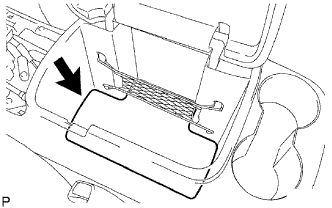 |
Remove the console box carpet.
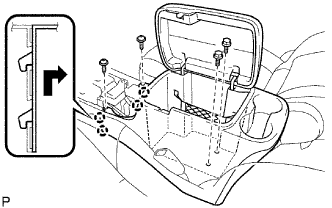 |
Remove the 2 screws <F> and 2 bolts <B>.
Disengage the 4 claws and remove the rear console box assembly.
| 7. REMOVE INSTRUMENT PANEL CUP HOLDER TRAY (for Automatic Transmission on Separate Seat Type) |
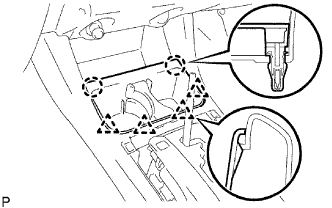 |
Disengage the 2 clips and 4 claws, and remove the instrument panel cup holder tray.
| 8. REMOVE FRONT CONSOLE BOX (for Automatic Transmission on Separate Seat Type) |
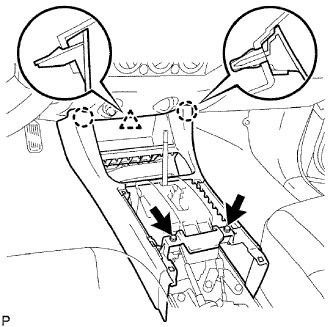 |
Remove the 2 screws <F>.
Disengage the 2 clips and claw, and remove the front console box.
| 9. REMOVE FRONT CONSOLE BOX (for Manual Transmission on Separate Seat Type) |
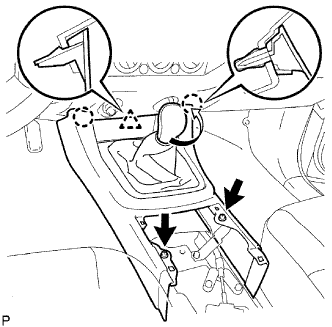 |
Remove the shift knob.
Remove the 2 screws <F>.
Disengage the 2 clips and claw, and remove the front console box.
| 10. REMOVE FRONT CONSOLE BOX (for Automatic Transmission on Bench Seat Type) |
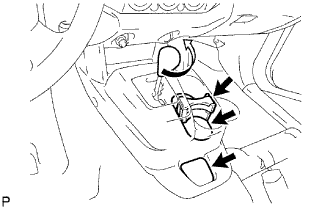 |
Remove the shift knob.
Remove the box bottom mat.
Remove the instrument panel cup holder.
Remove the No. 2 box bottom mat.
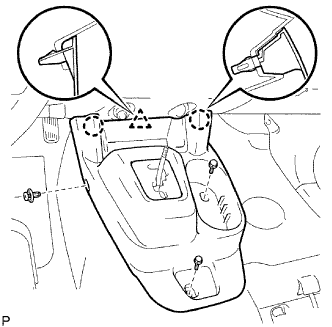 |
Remove the clip and 2 bolts <A>.
Disengage the 2 clips and claw, and remove the front console box.
| 11. REMOVE FRONT CONSOLE BOX (for Manual Transmission on Bench Seat Type) |
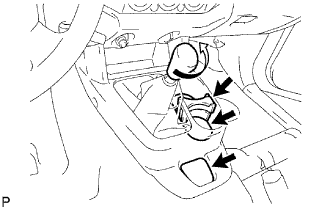 |
Remove the shift knob.
Remove the box bottom mat.
Remove the instrument panel cup holder.
Remove the No. 2 box bottom mat.
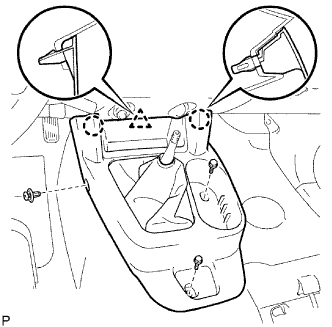 |
Remove the clip and 2 bolts <A>.
Disengage the 2 clips and claw, and remove the front console box.
| 12. REMOVE AIR CONDITIONING CONTROL ASSEMBLY |
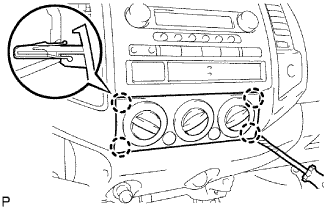 |
Using a screwdriver, disengage the 4 clips and remove the air conditioner control assembly.
Disconnect the 2 connectors.
| 13. REMOVE RADIO RECEIVER ASSEMBLY |
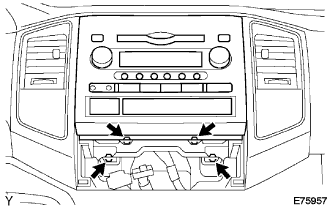 |
Remove the 4 bolts.
Disconnect the connector and remove the radio receiver assembly with bracket.
| 14. SEPARATE HOOD LOCK CONTROL LEVER SUB-ASSEMBLY |
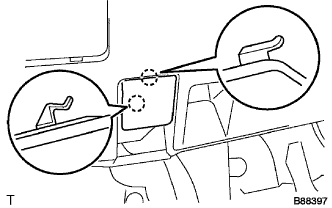 |
Disengage the 2 claws.
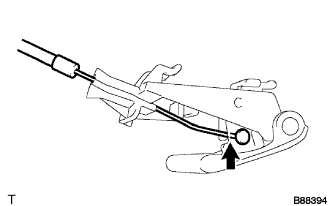 |
Disconnect the hood lock control cable assembly and remove the hood lock control lever sub-assembly.
| 15. REMOVE NO. 1 LOWER INSTRUMENT PANEL FINISH PANEL |
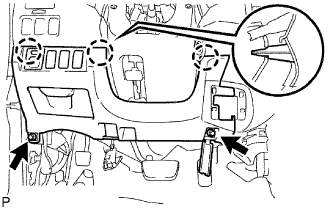 |
Remove the 2 bolts <B>.
Disengage the 3 clips and remove the lower No. 1 instrument panel finish panel.
Disconnect the connectors.
| 16. REMOVE INSTRUMENT CLUSTER FINISH PANEL SUB-ASSEMBLY |
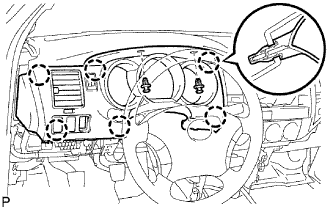 |
Remove the 2 clips.
Disengage the 6 clips and remove the instrument cluster finish panel sub-assembly.
Disconnect the connectors.
| 17. REMOVE INSTRUMENT CLUSTER CENTER FINISH PANEL SUB-ASSEMBLY |
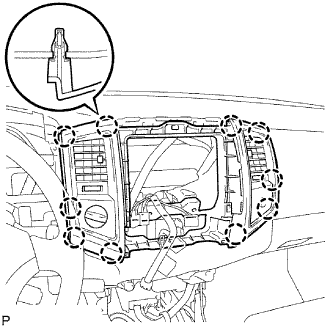 |
Disengage the 10 clips and remove the instrument cluster center finish panel sub-assembly.
| 18. REMOVE LOWER INSTRUMENT PANEL LH |
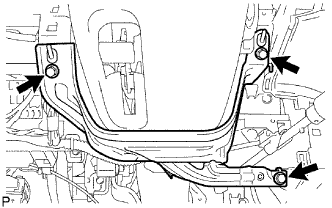 |
Remove the 3 bolts <B> and the lower instrument panel LH.
| 19. REMOVE INSTRUMENT LOWER COVER SUB-ASSEMBLY |
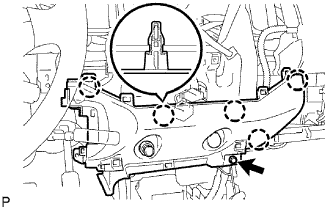 |
Remove the bolt <B>.
Disengage the 5 clips and remove the instrument lower cover sub-assembly.
Disconnect the 2 connectors.
| 20. REMOVE CIGARETTE LIGHTER COVER |
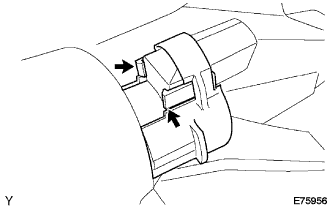 |
Disengage the 2 claws, and remove the cigarette lighter cover.
| 21. REMOVE CIGARETTE LIGHTER ASSEMBLY |
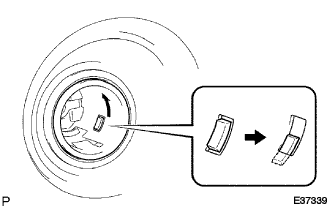 |
Remove the cigarette lighter knob and element assembly.
Turn the socket counterclockwise as shown in the illustration, disengage the claw between the socket and cigarette lighter bezel stay, and push the socket out towards the room side.
Align the socket with the notch on the cigarette lighter bezel stay, and remove the cigarette lighter assembly on the room side.